27 June 2023
Socket.io tutorial: Real-time communication in web development


The WebSocket protocol’s introduction of a full-duplex communication between a client and server made the technology one of the hottest web applications trends of the last years. But why exactly? How does it work and why it goes such a long way to reduce unnecessary network traffic? I decided to refresh my knowledge of WebSocket by making a quick app based on Socket.io – a popular event-driven library for building real-time applications. Join me and discover the power of WebSockets with me.
There are a few ways of building a tool for real-time communication, but two of them are particularly popular today.
What you’ll learn
Two of the most popular approaches presuppose the use of HTTP Long Polling or WebSockets, but it is the latter that is currently getting the most attention. That’s why in the article below, you’ll find:
- a theoretical introduction to the concept of WebSocket, including a Websocket handshake and the role of a client as well as a server in establishing and maintaining a connection,
- a brief comparison of WebSockets and a HTTP server (or HTTP Long Polling),
- a straightforward Socket.io tutorial for building a real-time chat, complete with code examples and more.
There is a lot to learn so let’s get right to it.
What are WebSockets?
WebSockets are quite an interesting technology in and of itself. Let’s take a closer look at what it is.
WebSocket definition
WebSockets API is a technology providing a bidirectional communication channel between a client and a server. That means that the client no longer needs to be an initiator of a transaction while requesting data from both the server and database.
How do WebSockets work?
Typically, the client requests data starting a new connection and then the client loses connection. The server sending data also only has connection during the exchange.
With WebSockets, during the first request to the backend server, except receiving incoming data, the socket.io client also establishes an initial connection. This process is known as the WebSocket handshake. 🤝
The Upgrade header is included in the request. That’s how the client connected informs the server that it needs to create a connection.
See also: A few simple tips on how to create WebSocket API in Node.js
WebSockets vs HTTP
So, does it mean it’s impossible to create a real-time chat application without WebSockets? 😨
Well, there is a technique called HTTP Long Polling. Using this, the client sends a request and the server holds that opened until some new data is available. As soon as data appears and the client receives it, a new request is immediately sent and operation is repeated over and over again. However, a pretty big disadvantage of using HTTP Long Polling is that it consumes a lot of server resources. 😥
To put it in other words:
WebSockets are Full-Duplex, while HTTP Long Polling is Half-Duplex. In the case of the former both the client and the server send and receive messages. As for HTTP Long Polling, a new request-response cycle is necessary each time the client attempts to communicate with the server.
⏱ Find out how good your company is at using data in 5 mins
If you use WebSocket, you must be processing a lot of real-time data. But do you use it to improve team productivity and infrastructure reliability? That’s what strong observability provides. It takes 5-10 minutes. No registration needed.
Socket.io chat room app tutorial – building a chat app 🚀
Below, I’ll present to you a brief Socket.io tutorial on how to create a simple chat application with Vanilla JS frontend part and Node.js server.
The Socket io library is a JavaScript library that enables real-time, bidirectional, event-based communication between the connected clients (browser) and the server side. It consists of a JavaScript client library and another one dedicated to servers. Both components share most of their API.
You need to create a project with the default package.json file.

Having this created, you need to set up a server and install all the needed dependencies. In order to do it, you need to create an index.js file and install socket.io and express. You can use the following command: touch index.js && npm install express socket.io && npm install --save-dev nodemon.
In index.js, you need to set up a local server and basic socket connection.
And basically, that’s all you have to do on the backend side at the moment. Once you make a proper request, the connection should be established. It will be visible through the logged message (as shown below).
Now, you need to prepare the frontend part.
Let’s start by creating the public folder and the following files: a html file called index.html, and a js file called main.js. Optionally, you can add style.css. We’re also going to use the Node package manager (npm).
Below, you can see the index.html scaffold. Basically, all you need are HTML tags you can refer to and some scripts from Socket.io included in the project. That’s how your index.html file should look with the WebSockets scripts included.
Then, you need to set up the connection on the frontend side. The only line of code you need in main.js is const socket = io();. It’s shown in the video below.
As you can see – once the page is opened and the script is loaded, the connection is established. The next thing you need to do is to handle a new user connection, a new message and, last but not least – a currently typing user.
In socket, there are two ways to emit data such as events. One way is from the user to everyone (including user) and the other which emits an event to all the other instances. The idea is to display the list of all the active users. So, when a user connects – they need to inform about it and get the list of users who are already active.
When a user connects – they emit the event which includes the information about their username. You should set the property of userId on the socket. It will be needed when the user disconnects. To do that – you need to add a username to the Set of active users and emit an event with a list of all active users.
In the main.js I created two functions and two socket listeners.
Firstly, I created a new user (you can easily extend functionality by adding some prompt with a real user name) and emit an event with that username. Also, I added them to the sidebar with all active users. When a user disconnects on the server side – they are removed from the Set of active users and a disconnection event with their username is emitted. After that – they are removed from the sidebar on the client side (as you can notice on the short video below).
Since we handled the way users can connect and disconnect, now it’s time we handle the new messages.
On the server side – you do nothing more than adding the listener shown below.
On the client side – you need to do a few more things, as per the example below.
The function responsible for displaying new messages is triggered right after receiving information from a socket. The message is pushed to the server in the listener function of the form submit. You just need to check if the client is a message author or not.
Now, I will show you how to emit the event responsible for informing all other connections except yours. We want to display info that a user is typing something at the moment.
On the server side, you need to add socket.broadcast.emit. Take a look below (it is the final version of the file).
On the client side, you need to take a look at inputField keyup event listener and socket listener on typing. Below, you can see both things and the final version of main.js.
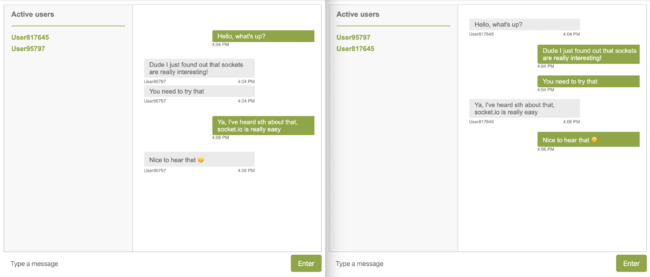
And the final effect is presented in the video below. 🙌
Want even more expert content on WebSocket? Check out these articles from my friends!
Socket.io chat application – powerful stuff NOT just for the pros!
As you can see, building a chat app (or any other web applications for that matter) equipped with basic chat messages features using Socket.io is not that difficult. I hope that this brief Socket.io tutorial helped you understand just how simple using this approach is and how many interesting things you can do with JavaScript or TypeScript as well as some basic Node.js knowledge.
There are plenty of app ideas based on WebSockets. You can create:
- an app that streams matches of your local sports team. You can stream games in the text version or video if possible (or maybe both? 🤔)
- multiplayer game for you and your friends 🎮
- secret chat available only for your group 🙊
- app based on GPS, maybe a game that uses location? 🌏
- or even a major event streaming platform for thousands of thousands of users like the one mentioned below! 🎉
I always strongly encourage you to learn more about other related concepts related to Socket.io such as socket namespace, socket object, state variable socket, Socket.io client, io server export default app, the message bus or broadcast flag. With that, you can create much more complex apps with multiple data points.
Your imagination is the limit!
Are you searching for software developers experienced with WebSocket implementations?
The Software House team implemented WebSocket for a major event streaming platform, which features heavy and constantly changing traffic as well as a host of other special considerations. In addition, our work on its API made it possible to automate many repetitive admin tasks. Read the case study to find out more about this AWS-based project.

