13 March 2022
How to build an API? A Developer’s Guide to API Platform

In the article, I’ll present how to build an API in a swift and simple way, using Symfony and API Platform. This library provides a fully-working CRUD, pagination, validation, HATEOAS and documentation. It supports XML, JSON and JSON-LD formats. Thanks to the use of schema.org markers – it also supports SEO. Moreover, it enables using GraphQL. Below, I’ll show you how API Platform works on an example of a simple application.
Our application’s name is “Flashcards” and it helps to learn new words. Whilst building the app, I’ll be showing you, step by step, the following API Platform components:
- creation of a simple CRUD,
- serialization groups,
- validation,
- enabling/disabling Operations,
- its own Operations,
- nested endpoints,
- searching.
Let’s talk about the application itself.
Description of the application
The app should allow users to have a variety of subjects they want to learn.
Each subject needs to be divided into lessons. Users can add flashcards with questions and answers to each lesson.
They should have access to the resources which are created by them only. And flashcards’ search should be possible through questions and answers.

Installation
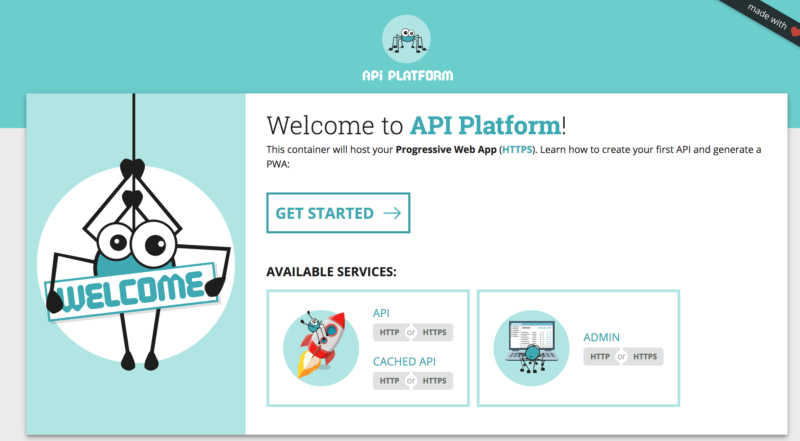
The easiest (and probably the best) way for developers to start working with API Platform is downloading a ready-made pack from GitHub. It contains all the necessary components you need to create the first project. There is a docker configuration inside the pack. After extracting the content and launching it through the command docker-compose up -d the complete development environment will be started. It contains the following elements:
- php – a container with PHP 7.2 and the composer,
- db – a container with PostgreSQL (port 5432) database,
- client – a container with a frontend part of the app; on default it contains a welcome page (port 80),

- admin – a container with the administration panel; it’s created automatically thanks to the API AutoDiscovery (port 81),

- API – a container with API and its documentation,

- cache-proxy – a container with a proxy (Varnish) for API (port 8081),
- h2-proxy – http/2 and https for all the apps (ports: 443 – client, 444 – admin, 8443 – API and 8444 – cache-proxy); it should be used for development purposes only.
If you don’t need the complete environment from the pack – you can use an alternative installation option. It uses Symfony Flex and Composer. You’ll find all the details about the process on the documentation website.
Model
We’ll start by creating classes, which will represent each of the application elements. Then, we’ll map these classes on the database and we’ll use the annotation provided by Doctrine ORM.
Let’s start with the user model. It will consist of basic information about the user: name and email. In the later stage, we’ll add the authentication. That’s why it’s worth making sure that a model implements UserInterface and contains all the necessary fields.
Then, we’ll prepare a model for subjects. According to the specification, a model should have information about the subject’s owner, its name and a list of added lessons.
Next, we’re creating a model for a lesson. It should contain information about what subject the lesson relates to, what is the subject and additionally, information about flashcards included.
The last element is a model of a flashcard. It should contain a question, an answer and information about what lesson the flashcard relates to.
Once the models are ready, it’s time to update the database schema.
bin/console doctrine:schema:update –force
CRUD
In order to create endpoints – it’s necessary to inform API Platform library which models should be considered as API elements. It’s possible to do it with XML, yaml or annotation. I decided to use the last method. For classes: User, Subject, Lesson, Flashcard, you should add annotation @ApiResource().
Here’s an example of Flashcard class:
You can find the examples of the other classes by clicking in the following links: Lesson, Subject and User.
The basic API version is now ready. You can perform simple operations on models: adding, reading, modifying and deleting. Additionally, the API Platform automatically generated the documentation.

Serialization groups
Generated endpoints are not adapted to our needs yet. They require precise information about the fields which will be inputted and presented.
Whilst normalization/denormalization, API Platform uses symfony/serializer. Thanks to that, it’s possible to use Group attribute. With that being used, you can change the form of objects’ presentation.
In this case, we’ll be using an annotation @Group to set serialization groups. Alternatively, you can use yaml or XML formats. More details about the serialization process are on the component documentation.
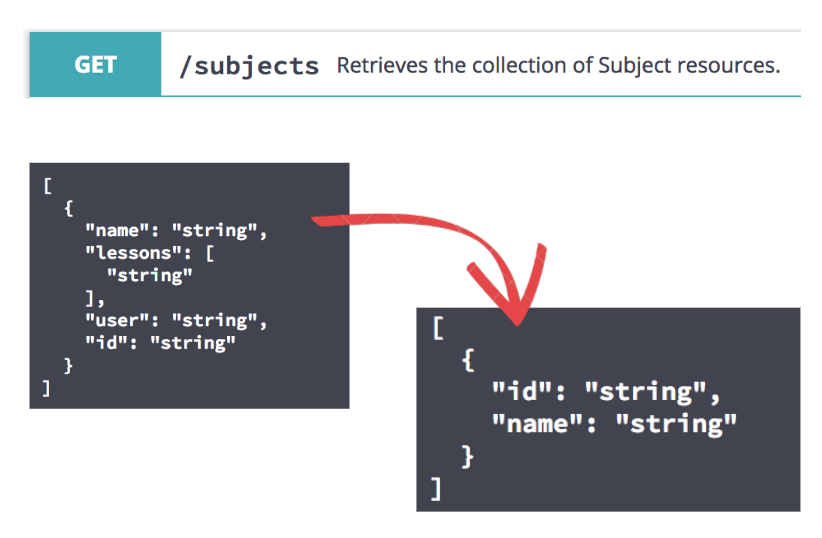
When creating a new subject, the only field which should be provided by the user is the name. Whilst downloading data about the subjects, information about the identification and previously inputted name should be displayed.
To achieve that, we need to add a group subjectList to the fields id and name. It will be used when downloading information about an object. To the field name, we need to add a group subjectCreate. Thanks to that, it’ll be possible to define if a field should be inputted when creating a new subject.
Next, it’s necessary to configure the API Platform by setting properties normalizationContext and denormalizationContext for suitable values. Property normalizationContext is responsible for informing which groups should be taken when changing the object into the array. denormalizationContext property is responsible for a reverse process.
We act similarly with all the remaining models: Flashcard, Lesson and User.
As the documentation is created automatically, it’s always up to date. After adding @Group annotation, documentation is updated automatically and it contains information about the used files only.

Validation
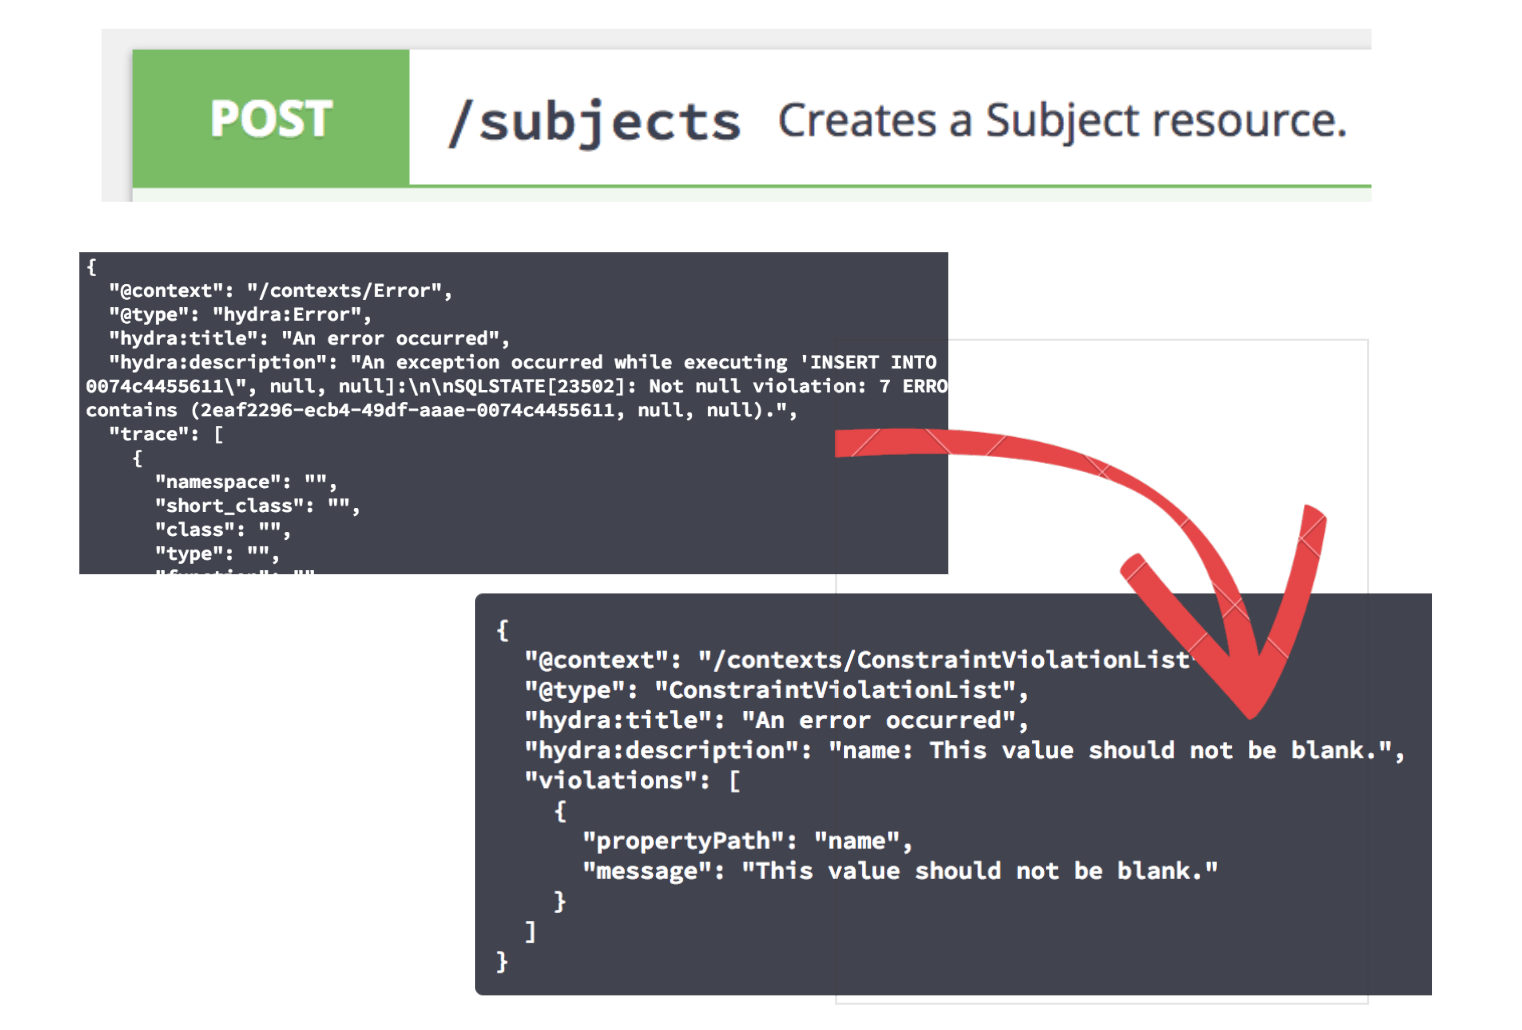
The application starts taking its shape. But it’s still very unstable, unfortunately. If you provide incorrect values when creating new registries – the application will return an error, instead of letting us know that the value is incorrect.
API Platform comes ahead of this issue and it allows using a symfony/validator component. To use it, you need to write certain constraints to the objects’ properties. You can do it through yaml, XML or php. Similarly to the previous examples, I’ve used annotation. To read more about validator itself, it’s worth visiting a documentation website.
We’re adding constraints to the models, to make sure we’ll be unable to add the data which may cause a breakdown of an application.
We act similarly with all the remaining ones: Lesson, Subject and User.
After adding constraints, the application will stop returning errors. Instead, it’ll start coming with standardised information about the fields with incorrect data.

Moreover, the documentation has been expanded with information about the required fields. API Platform allows operating on more complex examples. For example, it allows setting different serialization groups, depending on an action performed. It also allows setting dynamic serialization groups. Again, I’ll recommend reading through the documentation for more detailed info.
See also: What are the Google Maps API alternatives?
Endpoints
Configuration of available actions
It happens, that we don’t need automatically generated endpoints or that we need to add a special endpoint. API Platform allows us managing available endpoints in a simple way. By default, for all the resources there are 5 basic endpoints created. They are grouped into two types of operations. The first group is about operations performed on a collection of objects or creating a new element. Another type of operations is always related to a certain element (and it’s necessary to indicate this element).
In our app, the user can’t delete previously added lessons and subjects. That’s why, in these two cases, it’s indispensable to describe all the available actions. We’ll leave all the actions besides delete.
At the time being, we limited ourselves to deleting redundant actions. Now, it’s time for our own action. Our API should allow the user to change the password. We want to create the following URL: /users/{id}/change-password. And the user should provide only their new password. To achieve that, we don’t need to write a new action in a controller. It’s as simple as creating a new operation in API Platform and informing it that for a certain operation, the denormalization group should have a value that is only one field that may be provided with a new password. It’s necessary to take care of a password to be strong enough. We can achieve that by using validation.
We’ve added a new operation changePassword. We set a new denormalization group for it and a validation group userChangePassword. To make sure that the remaining validations still work, it’s necessary to set a default validation group in validationGroups properties. In this case, its name is userCreate. The remaining thing is to modify properties in the User class to make sure it has proper validation and serialization groups.
The new endpoint works already. API Documentation has been automatically updated.
Nested links
API should let user getting lessons which belong to a certain subject and to flashcards which belong to a certain lesson. API Platform allows preparing endpoints quickly and these will come with necessary data. It’s only about marking relations to lessons and flashcards with the parameter ApiSubresource.
Thanks to these modifications, we got 2 new endpoints. Again, API documentation has been modified automatically.

For more details about managing operations in the API Platform, I’ll recommend reading documentation of the library.
Searching
Data searching is one of the most often repeated business requirements. Our application should let the user search for flashcards through fields question and answer. API Platform prepared a collection of filters that you can use.
There are several filters available:
- search filter: enables searching through strings (exact, partial, starting with a certain phrase or word),
- date filter: enables searching through a date (or before/after a date),
- boolean filter: enables searching through boolean fields,
- range filter: enables searching through numbers (higher, lower, in between),
- exits filter: enables searching if a field has any value (if it’s not “null”),
- order filter: enables sorting a list of results through a provided field.
Besides built-in filters, there is a possibility to add your own ones. Flashcards must have the ability to be searched through text. To do this, we will use a search filter (SearchFilter::class). But, to make the search not exact, we will use parameter partial. It’ll mean that we will be looking for any text with the given phrase (LIKE %searchPhrase%). We know which filter we want to use, but how to inform API Platform about it? As always, we can do it by using one of a few methods – through XML, yml or annotations. As earlier, I’ll use annotation. We add a new annotation @ApiFilter to the Flashcard model.
After adding it, we will receive a possibility to search through fields question and answer and documentation are updated with this information.

Detailed information about the implementation of the remaining filters is available on the website.
See also: Creating an API with Apiary
We still need to improve upon all of that in order for the app to gain its final shape. That’s why it’s necessary to create the following elements:
- users’ authentication,
- adding your own logic to requests,
- assigning the logged-in user to a subject,
- limiting users access to their own resources only,
- extending the documentation.
Let’s start with the update of dependencies.
Dependencies update
Since the time I first started working on the project, quite a lot of the elements of the application have been improved and added to the API Platform. That’s why the first step will be to update all of the libraries to their newest versions.

Composer will inform you that the bundle “symfony/lts” was abandoned. You can remove it safely using the command below:

Now, you can move to the creation of the aforementioned elements, starting with users’ authentication.
Users’ authentication
API Platform allows the implementation of a simple authentication with the use of JWT. If you want to use it, you need to install lexik/jwt-authentication-bundle library:

Once you install the library, you should generate the keys which will be used by the library. You can do it using the command below:

Now, you need to change the password for the private key in the .env file. Please note that it should be the same as the one provided whilst generating the key.
The next step is to configure the Symfony security component the way it uses the library presented above. Users who use the application should be saved and stored in the database. To make it happen, you need to use the entity user provider. You can find the guide about the configuration of entity user provider on the official Symfony website.
It can look like in the example below:
Then, you need to configure Symfony security to use the functionalities provided by JWT library. You have to configure the sign-in form and you should add the main firewall.
It’s also necessary to create a new routing for login. It should be compliant with the security configuration settings.
Theoretically, everything should work properly now. However, it appears that it’s necessary to encrypt the password during the creation of a new user to make sure that all of the elements work fine. At this point, you can use API Platform events.
Event system
You can use the events triggered by Kernel (such as kernel.request, kernel.view or kernel.response) to extend the basic functionalities of endpoints. API Platform uses these events in its own processes as well. If you need to execute your own operation/code before or after any other event, you need to set a proper priority for your Event Listener. API Platform provides a few const elements which define what priority should be set to the listener for the action to be performed at the time you expect it.
You can choose from the following list of the const elements: PRE_READ, POST_READ, PRE_DESERIALIZE, POST_DESERIALIZE, PRE_VALIDATE, POST_VALIDATE, PRE_WRITE, POST_WRITE, PRE_SERIALIZE, POST_SERIALIZE, PRE_RESPOND, POST_RESPOND.
The first action you should execute is to set encoder you’ll use while encrypting a password. If you are interested in the newest recommendations, I’ll advise you to visit the Symfony documentation website. However, I have used argon2i encoder. If doing so, you should remember to add a proper encoder configuration to security.yaml (as per the example below).
You should also correct a configuration of the user model itself. The field for encrypted password should allow you to type up to 255 characters. Additionally, a user should have been assigned with a default group.
In the presented case, it’s necessary to encrypt a new user’s password before adding them to the database. Password encryption should be also performed anytime a user decides to change their password. To do it, it’s necessary to create your own event subscriber which listens for the kernel.view event with “PRE_WRITE” priority.
getControllerResult() method gives back the processed object. You are only looking for a case when a request is connected to the User object with the plainPassword property set. If you meet both of these conditions – you need to encrypt a password, using a previously created encoder.
Securing endpoints
Once you configured security for your application, you need to resolve an issue connected to the fact that all the endpoints are still available for the users who are not logged in. There are at least two methods you can use to solve this problem.
The first method is to add the proper registry to section access_control in the security.yaml file to secure endpoints from unauthorized access. You can read more about this on the documentation website.
The second mechanism you can use is the addition of access_control attribute to the resource configuration.
Access to the Resource Subject should be available only for the users with the role ROLE_USER.
You can also set some more complicated rules for granting the user with access to the resources. If you want to allow the user to have access to the resources connected to their profile, you can use the following command:
Now, the method PUT on Resource Subject can be only performed by the user who created this resource.
Extensions
The issue of access to the data is almost solved. There is however a remaining problem of the data displayed on the listing which appears regardless of the logged-in user. API Platform provides the mechanism called Extension. It allows you modifying the queries which are sent to the database. Thanks to this functionality, you can limit the collection’s results the way it contains the resources which are connected with the logged-in user.
It’s as simple as implementing the interface QueryCollectionExtensionInterface
Every time you decide to add the aforementioned code whilst getting the subjects for the database query – in the code there will be a condition added. It will limit the search results. This class should be extended with protection for the lessons and flashcards classes. Besides that, it’s possible to limit the database query for the single elements. To do it, you should implement the interface QueryItemExtensionInterface.
Extending the documentation
Unfortunately, API Platform won’t create the API documentation for the endpoint which allows signing-in. However, there is a possibility to add your own data to the documentation. You need to decorate the service api_platform.swagger.normalizer.documentation. Inside the decorator, you have access to the array which contains all the elements of the documentation. You can modify the array freely. Below, there’s a presentation of how to add the information about the signing-in endpoint to the array.
Thanks to that, In the documentation you have the information about how to log in to the app.


How to build an API – conclusions
The application is now fully functional. You can create new lessons, subjects or flashcards and users have access to their own data only. Backend work is done and you can create an application which will use the API you built. Again, the API Platform comes with help. The creators of this library prepared the generators of the clients. You can read more about it in the documentation.
Besides the functionalities I’ve presented, API Platform offers a variety of different solutions, such as CQRS, DTO, integration with ElasticSearch, MongoDB, GraphQL as well as the administration panel generated on the base of JSON-LD. Using this library, you can significantly shorten the time you spend on the repeated tasks.
I hope that this extended article gave you a glimpse of what API Platform is and how to use it. If you want to deepen your knowledge, once again – I recommend visiting the API Platform documentation website. And if you want to take a look into the application I’ve created for this article purposes, you can visit Gitlab.

