16 February 2022
Serverless tutorial: Let’s build a virus scanning solution with automated database updates


The Internet can be a dangerous place – that’s why most of us have antivirus software and firewalls guarding our computers. As software engineers, shouldn’t we protect our applications with the same cautiousness? If you are a cloud developer using serverless who cares about user security, you’re in the right place! This tutorial will teach you how to build a full virus scanning solution based on a Lambda container image and other fancy AWS tools.
Can you risk not having an antivirus for your app?
Let’s say that your system has an upload/download function for files. Users can upload them via the web application and later on, they can decide to make the files accessible to other people, so they can download them to their devices.
Also, imagine that the system’s employees can attach the files to specific users’ storage directly by using a CRM, while also being able to browse the storage itself.
In the AWS world, one possible approach would be to introduce an S3 bucket where files can be stored. In order to support file upload and download by users, we can use AWS presigned URLs. For example, by combining them together with an API Gateway, we can give users access to such features by REST API.
Now, what happens if a customer uploads a file — purposely or not — that’s infected by a trojan?
What unprotected file transfer can cause
While AWS keeps the file harmless, if someone downloads the malicious data, they’re in deep trouble… It could cause a system leak or a service crash and the risk is real. The average cost of a data breach now stands at $1.07 million (IBM).
There can be an avalanche of consequences when this happens:
- Reputational damage
- Losing confidentiality and security your users expect
- The possibility of exposing the system’s sensitive data, if an employee’s device gets infected
The best approach would be to remove that nasty upload/download functionality to prevent malware from spreading. 100% safety guaranteed!
Since this is not a plausible option… Let’s think about how we can build our own custom virus scanning solution which will kick out any viruses.
In a world of servers, virus protection is pretty simple
There are a few open-source, anti-malware toolkit solutions that you can use to perform a scan. One of them is ClamAV, an engine for detecting trojans, viruses, malware & other malicious threats.
Simply working with containers/servers, we would configure such an antivirus engine on the container/machine and let it do the job.
We wouldn’t even have to worry about updating the virus definitions database. ClamAV already comes with a built-in tool called freshclam, which takes care of downloading and updating ClamAV’s official virus signature database.
However, as lazy serverless app developers who don’t want server management at all, we have to figure out how an antivirus solution can work on serverless architecture.
Before we start, I’d like to thank the community
What I like most about the software engineering industry is the community that loves to share knowledge.
Educating each other works like a snowball. Someone shares their recent development experiences, people read them and say “wow, I need to try this out!”. And they try.
Later, they share their own thoughts on the subject, inspiring a wave of other engineers to build on that work and bring back fantastic solutions!
I was hit by a snowball rolled by the pros before me. I would like to make it even bigger and push it even further!
Big thanks to Joseph Sutton whose guide to building a serverless virus scanner helped me set the foundations of my extended solution. Without the work that he had done, this wouldn’t be possible 🤝
Pro-tip: You might want to read it first to understand what we’re doing here.
I reused what he built for an AWS Lambda that scans files thanks to its support for container images i.e. the javascript code with the serverless configuration.
By using the serverless framework, configuring the solution is really simple and minimalistic. Then, I added a functionality of automatic updates for the virus definition database, presenting some real-life use examples for the application along the way.
You won’t find the process of building a Lambda scanner described in-depth, but I will summarize what Joseph did, in brief, to focus on the improvements I added.
Lambda container images help you create a custom runtime for your Lambda functions
With Lambda functions, we don’t provision or manage any servers. AWS gives us the list of supported runtimes we can run our code on. We simply pick one and leave the rest to the cloud provider.
Sounds convincing and handy. Things get harder when we want to do something custom that AWS’ pre-defined runtimes don’t offer, which we cannot do by using some library or a framework.
In that case, we need a custom runtime that the Lambda function can run on to satisfy our sophisticated needs.
As you might already know from Joseph’s piece, at the end of 2020, AWS released support for Docker images. We can now build our own Lambda runtime that comes packed with everything a developer needs.
With a maximum size of 10 GB for a Docker image, we can do really great things. In our case, we just need the ClamAV antimalware toolkit and AWS node.js Lambda runtime installed, and we should be ready to go.
To create a Dockerfile (i.e. configuration file for our Docker image), simply grab the one from Joseph’s article (written really well) or try to create your own one.
Protip: ClamAV has the official image that you can use in order not to do everything manually.
One thing I would like to highlight here is the part below.
Set up all the stuff that ClamAV needs. Using the multi-stage Docker build, import the official AWS Lambda’s Node.js image that implements the Lambda runtime API.
If your Lambda needs any dependencies, copy the dependency files (in terms of Node.js these would be package.json and package-lock.json) and install them inside the image.
The most important part of the Lambda is described below.
We call the ClamAV executable to perform an actual scan. If the error’s status is equal to 1, that means the file has been detected as infected. Then, it’s your choice how to handle this scenario. Let me show you what I would do.
🏗️ Building with serverless?
Consult your project with certified cloud engineers who’ve been using it in commercial projects for years. Why?
The technology is complex and can derail your efforts — not to mention the hidden costs. Some help won’t hurt.
How the app handles an infected file
I set up a temporary bucket where our files can be stored after being uploaded. If the file is infected, we move it into a bucket with no access for users. Let’s call it a quarantine.
But if the file is healthy, it moves forward to a safe place users can access.

Scanning the file for malware
The user uploads a file to an S3 bucket called uploaded-files. Thanks to the AWS S3 events, we don’t care about the UI or how the upload is implemented. All we care about is if a file lands inside the bucket.
If it does, a Lambda is triggered, and it performs a scan.
If the file is healthy, we generate an Event Bridge event to inform users the file is fine. Our handle-healthy-file Lambda listens for such events, so it can move the file to the healthy-files S3 bucket, where our users can access and download them safely.
If the file is malicious, we send the Event Bridge event informing that the file has been detected as infected.
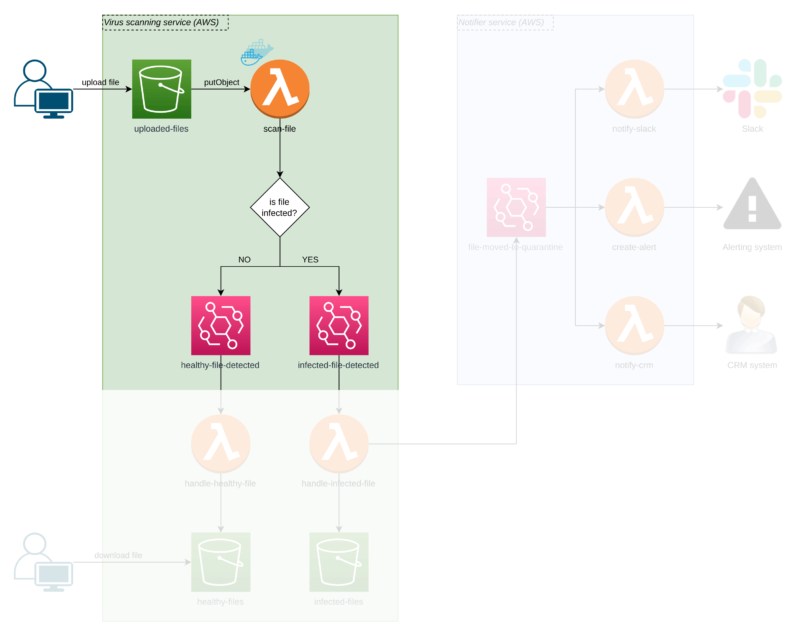
In line with the single responsibility principle — and in order not to mix business logic with technicalities — I didn’t want the scanner function to do anything else. It only scans the files and notifies (doesn’t matter who) if the file is infected.
In the next step, our handle-infected-file function moves the file to an isolated S3 bucket called infected-files where it stays locked with no customer access possible.
After the file hits the isolation bucket, Lambda sends another Event Bridge event to say the file has been moved into quarantine. Now, the situation is under control, but there’s more to do!
Notifying the user about malware
The`Notifier Service` in the diagram shows how the app can inform a security expert that they need to act after a file is quarantined.
We have multiple notifiers (also Lambda functions) which inform our system through different communication channels.
One Lambda sends a Slack message, another one creates an alert, and another one marks who sent the malicious file in the CRM. Never go to lunch with them!
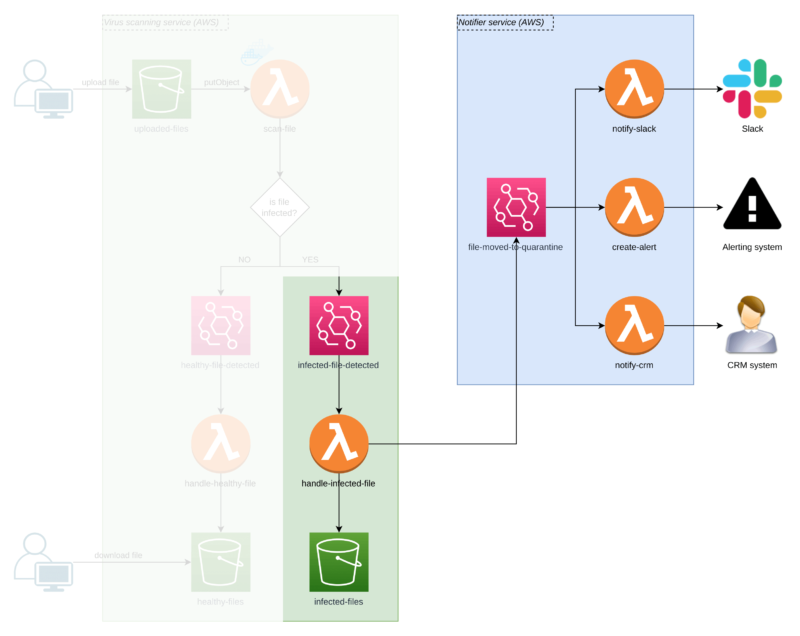
Thanks to AWS Event Bridge events, we’re flexible in adding more notifiers and removing the existing ones that are not needed anymore!
How to make ClamAV auto-update the virus definitions database
One thing I was missing in Joseph’s solution was an update function for the virus definitions database.
Once we build the image and push it to ECR, it doesn’t get updated anymore unless we redeploy the whole service.
ClamAV does everything for us thanks to the built-in freshclam tool.
Under the hood, it runs a CRON job which pulls the latest definitions from a database that is being updated daily.
For ClamAV to work with serverless functions, you need to do some tweaking
While thinking how this can be solved, some other bright minds and I came up with two neat ideas. Let’s compare them and decide which one is a better fit.
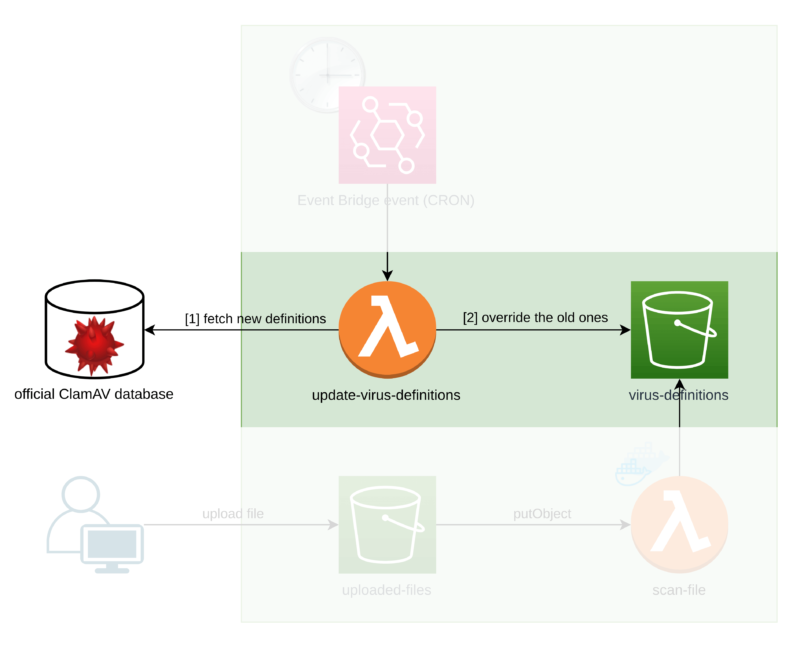
Option 1: Static container & dynamic storage solution
Look at the diagram below to understand what mystery is hiding under this name.
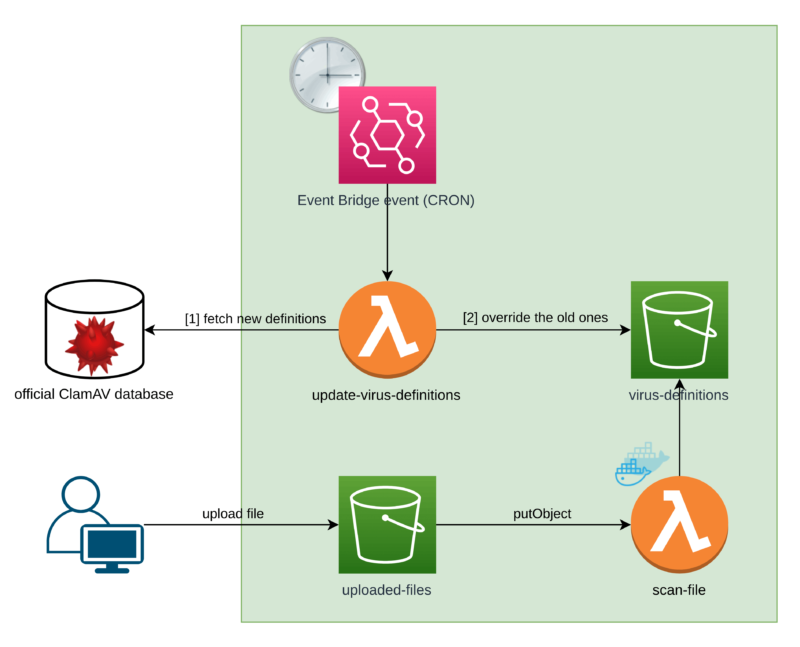
I didn’t put the rest of the process here in order to keep things clear. What I have added are the 3 extra components. Counting from the top, these are:
virus-definitionsS3 bucketupdate-virus-definitionsLambda function- Event Bridge scheduled event (or simply a CRON job, since we’re used to calling it that!)
The idea here is to extract the virus definitions database to some external storage, which in our case is an S3 bucket.
Because we extract our database from the image itself, we can introduce a process that will keep it updated.
Option 1: The flow
We can have the extra Lambda function called update-virus-definitions which is triggered by an Event Bridge event under a set frequency.
First, it downloads the ClamAV virus signature database from an official source. Then, it overrides the old database with the new one.
Now, our Lambda that scans the files (called scan-file) has to first download the database from an S3 bucket.
The
static container & dynamic storagesolution’s big advantage is that we can remove the virus definitions database from our Dockerfile because we move it into an S3 bucket.As a result, building the image and pushing it to ECR is way faster, shortening deployment time.
Can you see now why I called it a static container and dynamic storage solution?
We have a container that can be built only once (static container) and a storage (an S3 bucket) that is being continuously updated (dynamic storage).
Option 1: Disadvantages
- Before performing an actual scan for a single file, a database of around 300 MB has to be downloaded first.
Moving the files from and to an S3 bucket inside the cloud is fast — but not fast enough for this. My time test of a Lambda needs to download and save S3 bucket files gave me 4 seconds you need to add to total scan time. - Lambda functions have a limited temporary storage size of around 500 MB.
Although AWS Support Center can lift some limits for you, this one is a no-go. It’s a hard limit you have to respect just like with Lambda’s maximum execution time, or max RAM.
Since the database weighs 300 MB, that leaves you something around 200 MB for an uploaded file that we also need to download to scan it.
Is it much? If your application supports uploading files of at most 5 MB, then you can consider this solution. But for file uploads larger than 200 MB, well… that’s a no-no for you. - It’s not only about the size of the scanned files but also about the database size.
Since it’s being updated 24/7, it will continue to grow in size. For me, the size increased by 3 MBs between December 2021 and January 2022.
You might say: “it’s not that much!”. Well, if you plan to build a system that will last for years, eventually you will reach the limit that Lambda/tmpstorage can handle.
For me, the last disadvantage completely cancels this solution.
Option 2: A dynamic container solution
As previously, first look at the diagram below.
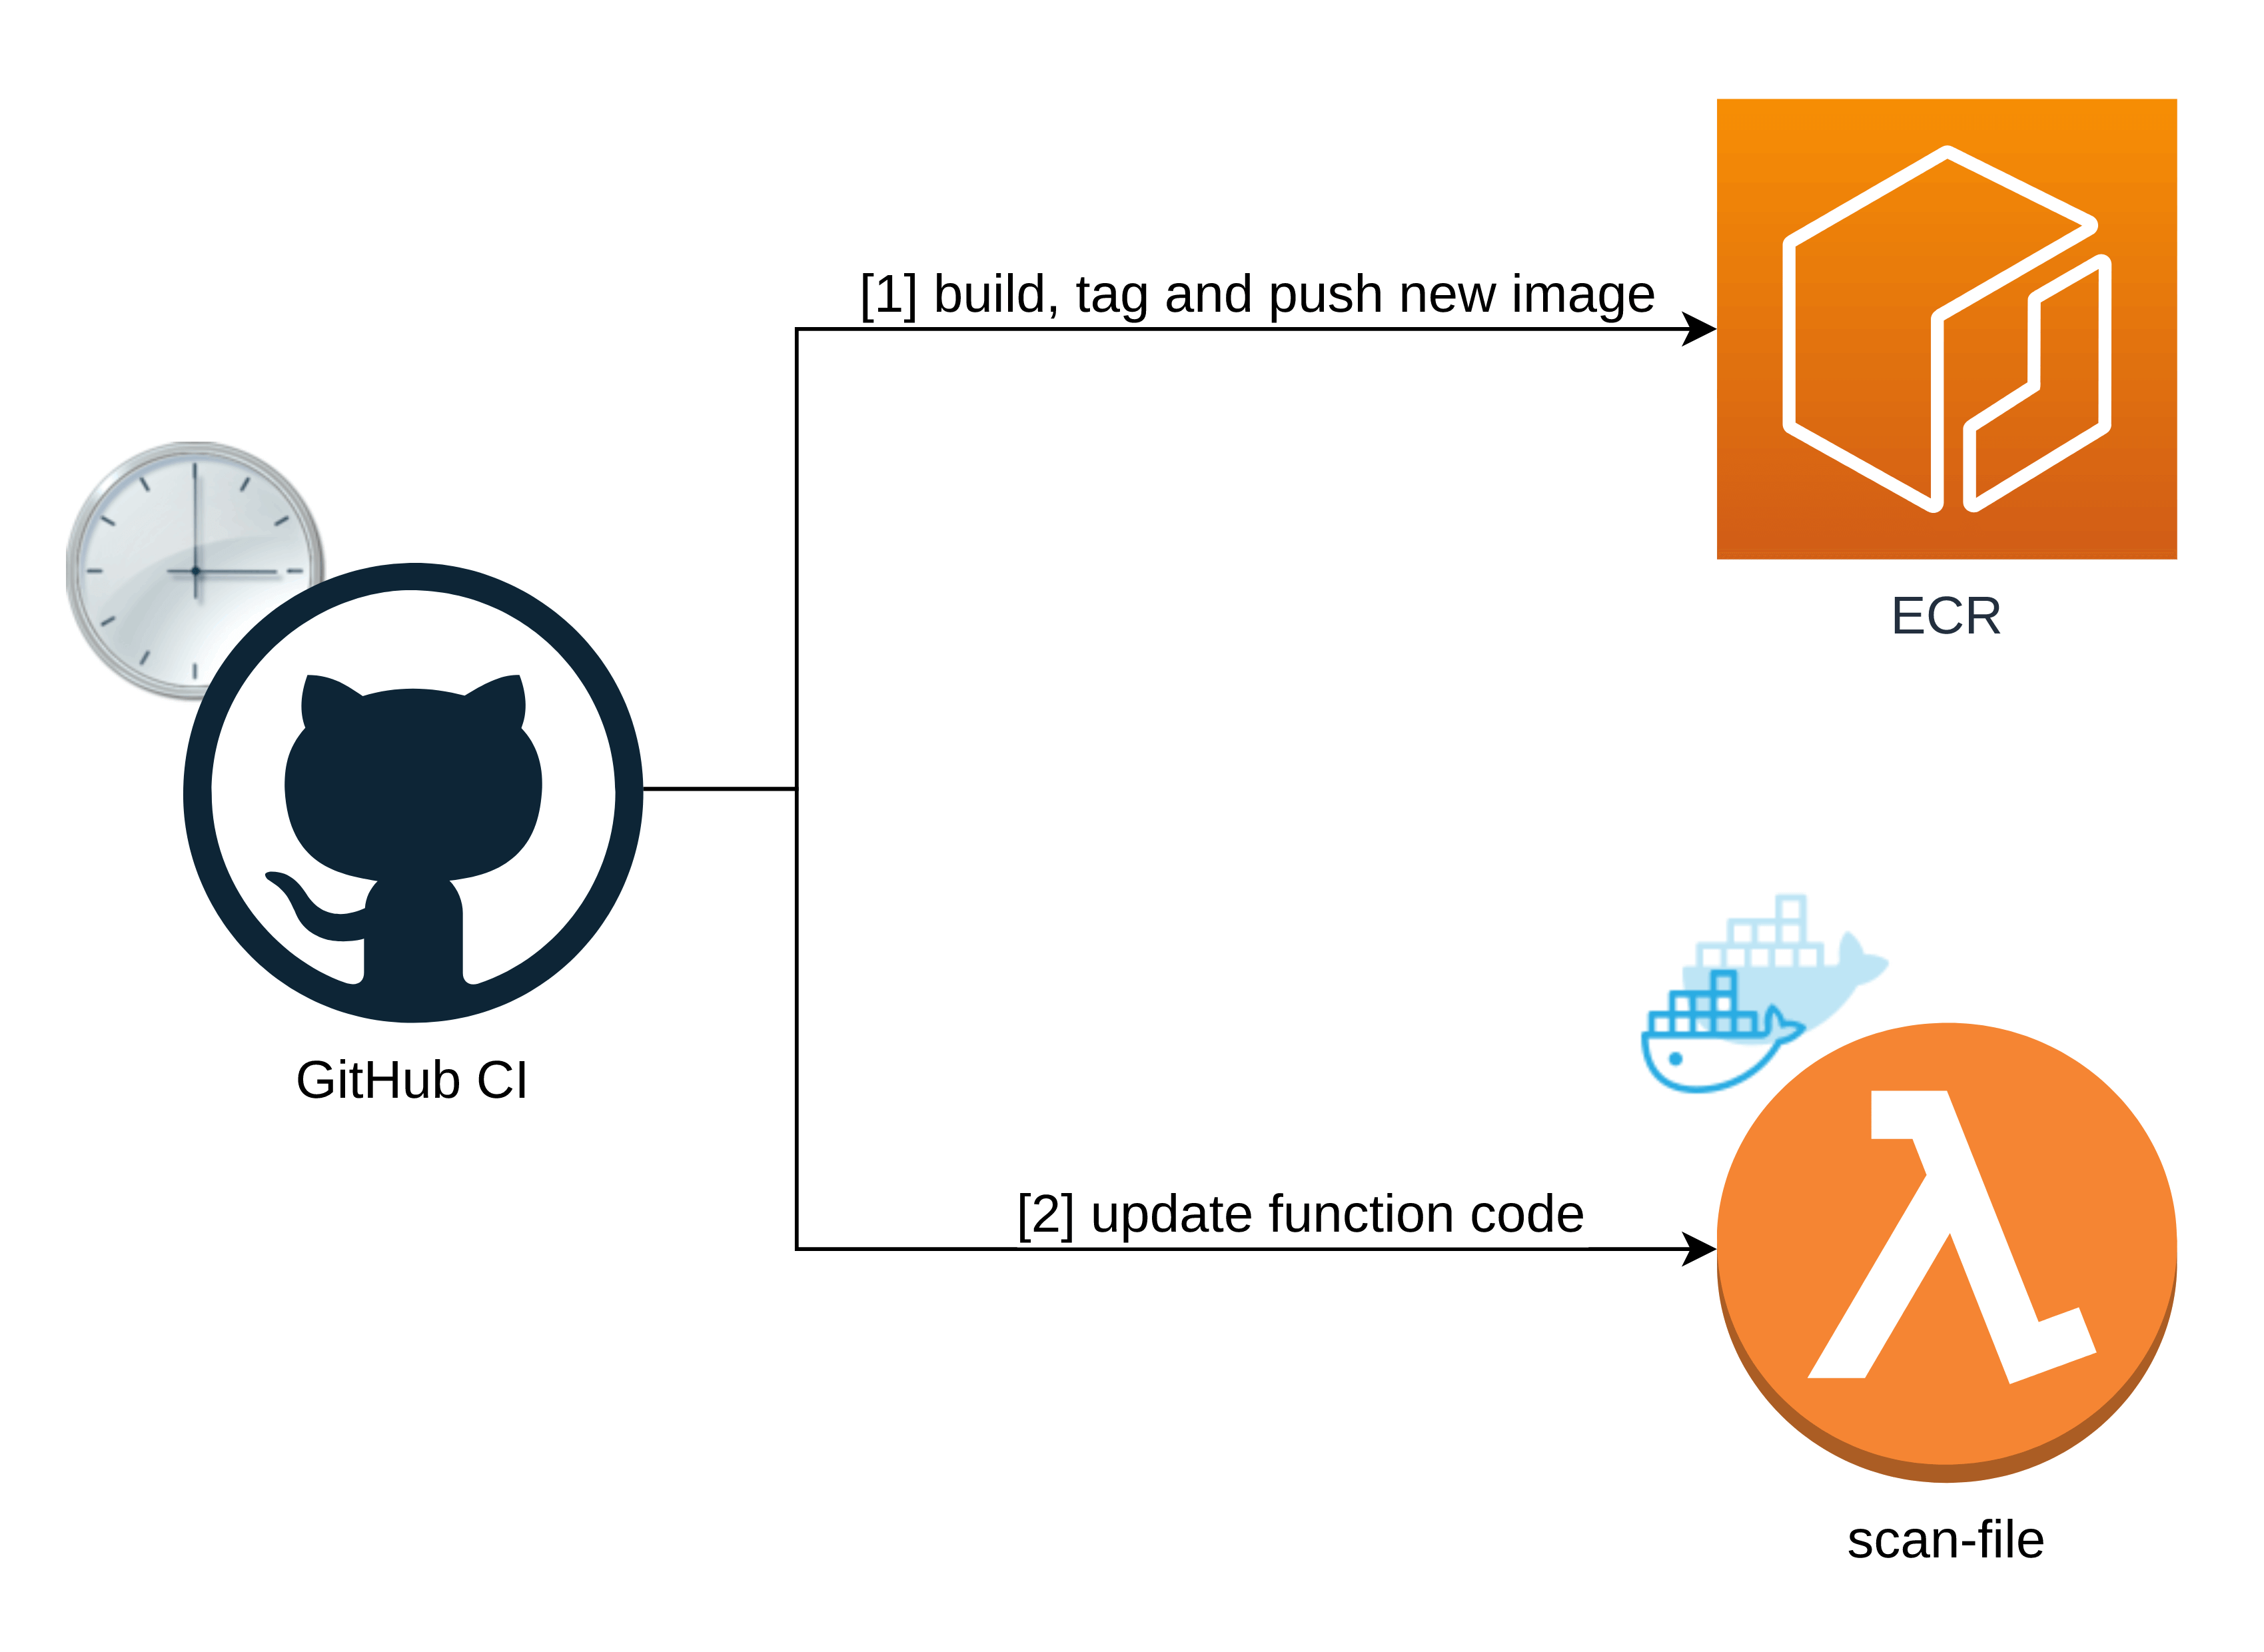
This solution doesn’t have any storage. The database is bound to the Docker image itself, just like in the original solution.
To keep the virus definitions database updated, the app builds, tags, and pushes a new Docker image to the AWS Elastic Container Registry, and then updates our scan-file function’s code with the last pushed image.
💡 Learn how other pros work with serverless
A GitHub Actions pipeline for the dynamic container
Using GitHub Actions is my preferred CI/CD solution. Since it’s a very simple action, I’m sure it will work with other workflow automation platforms like BitBucket Pipelines, GitLab CI, or Jenkins.
Here’s a reusable GitHub Actions pipeline that updates the virus definitions database.
What you see above GitHub names a workflow_call (see GitHub documentation). You could compare them to functions.
The GitHub Actions pipeline presents a piece of code that takes some parameters (exactly like a function) and does something for you.
It’s a really handy way of not duplicating your pipeline code in a situation when you have multiple environments you deploy to. The deployment process probably will be the same for each of the environments with different parameters.
So we have GitHub action that later on we will apply for different stages (represented by different AWS accounts) of our application via programmatic access.
Let’s analyze what’s happening here.
Under inputs and the secrets sections, you can see the input parameters. Most of them are obvious.
ecr_repository_name is where the Docker image sits, which is required to rebuild the Lambda scanner. function_name is the scan-file Lambda function, which is the one that the application rebuilds.
The pipeline has two jobs in total.
First job: Build, tag, and push the image to ECR
The first job is to build an image and push it (or to be precise — to override an old one) to the AWS Elastic Container Registry.
The most important step is called Build, tag, and push the image to ECR.
Using environment variables, we define the ECR registry, the repository name, the image tag we create for our image, and the path to the directory where our ClamAV Dockerfile sits in.
As you might have noticed, an image tag is custom but stays the same all the time.
In my case, I don’t need historical images tagged differently, but if you do, it’s just a matter of adding some custom id to the image’s tag.
That’s really all that it does. It uses official GitHub and AWS actions to the job – no magic here!
Second job: Update the Lambda container image
The second job depends on the first one. Before it can rebuild the Lambda function’s code, it needs the new Docker image to be already sitting in ECR.
Here, the most important step is named `Update function code`.
It uses an AWS CLI command called aws lambda update-function-code which supports --image-uri and --function-name options. With them, you can simply pass an ECR image URL you’ve just created and point it to your function!
The next command waits for the function’s LastUpdateStatus to be Successful. If the update fails, we will know about it via the failing GitHub pipeline.
All together: The actual GitHub action
Now, you’ll learn how to use the reusable workflow for a specific action.
Let’s say that the pipeline presented above is for your development environment. In real life, you probably have other ones for different stages like staging or production.
Simply provide them all the variables you defined previously and tell the pipeline that it should be run on a schedule. In my case, it’s 8 AM every day.
You should also specify workflow_dispatch so that the pipeline can be triggered manually (by GitHub Actions UI, for example).
It’s a measure prepared just in case you’d like to patch the virus definitions database ad-hoc when some new menacing virus is released.
Is this serverless solution worth the effort?
I hope this serverless tutorial helped you decide. There’s also the option of installing ClamAV software on an on-prem device or inside a Docker container.
You might say that by going serverless, we kinda lost the biggest advantage of Lambda functions — delegating managing servers to AWS.
Here’s why you might find the serverless way the better alternative:
- You still don’t manage any servers at all!
We only wrote a custom Dockerfile as a one-time action. Thanks to the official AWS Lambda images, you can import one in your Dockerfile and continue to rely on the stuff that AWS manages in full! - AWS Lambda functions scale extremely well
With servers, you must take care of scaling our infrastructure while serverless solutions scale flawlessly out of the box thanks to AWS’ helpful hand. - The price is a bargain.
Lambda invocations cost $0.20 per one million requests and $0.0000166667 for every GB-second in the case of x86 processor architecture.In the case of ECR, you only pay for storage. If you only store one image-tag pair at a time, you are faaaar away from reaching $0.01 per month. You won’t be able to beat that cost with a non-serverless approach.
💡 Optimization is key

