21 August 2018
How to create a React Native app: Frontend developer’s toolkit


If you’re a web developer and you want to create a React Native app, you’re probably wondering: how can I build it in a frontend-developer-friendly way? It turns out you can do quite a lot with what you already know. Here are all the tools I’ve used in my own mobile app development process in order to create a React Native app.
Last year, I was tasked with researching React Native as a way to develop a cross-platform mobile app. I was quite sceptical about it, to be honest. While I’m a total React-junkie when it comes to web frontend, I had mixed feelings about hybrid, multi-platform React Native mobile apps. I knew the final effect might be something neither the client nor end-users would be happy with. I also knew that, like with every multi-platform framework, the set of functionalities we’d be able to implement would be limited and a few compromises would need to be made.
Long story short, React Native won us over. The scope seemed achievable and the app idea itself wasn’t too complex. It looked like a good scenario for a cross-platform approach. So, what did we, the frontend developers, do next? Let’s go through the process so you can create a React Native app on your own.
Getting started with React Native
I defined a goal: to set up the project for development in a way it would be as similar as possible to our web React projects. Meaning, I wanted to use as many of our favorite libraries as I could repeat the practices we know and mimic the familiar folder structure.
I have to say, even though I’d been good friends with React for some time, I didn’t know much about RN or how it worked.
A native app with JS? The code is probably pre-compiled, like Xamarin for iOS (AOT compilation), right? I was so wrong.
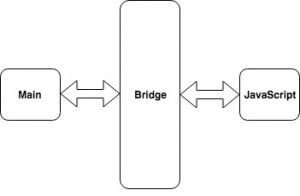
One of our previous articles explains the basics of creating a hybrid mobile app. When it comes to RN, there’s a JS engine running (either JavaScriptCore or V8) and native code, both connected with a so-called bridge (aka message queue). If you wish to learn more about RN internals, you can start with Alexander Kotliarskyi’s talk “React Native: Under the hood”. The thing is: if you have a JS engine, it’s probably possible to run some JS code. Good news for a web developer.
Setting up the React Native app project
Before we can create a React Native app, we need to do some setup work first. I needed to set up a project using a React Native framework – the boilerplate. Obviously, I wasn’t going to do it myself, so I turned toward starters and CLIs. Two projects caught my attention: an excellent Ignite starter by InfiniteRed and create-react-native-app. The first one is the most popular and advanced RN CLI. The second one is equivalent to the create-react-app tool.
Unfortunately, Ignite’s project structure was very different from what we were used to in our React projects. So, once again, I decided to go with what I know, scaffolded a simple project using CRNA, and made it look like our web projects. I snooped around the Ignite boilerplate for RN-specific tools, helpers, and libs, and introduced some of them to the newly created project.
I found out there are 2 main ways to work create a React Native app using CRNA:
- using Expo: a set of tools, libraries, and services which lets you build native iOS and Android apps with JavaScript,
- using Bare React Native: plain RN, with separate Android Studio and XCode projects, and a native build process you’re responsible for.
CRNA creates an Expo project by default. You don’t even have to install XCode or Android Studio. How? The platform does the native part for you, and you never see any Java or Swift code. Your React Native app runs inside a wrapper called the Expo client, both during development and in production. The JS code is bundled and hosted on dedicated servers (!) from which you can download it later to a device. Expo SDK offers its own library of components and services (which might be sufficient in many scenarios). Also, it offers instant updates to your users out of the box. All of this for free!
Side note: it’s also possible to experimentally use Expo with native projects through the ExpoKit library (one of the ways to eject in a CRNA project), but, as they state, it’s an early/alpha support.
Because of its nature, Expo has limitations. It offers a lot of hand-holding and ready-to-use modules in exchange for control. I knew I wouldn’t be able to use many community-driven plugins and libs for React Native with Expo.
Also, in The Software House, we have teams of experienced native app developers for both platforms.
They were ready to help if we needed any custom functionality not available in the React Native framework. As cross-platform apps are somehow limited already, I didn’t want to limit us even more. I decided to eject, gaining access to the native projects for Android and iOS. I had the Java files. I had the Objective C code. Is this where the JS heaven ends? ????
After I set up some pretty heavy dev environment (native SDKs, simulators and IDEs for both Android and iOS), I worked towards starting the app for the first time. Obviously, a native project needs platform-specific build tools. But when it comes to developing your React Native app code (JS), there’s a bundler running locally on your system which serves the code to the device. Think about it as a webpack-dev-server for React Native. And yes, it supports hot reloading! You get instant updates on the device screen without any reloading (unless you make changes in the native code – then you need to rebuild).
We could also attach a debugger, like Chrome DevTools, and debug our code exactly as we do in web projects. We could even use Redux Devtools! These are the things any frontend developer is familiar with. So, we knew how to run the app and how to debug it. Plus, we were able to develop it fast with HMR.
📚 The State of Frontend 2022 is out and ready for you!
Built on surveys by 3700 frontend developers from 125 countries, enriched with 19 expert commentaries, divided into 13 topical sections. State of Frontend is the most up-to-date information source.
Check where you (and your organization) fit within the modern frontend landscape.
Making the most of what we know – related knowhow in React Native project
Here at TSH, we’ve made plenty of web apps using React. As I mentioned before, I wanted to leverage our experience and lower the entry threshold for cross-platform mobile development. I firmly grasped the fact that I would be using React and JSX, but the rest was unknown, at least at the beginning.
Layout
How are the React Native views arranged and programmed? Guess what – you don’t need to learn any new, mobile-specific terms or practices. We have Flexbox.

Looks too good to be true, but they ain’t lying!
Remember, your React Native app is not some styled website. Flexbox has been implemented to position native elements for both platforms (see yoga). Just as they state in the docs, it’s not a 1:1 copy. I was skeptical at first – I expected it to be knotty, maybe even a bit buggy. But that was not the case. Because of yoga, we were able to quickly start building layouts for our app based on the designs.
Components
Although you import React and Component, you compose your UI using RN-specific parts, like TextInput or Picker. The syntax is the same. Think of it as if someone created a set of controls you can use for a mobile (Android and iOS) platform in your React app (that’s exactly what happened, actually). Most of the components render a platform-specific equivalent on both platforms. Some are available only for one platform, like MaskedViewIOS or ToolbarAndroid. Some require custom styling and some preserve the original platform look (like Button).
Web vs. mobile component – cool, isn’t it?
Customizing
It’s no surprise you won’t be using any CSS to make your app beautiful and shiny. Instead, you’ll style it with JavaScript objects: color, fontSize, textAlign and other well-known CSS attributes adapted for mobile development. It’ll take some time to get used to the names, and some familiar shorthands are missing. Plus, there are some React Native or even platform-specific properties (like elevation, which translates to Android shadow).
React Native stylesheet vs. CSS
It gets better: styled-components supports RN. While we don’t use styled-components that much in our web projects, it was a perfect fit for the React Native stack. We got an even more familiar syntax plus very clean and readable JSX.
Redux
Basically, you use Redux the same way as in web projects. Global state management is great for mobile applications.
Persistence
State persistence might not be so important for a web app that is not running offline, but you usually do want to cache content in a mobile app. This way, you can use it offline to some extent. There’s this fantastic library, redux-persist, which supports many different storage engines, including localStorage and React Native AsyncStorage. For a React Native app, this is great, because:
- you can persist any part of the state you want, including user settings stored on the device or data fetched from the backend,
- you can store user auth data without writing any additional logic.
All of this without even touching any device storage API or native code, thanks to Redux!
Forms
We use Redux Form in our web projects, and that’s exactly what I decided to use for the React Native forms. All you need to do is swap a component – instead of <input>, you use <TextInput>. The rest stays exactly the same.
Communication
Fetch is available when working with React Native. Because of this, it’s possible to use libs and helpers you love during web development. We like to use redux-api-middleware for communicating with the API. Despite its flaws, it’s more time-efficient than writing boilerplate for REST requests. Again, because this is something we were familiar with, I wanted to make everyone feel at home.
Side effects
Not much to say here. We usually choose redux-saga and that’s exactly what I did for the React Native app.
Testing
We unit test everything, especially all of the React components. We’re very used to a certain testing style, using Jest and Enzyme in our React projects. When it comes to React Native and Enzyme, shallow allows us to create most of the standard component tests that we do in web projects. We can locate elements, simulate events, check state and test lifecycle methods (yes, shallow calls lifecycle methods – for over a year now).
We don’t have the availability to mount, as it’s based on jsdom for simulating the browser environment. There have been attempts to make mount work with React Native, but I advise against it.
Enzyme is a very powerful tool and, combined with jsdom, it allows you to create quite complex tests of your web app (like simulating input focus or other DOM element events).
Still, you should ask yourself whether this is a scenario for unit tests or, maybe, an integration test. I mean, even with web applications, jsdom simulates env and does not match the browser 100%. It doesn’t make much sense to use it for a mobile app.
When it comes to integration tests, there’s plenty to choose from. You can use regular testing tools for mobile apps, like Selenium-based Appium. Another option is Wix’s Detox, which is built from the ground up to support React Native projects. There’s also a dedicated framework for React Native which doesn’t interact with native elements, but works on the RN-level through refs, called cavy. Pick the approach which fits your project best.
An example Detox test (straight outta docs)
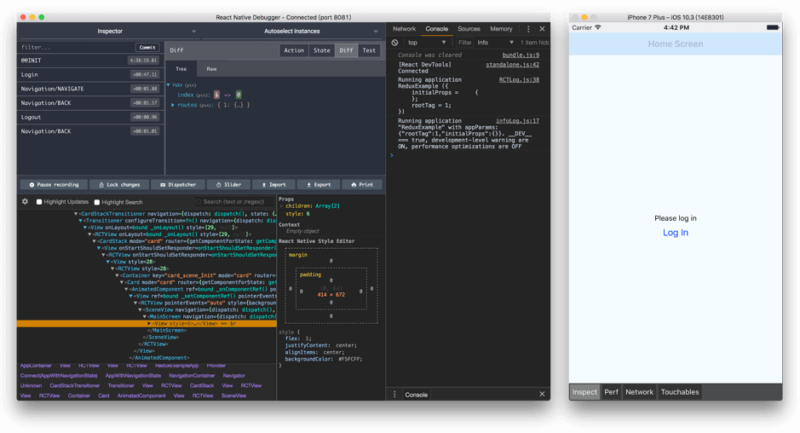
Debugging
As I mentioned earlier, you can simply use Chrome devtools to debug your code. There are dedicated tools, e.g. React Native Debugger. It combines a remote debugger, React Inspector and Redux Devtools, providing all you need for most RN projects.
See also: Code-splitting with React and Webpack for frontend optimisation
Wrapping it all up
To sum up, our React Native app project contained:
- Redux as a state container,
- Redux-saga for managing side effects,
- Redux-forms for handling user input,
- Redux-api-middleware to reduce communication boilerplate,
- Styled-components to make our components shiny,
- Redux-persist to store stuff between app sessions.
All of the above are libraries commonly used in web projects that you can also use to create a React Native app.
One thing you need to remember is that you don’t become a mobile developer in a day. Mobile app development comes with its unique set of difficulties and technical problems. For example, the screen is small, so the design guidelines and user expectations differ from those characteristic of web apps. If you wish to know more, read my colleague’s article: Web developer’s guide to the mobile development galaxy. It focuses on native solutions, but there’s plenty of universal information for a web developer who wants to develop his or her first mobile app.
Nevertheless, React Native is a massive upgrade in comparison with traditional hybrid app tools.
Today, as a frontend/JS developer, you’re able to create a React Native app that works on mobile devices by using what you already know and probably enjoy working with, i.e. JS and React. Some things differ from the web, like navigation, but, overall, frontend developers should feel at home.
There are projects which attempt to blur the line between web and mobile development using React Native even more, like react-native-web and react-primitives. The idea behind these is to allow cross-platform mobile and web app development using one set of platform-agnostic components and APIs. Also, Microsoft seems to be really into React and React Native cross-platform development with their ReactXP. How will the concept of cross-platform apps and React Native evolve over the next few years? It’s definitely something to look out for!
Check out the services page to find even more information on how to create a React Native app as well as career opportunities for React mobile development at TSH!

