22 January 2019
Revolution incoming: CSS Houdini and the future of frontend development


The frontend development differs from other programming environments. It’s more limited, more pre-prepared. But things are going to change. There is a revolution around the corner that will determine the future of frontend, which makes me very excited.
It will bring faster user interfaces, richer visual effects and brand-new possibilities. Additionally, the distant future of frontend may even erase browsers compatibility problems!
The problem
When creating effects on the website you often hit the wall of limited HTML and CSS possibilities. That’s why you use already existing JavaScript libraries to make up for the missing functionalities. But are you aware of all the consequences? Often, those libraries have hidden drawbacks that may harm your application. Animations on scroll, custom layouts, and many types of polyfills – all of them have pretty common problems:
- A lot of data is not available for the frontend developers, e.g. displayed text width or values of unknown CSS properties. To collect that information, you need to use slow and dirty workarounds.
- Some logic, instead of working under the hood of the browser, is running on the application level. It hits the overall website performance because it misses browsers’ optimizations done for the native code.
- JS scripts often trigger extra view re-renders when you compare it to native functionalities. It forces the device to perform much more work and, as a result, drains the batteries faster.
The latter is probably the most interesting, as it relates to how some types of polyfills work. That’s why we will take a closer look.
Those are the small libraries that try to add missing functionalities to web browsers before they are ready to use there.
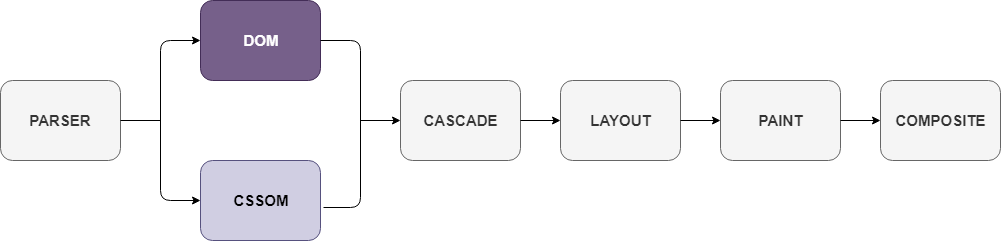
In the scheme above you can see a typical view rendering process from web browsers like Chrome or Firefox. It consists of many stages that run one by one after something changes and every time the view needs to be updated.
During that process browsers do a lot of magic – they parse code, calculate layouts, paint elements, and eventually, they put together the final view. It works well.
📚 The State of Frontend 2022 is out and ready for you!
Built on surveys by 3700 frontend developers from 125 countries, enriched with 19 expert commentaries, divided into 13 topical sections. State of Frontend is the most up-to-date information source.
Check where do you (and your organization) fit within the modern frontend landscape.
Now imagine you want a masonry layout on your website, just like Pinterest. Can you ask the browser to help you? Unfortunately, you cannot because browsers do not support those layouts yet. You need to do everything in your application using JS, totally outside the rendering process. This is how it will look like:
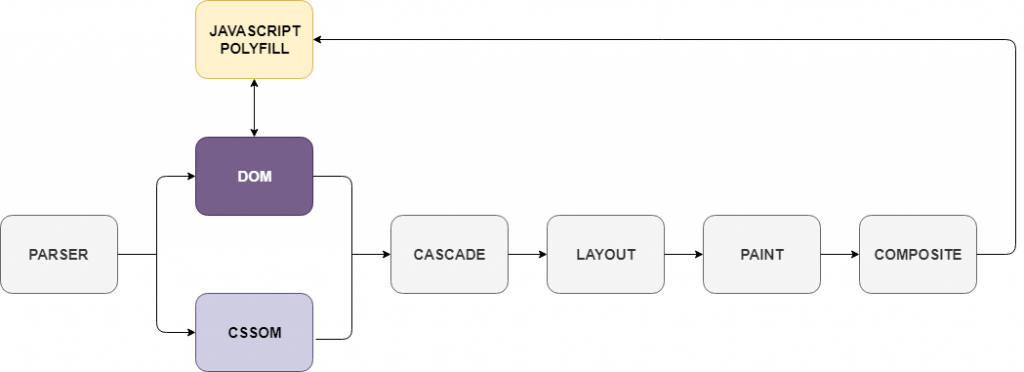
This is how polyfills (and every other JS library) works. It does its job after the rendering process is over. Then it changes the HTML, updates the styles, and therefore, it forces the browser to start the whole rendering process again.
The second run must happen to make the changes visible on screen, and that’s a big problem because every screen refreshing takes time.
Currently, you can’t do anything about it because you don’t have access to the rendering process and the whole browser magic, but what if you could? As far as the future of frontend is concerned, here comes…
The revolution
Some time ago, a group of developers from well-known companies met and asked themselves: what if we could make a change here? They called themselves CSS Houdini Task Force, after an illusionist Harry Houdini, who was famous for demystifying magic.
The people behind CSS Houdini want something similar: to demystify browser magic and bring it closer to us – the frontend developers. They want to create a collection of low-level JavaScript APIs for better control of website rendering. Doesn’t it sound cool?
So think about creating advanced animations, layout compositions and image rendering. Everything in the blink of an eye. Without performance overhead. Deep under the hood of a web browser where the real magic happens.
I’m sure I’ve already caught your attention. Those new APIs will give you access to the rendering process. You will be able to read information that is currently inaccessible, and extend those rendering phases with your custom code, add new functionalities to the browsers or fix the existing ones. In order to do that, you attach small programmes to the browser. They are called…
The Worklets
These are not workers you may know from push notifications. Worklets are small ES6 classes that you register in JS files, attached separately to the document. Each class needs to implement one of the new CSS Houdini interfaces. However, you will not use these classes in your application directly. The browser will take responsibility for that and it will instantiate objects from those classes when needed.
What’s interesting, from worklets methods you will have no access to the outside world – that means no window, no document objects, no application data, no high-level functions like an alert. Every worklet will run in a separate context under the hood of a browser, without access to any of the listed information.
The CSS Houdini designed them this way to make sure worklets behave like a native functionality. Fast and without footprint on the interface responsiveness.
The speed is very import because of another reason:
- Worklets run during the rendering process and some things, like animations, make them execute very often. Sometimes even 60 times per second.
Because of that we, as frontend developers, must think about making the logic inside worklets noticeably light.
It shouldn’t take too much time to execute your worklet because any time-heavy calculations will slow frames rendering. As you know for sure: with great power comes great responsibility.
But enough theory for now, let’s do some coding!
Paint API
This is first of the new CSS Houdini interfaces I want to talk about. It’s not only the easiest to understand but it’s also one of the most effective. Paint API will allow you to generate some extra graphics during the paint stage of rendering process and use them in CSS definitions.
We can use those rendered images in every CSS property that accepts images as one of their values, e.g. backgrounds and borders settings.
So here comes the first worklet ES6 class. In Paint API we call them Painters. They must have a method named paint which takes three arguments. See the example below:
Context, the first argument, is a canvas-like object on which you will draw your image. Geometry informs you about how much space there is to draw on it. Parameters are an object with extra data you can pass to the worklet.
At the end of this code snippet, you can see we used a special function to register our class as a painter. In the same function, we give our painter a short name which we will use later.
Do you remember when I said that you must define the worklet code in a separate file? Now let’s learn how you can attach them to the document. As you can see below it’s extremely easy.
When you have done that, you can use the new worklet in CSS to finally do some work. For example, let’s make the background of the menu more WOW:
As you see, to use this painter in CSS, you must choose a paint function and give it a name under which you have registered your worklet.
Looking for some real-life examples? There you go! Check this demo on CodeSandbox that makes a checkered background for a textarea.
However, there’s a catch: only fully visible fields are allowed. The browser needs to adjust the size of every pattern field, depending on the size of textarea, to avoid rectangles cut in half.
This is an effect impossible to achieve with plain CSS, but quite easy to make using Paint API.
See also: Hybrid mobile apps in 2018: React Native vs Xamarin
Open the example below and try to resize the text area by dragging the right bottom corner of it (on desktops). Please remember that this example will only work on the latest versions of Google Chrome and Firefox.
The textarea example was working on its own but what about more cooperativeness between a worklet and application? It is also possible. You only need to use CSS variables and pass them as parameters to your painter.
As you probably noticed, you have to explicitly define inside the inputProperties method which CSS variables will be available to your worklet. It’s required because of safety and performance.
The other thing – in the code snippet above we set the CSS variable in an external stylesheet. However, you can also do it dynamically by setting the style property of any element.
We will use this trick in the next example: a password input which calms down if your password becomes strong enough. Check it by yourself.
In a separate file, you measure how strong the user-defined password is and you set the value as a CSS variable. After every key pressed, a browser must re-render the whole input so it calls your worklet to get a new background image. Out worklet gets the current level of password strength and draws the background accordingly – that’s all!
So that’s Paint API. However, you may wonder if you can do some animations with it. We will cover this topic later. For now, let’s talk about a different type of animation.
Animation API
So, here’s a thing: currently browsers give us some tools to make native animations in CSS, like the transition property. The problem is that all those animations are time-based. When time passes, the animation progresses. We call the source of animation progress a timeline.
Nowadays, we often work with animations based on other timelines than time-based. For example, Twitter animates the position and size of a profile photo when the user scrolls their website. This is an animation with progress based on a scroll. Other types of timelines are also possible.
We can image an animation of progress bar based on the percentage of file upload. Unfortunately, we can’t make nice, smooth, native animations like that using only the built-in CSS tools.
Luckily for us here’s where CSS Houdini group comes to rescue with Animation API that will work during the composition stage of the rendering process. Below I will show how you can use it.
We will start creating your animation by defining the source of progress: your timeline. In this example, we will use ScrollTimeline – an available out of the box timeline which progress when users scroll some element.
In the constructor, you need to pass the object with two properties. First one is a reference to an element which scroll position you want to follow. The second parameter is the maximum value of this timeline which will be set if the scrollbar reaches its end.
That’s the source of progress. Now let’s define how the animation will work. This definition we use to call an effect.
To define an effect, you need to get a reference to the animated element, keyframes of your animation and information how long should the animation be. In the example above, you are animating an image by making it smaller to one of fourth. The animation will take 100 seconds (yes, we still count animation progress in seconds).
You have the timeline, you also have the effect. Now let’s make the last part: something which will set the effect progress based on the timeline changes. This is the animator, the worklet which will work under the hood of the browser.
So here we have a quite simple animator. It takes the time from the timeline and sets it to the effect after multiplication by some factor. However, you can make it a bit more complicated e.g. with easing functions.
As you now have all the required parts, you can finally make your animation! Combine the timeline, effect and animator in one native, browser-friendly, stuttering-less animation. Also, provide a required object with parameters. The browser will pass it to the animator constructor.
As you can see, you can make use of the animator right there with methods like play, pause or stop. I didn’t show how I attached the worklet to the document, but you can check it on your own in the real-life example below.
This is a fully-working reading progress bar which makes use of Animation API. In this case, we used the animator parameters and the worklet became a bit more interesting than before. Check the comment inside it for explanations.
Remember, that if this example doesn’t work for you, use the latest Chrome version and go to chrome://flags/ to enable Experimental Web Platform features. After re-launching the browser everything should be fine.
So, we’ve already discussed Paint API and Animation API. Worklets, however, aren’t the only innovation that CSS Houdini tries to bring to the table. There is a whole new interface connected with how browsers are interpreting CSS. It’s called Properties and Values API.
Properties and Values API
The classic CSS programming interface called the CSS Object Model… sucks. See for yourself, if you don’t believe me. Let’s start with setting the opacity of some elements by half. We will use the document body in this example.
Now let’s get that value back.
What do we get? A string “0.5”, even though we had set a floating-point number earlier. This happens because the old CSSOM, the style property in elements, is a black box which automatically casts every set value to a string. You can try this yourself. If you’re in Desktop Chrome, just type CMD/CTRL+ALT+I (like India) and put those two lines in the Console.
It gets even weirder when you try to increase the opacity by 0.3 with the += operator.
Oh well, that’s JavaScript for you. Fortunately, the CSS Houdini group is trying to stop this madness. They’re creating the Properties and Values API. It’s a bigger thing, an interface for changing how browser understands your CSS rules and how you can work with them.
Part of the Properties and Values API is a successor for CSSOM: the totally new CSS Typed Object Model (CSSTOM). It fixes a lot of problems like the one I showed you before. CSSTOM will be available in the attributeStyleMap property of any HTML element and it will deliver more intuitive setter and getter:
This command sets the elements top margin to 5 pixels. What will you get after using the getter for the same CSS property? Surprisingly not a number nor a string. An object of CSSUnitValue class which will have two properties: the numeric value and the unit.
The pros of setter in CSSTOM is that it tries to parse every passed value to the appropriate object. For complex values (like translations) CSSTOM offers some special value objects too.
If you want, you may pass a value object to the setter. CSSTOM gives you ready to use constructors for distinct types of values like seconds, pixels, and degrees.
Look at this line. Did you notice something? We are setting the width of the element to 5 seconds! It doesn’t make any sense, does it? Fortunately, this is CSSTOM and T for Typed is there for a reason. Every type of unit is like a different type of variable and the CSS properties can now recognize what types are good or bad. Because of that, the last command will end up in an error.
Browser will validate the values of known CSS properties against type correctness. But what with custom CSS variables like ––effect-color used in this article earlier? CSS Properties and Values API have already given us some tools to manage this. You can define the type for every custom variable like this:
You may ask, why do you need this, and that’s a good question. It’s connected with animations. If the browser recognizes the type of given property or variable, it can animate the change of it. It knows how to iterate over it. The value of opacity is a plain number, so the browser just increments or decrements it.
For sizes, browser iterates over the number and concatenates it with the unit like px or em. Colours are trickier because the browser must iterate every component of it separately, e.g. R, G and B.
Now when you know how to make custom variables animated, you can combine it with Paint API and create very cool background animations. Check this demonstration below.
In this example, inside CSS file you set the variable ––rainbow-progress to 0 for a normal button and 100 for a hovered one. You also set the transition time for this variable and define it to be a number. The browser knows now how to transition it between two states which manifests itself as an explosion of colours after moving the mouse on the button.
That’s CSS Properties and Values API in short. We only scratched the surface of the topic because this augmentation is much wider, e.g. CSS TOM will have many tools to improve mathematical operations on CSS values.
Other things
We discussed some of the new tools that CSS Houdini project wants to bring to the frontend development world. However, there is still much more work in progress or in early development. Now let’s quickly go through them.
- Remember when we talked about the masonry layout? We said it is impossible to create this layout natively in browsers nowadays.
That is the reason CSS Houdini is working on a possibility to extend the layout stage of the rendering process by creating the… Layout API. Thanks to it, we will be able to arbitrary position elements on the website in a more browser-friendly fashion without using CSS position property.
The browser will pass a list of elements and information about the container to our worklet.
Our job will be to calculate their position. You can also decide to not render some of the elements. You may even implement your version of the flexbox or grid layout. To make it happen – except the worklet – you will only need one line in CSS:
CSS Houdini also wants to deal with one of the most magical things in frontend development: text rendering. This is a black box that you can’t control in any way. You can set some CSS properties connected to it, but there is no programmatic way to “see” how out text is visible on the website.
This is where the Font Metrics API will come in handy. It will not only give us access to some interesting font metrics (e.g. baseline position) but also will allow checking how browser rendered the text, which font the browser used and how it wrapped long lines. Unfortunately, this API is still in the early stage of development with nothing to demonstrate yet.
The same goes for Scroll API. Do you sometimes dream about having more control over how scrolls work? To control how much the website scrolls after one swipe on a mobile device? It will be possible when this API will be ready. You may then forget about libraries implementing custom scrolling, as you will be able to set up everything in a few lines of CSS.
The last thing worth noting is the Parser API which will allow you to extend the browser parsing mechanisms. Custom CSS properties and custom units – they will allow us to create better CSS polyfills that don’t need to parse stylesheets by its own.
The list is still not complete. The CSS Houdini project is huge and requires a lot of effort. There are few other interfaces drafts that will allow extending browser capabilities even more. Most of those things, however, are only part of.
The bright future of frontend?
In this article, I’ve presented a lot of cool features. Can you use them in your applications now? The short answer is… no. Check this table from ishoudinireadyyet.com.
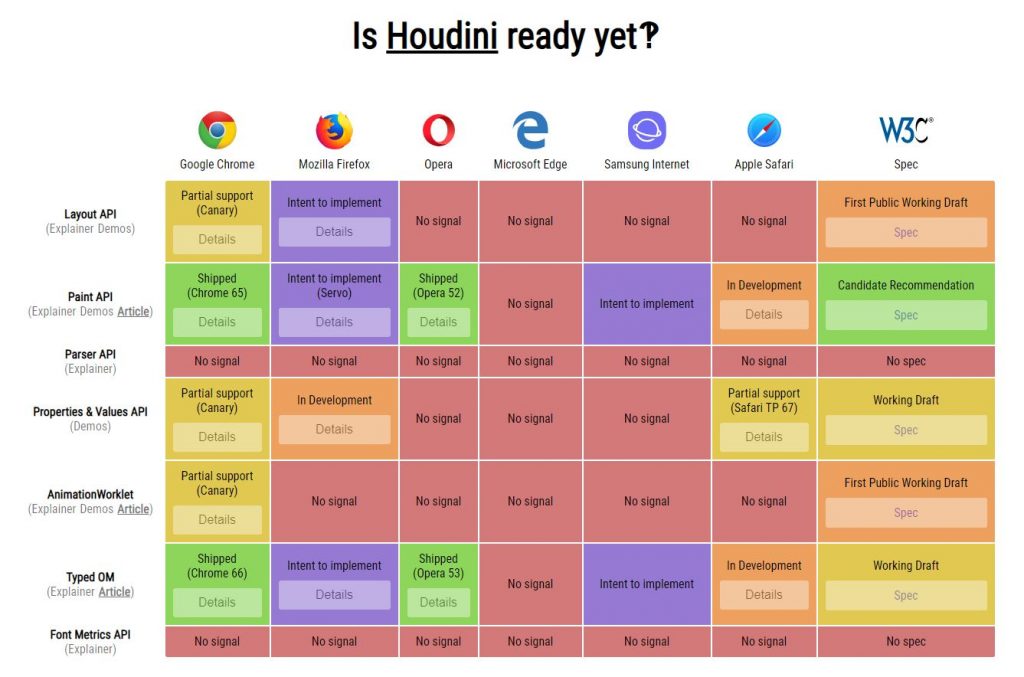
Open source enthusiasts slowly implement all the features into Google Chrome. Firefox also will be implementing them later on. Microsoft Edge column is red but it’s basically a dead browser now, so nobody is surprised.
Will browsers adopt CSS Houdini widely? Nobody knows. But if they do, it will change the frontend development image forever. It will be the biggest change since HTML 5 and CSS 3. I
t may even change the way we build websites on HTML templates. Do you want a fancy layout?
Good, there is a worklet for that! Just download it and add one line to CSS. Having to add too many worklet files to the application? No problem, in a few years there might be some Webpack plugins to help you with that. Who knows?
I hope it won’t be just another cool feature in Chrome and Firefox that people will soon forget but rather a positive impulse for the future of frontend. Keep your fingers crossed!

