05 February 2019
Step-by-step guide: creating an npm package for Node.js and Frontend developers

A modern developer has free access to various tools, programming libraries and many ready-to-use, usually battle-proven open source solutions. They are fast and easy to use thanks to package managers, eg. npm (Node.js Package Manager) and its packages that are published and maintained by various authors. If, like me, you’ve wondered what it takes to publish such package, read on. In this article, I’ll show you step by step how to create a npm package and publish it for other Node.js and Frontend developers to use.
Step 1: To publish or not to publish
Let’s assume that you have a bunch of successful projects based on the same boilerplate under your belt (like redux middlewares used for connecting with API, auth or token refresh). Because you are ambitious and simple copy/paste wouldn’t ever satisfy you, you improve these common elements each time you start a new project. At some point, you realise that thanks to gained experience you managed to create a performant and reliable solution to a given problem. What are you going to do with it? Have you ever considered it’s worth sharing with others?
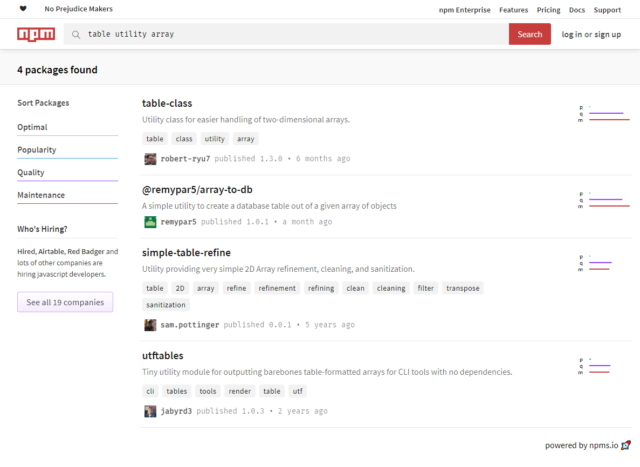
Everybody has the right to publish a npm package for free but it’s a good idea to think first if it’s worth it. Based on modulecounts.com, the primary registry of npm contains more than 700 thousand modules. You can think of npm size both as an advantage and disadvantage: advantage because whatever you may need is probably already published by someone, and a disadvantage because you may have a problem finding it in this haystack.
Additionally, if you manage to find multiple suitable packages, you may have a problem choosing the right one.
Unfortunately, it’s pretty common to find that many modules implement the same functionality but only a handful do it well and therefore are worth using. As a potential package author you should ask yourself these questions:
- Is my solution good enough to help other developers?
- Is there already a package that does exactly the same thing? If there is, then maybe it’s better to help its authors rather than compete against them?
- If there are similar packages, does mine offer anything that makes it stand out from the rest?
- Will I be willing and have time to maintain my package if it becomes popular?
I think that the latter requires some additional comments. Let’s assume that the first version of your module is frequently used by others but after a few updates, you stop maintaining it. It may be difficult for other Frontend, Node.js developers and others who were hoping for further module development – they will be forced to quickly look for an alternative and migrate to it because their client demands certain features not available in the latest release of your solution.
Of course, that doesn’t mean we need to maintain our package and keep adding new features ourselves – other programmers can create pull requests. All we need is a technical writer to keep track of the changes and someone to accept them.
📚 The State of Frontend 2022 is out and ready for you!
Built on surveys by 3700 frontend developers from 125 countries, enriched with 19 expert commentaries, divided into 13 topical sections. State of Frontend is the most up-to-date information source.
Check where do you (and your organization) fit within the modern frontend landscape.
One more consideration: module maintained in a careless and/or irresponsible fashion may also be a source of further complications. If you introduce to the code some “breaking changes” that are incompatible with the previous version and do not notify users about it by updating the version number or by an entry in the changelog, you will make other developers quite unhappy.
It might be quite problematic and they will struggle to find a cause for an unexpected bug in their application which was working fine until now.
See also: Swoole – what is it, functions and what are the problems with it 👇
Step 2: package.json
As with any modern JavaScript project, the first step is to initialize a new module by executing npm init (or yarn init if you are using this alternate manager). After that, the tool will ask you a few questions providing sensible defaults so if you want you can just hit enter a few times and be done with it or use -y option to automatically skip all questions.
What does an initialization do? It creates a file called package.json that contains a seed of our project.
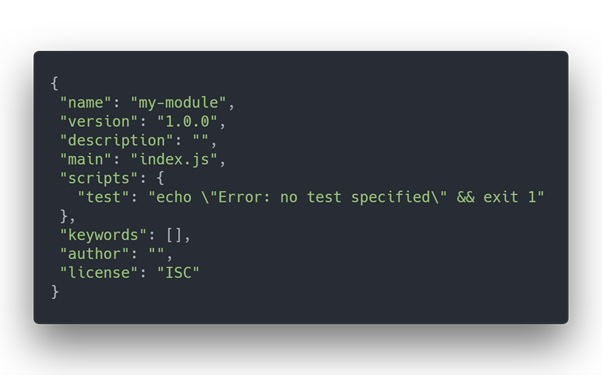
package.json can serve many different purposes (I’ll talk more about them later) but first and foremost it is a manifest, source of basic information about a module and its configuration.
Based on official instructions, to publish a package you are only required to provide the name of the package (name) and it’s version number compliant with semantic versioning (version). In my opinion, this is definitely not enough and fields like description, license and keywords should also be considered mandatory. This way it could be easier for everyone to find the package and be informed about its terms of use.
It would also be a good idea to provide author’s information which helps in contacting you for whatever reason. Additionally, if you wanted to encourage other developers to help you with further project development, you should add repository and homepage information too.
Other important configuration options of the npm publishing process:
- main – defines a module’s entry point. Importing a module without specifying an exact file (like this: const myModule = require(‘my-module’)) will import a file path given under the main key (so, for default config, import statement without a path will be treated as const myModule = require(‘my-module/index.js’)).
- scripts – it enables developers to automate certain tasks, for example building the project before publication by using the prepublish key. You can also specify custom scripts under custom keys which are helpful during project development.
- dependencies, devDependencies, sometimes peerDependencies and very rarely optionalDependencies – they all specify module dependencies.
Types of dependencies
Based on the aforementioned information, you can see that there are different types of dependencies. It is important to understand the differences between them and to use the proper type based on each case:
- dependencies – these are required for the module to work and are installed automatically by npm tool during module installation.
- devDependencies – useful only during module development. These type of dependencies are used mostly for tools used for transpilation, static type checking, unit testing, linters, code beautifiers and more. These dependencies are not installed along with the module.
- peerDependencies – peer dependencies are similar to plain dependencies since they are also required to run the module. Firstly, the difference is that they are not installed automatically so the application developer needs to add them manually along with our module. Secondly, it enforces the usage of a single instance for this dependency, which in some cases is mandatory for the application to work properly.
- optionalDependencies – these dependencies, as the name suggests, are not required to run the module but can improve it in some ways. These are installed automatically along with the module if it’s possible. Using optional dependencies makes sense if we are using a platform specific (Linux, Windows, MacOS etc.) functionality and we properly handled cases within code when it isn’t available.
To sum up, by assigning proper types to dependencies we can optimize module installation time by excluding dependencies used only during project development. Sometimes it is also necessary to fix runtime issues.
When necessary, you can add other configuration and metadata fields into package.json concerning both the module itself and the way it is handled by npm. Once more, for more information check out the official documentation.
Because package.json file enables you to define custom keys not related to npm functionality, it can also be used as a configuration file for additional tools used during development. Commonly found keys in this category are:
- jest – contains jest framework configuration used for unit testing
- eslintConfig – configuration options for ESLint code quality control tool
- prettier – code style definition used by Prettier
- husky – defines additional tasks which are automatically executed by husky during work with the code repository.
What about other important files?
Step 3: Other important files
Every respectable open source project should have some form of documentation, the npm package is no exception. Npm endorses this by sharing a popular convention adopted by GitHub that treats the content of README.md file as a detailed project/package description, which is really nice since there is no additional work required if you already created README.md for the needs of our code repository.
There is also the special meaning behind .gitignore and .npmignore files. The first one is directly related to git version control system and determines files which should be ignored by it but also can be used by npm. The second file is similar to the first but it concerns only npm.
Both of those files determine what will be the part of the package when it gets to the npm repository. If you don’t create a .npmignore file but there is a .gitignore file, then git ignore rules will be used. If however, you want separate rules for git and npm, you should create both files.
In this situation, git rules will be ignored which means that creating an empty .npmignore file will remove all exclusion rules and all project files will be included (with the exception of node_modules directory which is always excluded). Use of those files isn’t required but can improve package size by, for example, skipping unused source files.
Because there are some difficulties with removing already published packages, npm tool gives you the opportunity to create a test package by using npm pack command. This command creates an archive containing all soon-to-be-published project files so you can see what exactly will get uploaded into the repository.
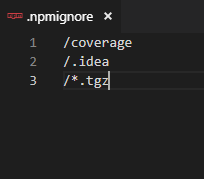
For the purpose of further testing, you can also install such archived package without the need of actual publishing, simply by providing the path to it in place of the usual package name: npm install ../my-module/my-module-1.3.0.tgz.
As a side note, I would like to describe a particular case I had encountered in the past: while preparing for package deployment I generated a test archive but I forgot to remove it before real publishing (npm publish). It caused the final package to contain an archive with the previous version of the project (ouch!). Since then, I’m adding a proper rule to .npmignore.
Step 4: Deployment and maintenance
To publish npm package, it is required to have an npm account and be logged in, after that the rest of the process is equally trivial (if not more) as preparing the package, all you need is one command: npm publish.
It is the usual way to publish. If the directory where this command was executed contains a valid package.json file, project files will be prepared (prepublish) and filtered (.gitignore, .npmignore). After that, an archive will be created and uploaded to the main npm package repository. From this point onward, the package is publicly available for everyone to install, although it may take some time for it to appear in npm search results.
It is important to remember to remove all sensitive data (like passwords or API keys) before publishing! You can obviously temporarily remove or move such files outside the project but exclusion rules inside .gitignore/.npmignore are better suited for this kind of a scenario. Just make sure they are working correctly by creating a test npm package.
Beyond the usual public packages, it is also possible to create private npm packages which, as the name suggests, are unavailable for other users. Unfortunately, this option isn’t free of charge.
To publish a private package you need to use a scope which is a unique prefix (user name) added to the package name. Scope by itself is optional and free to use by everyone, it is only mandatory for private packages. Also, if you change your mind, private packages can be made public later on.
By using –tag option it is possible to publish alternate versions of the packages. By default, every published version is tagged as the latest (this version will be used during module installation if no specific version number or tag is given) but any custom tag can be given (for example beta). This enables users to easily refer to a specific package version like this: npm install my-module@beta.
Options for business
Although in this article I try to describe npm from the perspective of small/medium open source projects, I would also like to mention some options available for enterprises. Npm tool allows not only to publish private packages but also to use private repositories.
Private repository guarantees that packages are only accessible by authorised users and, if you are using your own hosting solution, it makes it independent form npm infrastructure.
Another business benefit is the possibility to integrate with continuous delivery solutions as can be seen with one of our customers here at The Software House. In short, the client’s application is separated into many smaller SPA apps which are deployed as npm modules into a private repository using Bitbucket Pipelines. During the work on the main application, this enabled us to independently control each of its modules.
Finally, a few words about maintenance
Because npm requires a new version number each time the next version of an npm package is published, it is important to remember about proper versioning. In this article I’ve already mentioned semantic versioning – it is a simple convention which is not only required but also supported by npm tool.
Although it might be preferred to manually increase it, the command npm version major/minor/patch will automatically increase the version number in package.json file based on the given type of code changes. Additionally, if git is used, a proper commit will be created which can even have a custom message attached: npm version patch -m “Upgrade to %s for reasons”.
Even if npm doesn’t require the use of version control systems like git and pushing code to remote repositories like GitHub or Bitbucket, using them is highly recommended. It opens up our source code to further development with the help of contributors. Even if your project is developed and maintained just by yourselves, keeping it in a remote repository gives you the feeling of safety and ease of access.
Interested in developing microservices? 🤔
Make sure to check out our State of Microservices 2020 report – based on opinions of 650+ microservice experts!

