08 June 2021
How I solved nested view switching in Next.js


If you haven’t started working as a dev yesterday, you most likely already experienced a seemingly simple task that grows into a complex one with additional details. That’s exactly what happened when I embarked on developing a notification system for a Next.js app. This seemingly trivial task eventually forced me to create a custom solution for rendering views in Next from each place in the app that I would like to share with you today. Here’s my journey.
During a recent project, I got the job of developing a notification system for an app written in Next.js. Simple, right? Wait till you hear the rest…
The challenge
To properly understand the assignment, I need to provide a little background. First, all of the examples and related drawings refer to the mobile view of the app only.
A good place to start is an analysis of application components to get the picture of the dependencies within the app. Eventually, I determined that everything came down to a single base component (let’s call it Base) consisting of a top bar (TopBar) and the remaining space, which included the content of the application (list of pages).
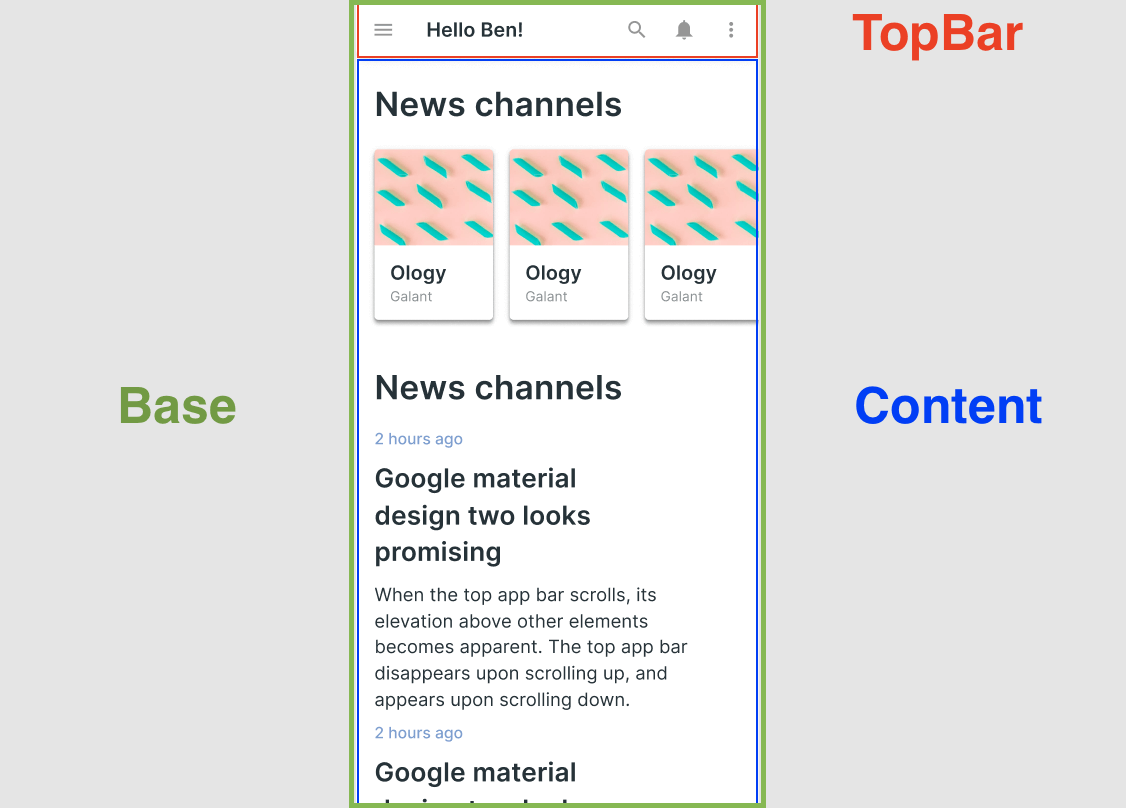
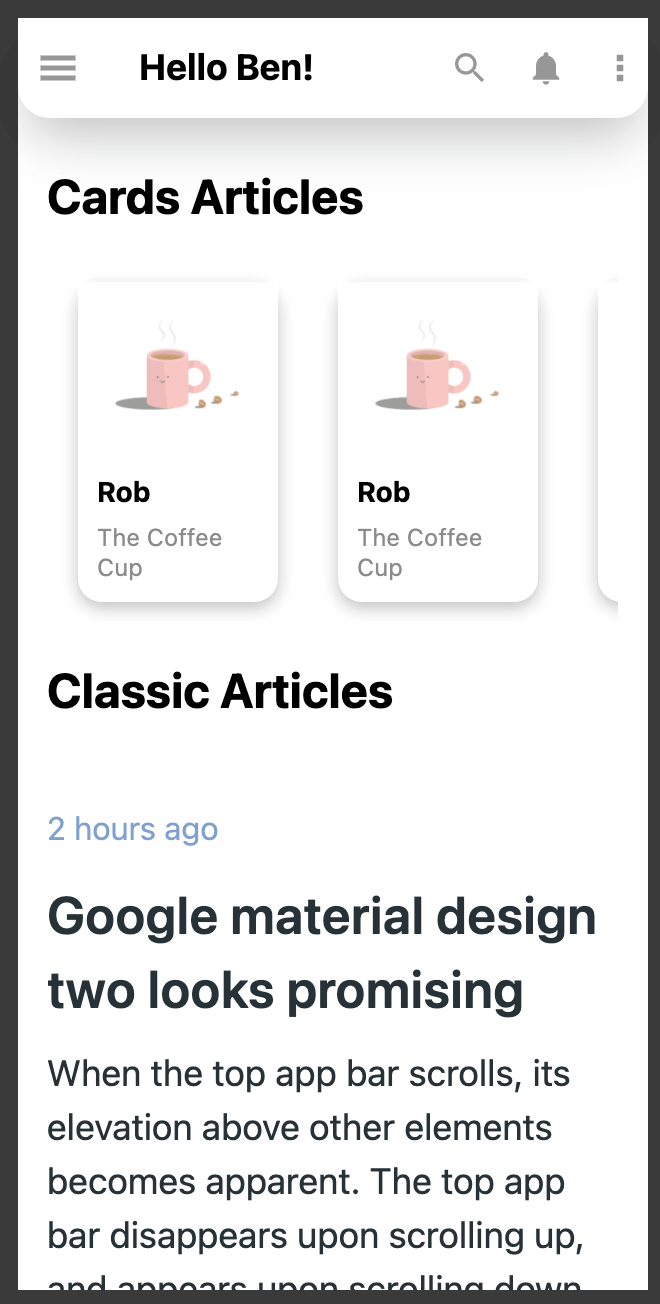
The Base component was filled with some content depending on the URL and featured a bottom bar (called Footer from now on). For example, the /articles URL would populate it with a list of articles, while the / URL would yield the homepage.
Articles:
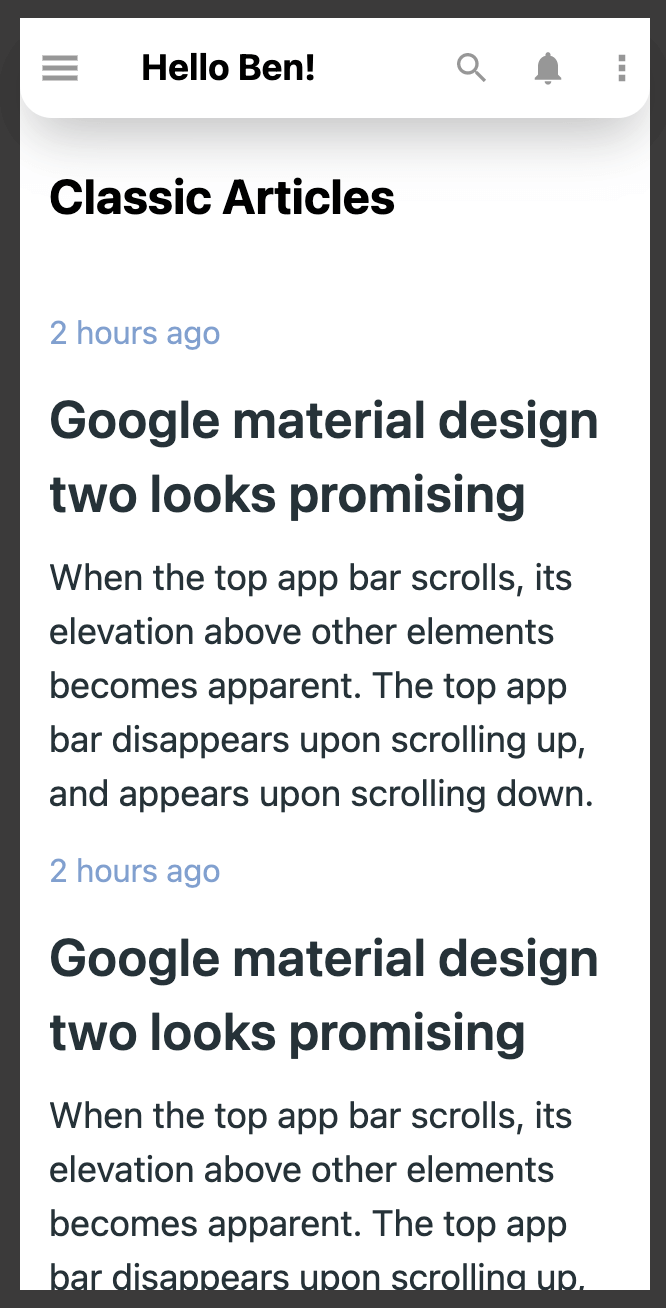
Home:
Now, onto the main task – I needed to add the notification icon in the TopBar component. When the user clicks on it, the entire view should switch to the notification view.
Home:
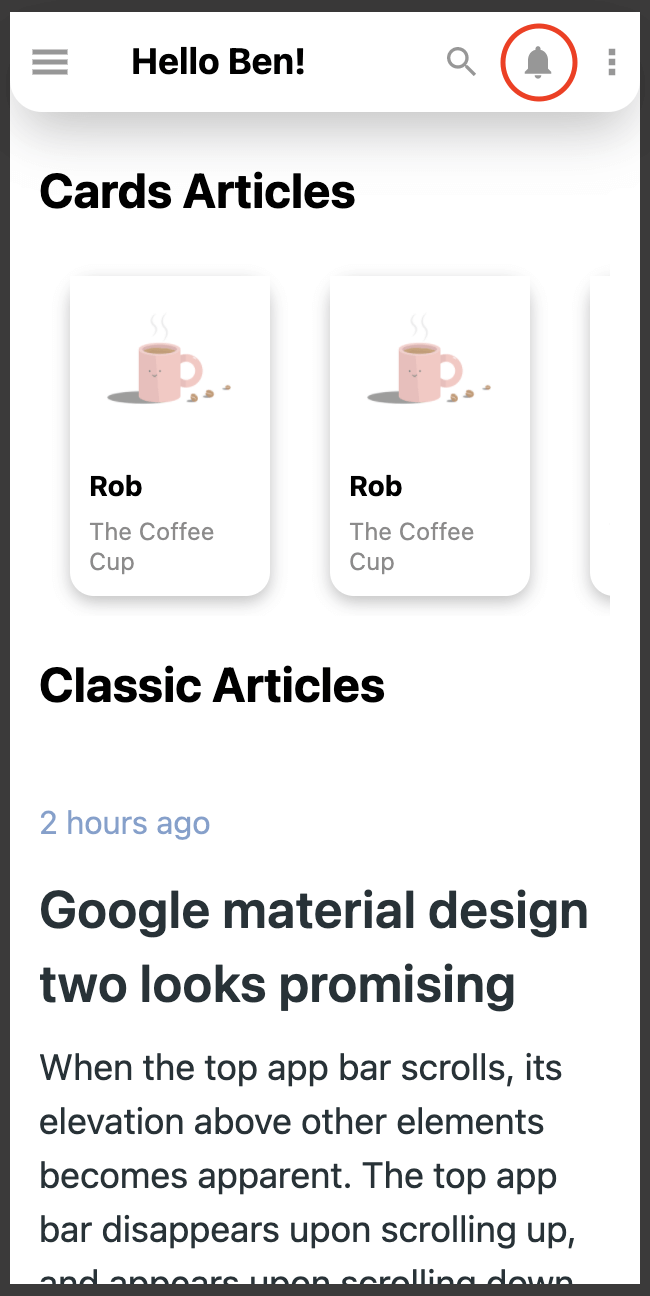
Notifications:

In an ideal world, it should be a very easy task. I should simply pass the state into the application to perform a conditional rendering of the element. But this time, things got complicated really quickly.
The TopBar is not just there to make the application pretty. It has its own roles, which can change depending on the current view of the app. That’s why it takes in other components with various jobs to perform. Their complexity means that they also have other components nested in them. This complex sequence of component dependencies makes the task at hand far more difficult. Why?
Passing the state further than 3 or 4 levels deep into the app usually ends up causing various minor bugs, impacting overall software quality. What’s more, any good solution should be flexible and reusable, because it will most likely not be the only case when the current view needs to be replaced with a different component.
Need a more general introduction to Next.js – here is a quick Next.js guide for you.
Possible solutions for Node.js dynamic content
1. Displaying content over the element
| Pros | Cons |
| Simplicity | Requires taking into consideration changes in the height of the top bar |
| May cause problems with the z-index property, which will in turn cause elements to overlap each other |
One of the simplest solutions to this challenge. However, in practice, we’re only going to overlap the content rather than replace it.
2. The portal
| Pros | Cons |
| Sounds solution for rendering elements over other elements | Required rendering outside of the main root of the virtual tree |
| Overlays elements rather than actually replaces them | |
| Next.js doesn’t support portals by default because of SSR (can be achieved with Next.js extensions or custom implementation) |
Similar to displaying a component with the position: absolute property. An interesting solution, but not viable this time due to the way it works. The portals have to be rendered outside of the main root of the React virtual DOM. In the case of Next.js, it also requires additional logic that could make it work properly.
3. Remaking all views
| Pros | Cons |
| Consistency | Very time-consuming |
| Code clarity | May cause a variety of new bugs |
| As the app continues to grow, new problems of similar nature may arise, resulting in returning to square one concerning the problem at hand |
One may consider simply remaking all the views. When presented with new requirements from the client that never we as developers nor the business stakeholders anticipated, it may be a sound idea. From the standpoint of code clarity, it’s possible the best solution. However, its time-consuming nature makes it unacceptable. Investing that much time for such a minor task is out of the question.
4. Dynamic view switching
| Pros | Cons |
| Highly dynamic | High cost of rebuilding the virtual DOM tree |
| High customizability of the solution | |
| View management from each place and component |
This solution requires me to take a step back. What does it even mean in this context? Let’s say that we have a complex component structure such as this one:
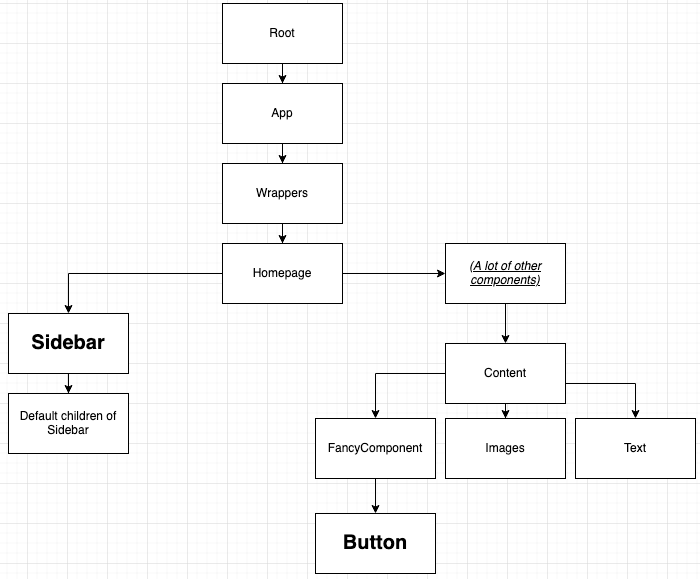
I want to now make it so that when the user clicks the Button, the default component generated in the Sidebar is replaced with another component.
Simple, isn’t it? All it takes is to create a simple If statement and pass a callback to the parent of each child. Once you edit about 30 files (it’s a big project, after all!) just to deliver and pass a new prop, it’s all done. It sure was messy, but it worked at last. Unfortunately, this daunting task was just the tip of the iceberg.
What if there were more components such as this? For the sake of the argument, let’s make it 3. Naturally, each and every one of them has to switch the view with a new element. Still quite feasible. I could add a simple state management machine (for code quality’s sake), edit 60 files and it’s done! However, it seems that at this point the one that will have the misfortune to read our code may be quickly in need of some sedatives. Still, it’s another success! But is it really?
What if I didn’t know what view I wanted to render? What if the views were not defined yet by the client? Further actions of this kind could quickly cause half of your team to go on an extended vacation.
This is not the kind of solution I need. I’m looking for something that is more dynamic and reusable. Something that can render practically any component and cause the DOM tree to be rebuilt accordingly with just about any component as a starting point. A solution like this should spare me the trouble of nesting or passing the state or its setter.
Even more solutions?
There are definitely more possible solutions to this problem. However, my goal here is not to analyze them all. Rather, I would like to focus on one that I find the most optimal.
My Next.js dynamic content solution
As you probably expect at this point, I ended up developing my own alternative solution. One that will allow me to switch views dynamically. Its potential reusability in other future projects motivated me to dedicate more time and effort to it.
The implementation
I’m going to need a couple of elements:
- A context in which I can store the state of the application.
- A simple API to execute the registration and switching of views.
- A constant for improved management of the rendered views.
The context
I’m going to use TypeScript, and React ver.17 with its Context mechanism. It’s my source of truth. It’s going to include all the information about the current state of all registered contexts, options for configuring various functionalities and the callback for rendering a given component. Since you probably know Redux and React’s Context well enough, I’m not going to go over its entire implementation. Let’s focus on the reducer alone.
Note that pretty much each of the elements checks if the provided data is sufficient for performing a given task. It’s a form of early debugging. And bugs are quite difficult to find and amend with logic so abstract. With an approach like this, I can display all the necessary information in the console and remove any issue more quickly.
SET_VIEW
With this action of the reducer, I can register a given component. It involves adding or overriding an object in a state it is held inside the context under a given ID key. Each registered view will be easy to find (e.g. with ReactDevTools) and check for the current state. All I need to have is its ID.
Make sure that the isVisible field is set to false. This reducer should only (as the name suggests) register a component rather than cause it to be displayed.
TOGGLE, SHOW, HIDE VIEW
These functions are easy enough as well. All they do is change the state of a displayed view. It’s worth it to mention the errors that prevent any further bugs. It’s a good idea here to adopt a defensive style for writing this code.
API
Let’s start from the hook, which gives me the ability to register and command components.
As you can see, it delivers quite a few key functions. Let’s focus especially on registerComponent. It saves the component to be rendered at a later time in a previously created state. The component itself has to be a function which, when called, returns a component to be rendered. The other component is responsible for information on the location from which the component is registered.
There are also the toggleView, showView, hideView functions. I can use them to manage the state of my context. With them, I can switch content in a given place. I also have the selectedViewState function. It is the state of a given view. It has all the information on a given registered view.
Let’s now take a closer look at the element that I use to replace views:
This component uses the given ID and state passed in a context with the useViewSwitcher hook in order to render default values or a registered component. It all comes down to a simple if statement.
The constants
As you can see, there are two constants: RegisteredBy and RegisterViewID. They make it easier to manage the registered views. Note that each of these enums is given a specific value. Why is that? First, to avoid a situation in which during the registration of a component in the reducer, the first value with 0 indexes can never be properly registered. Secondly, when debugging, a console log that explicitly mentions a TopBar component is clearer than one that talks about a component zero, one or two etc.
Let’s start with RegisteredBy. These values will manage the places from which I’m going to register the views. It provides a couple of benefits:
- When presented with a bug, I can find it much quicker.
- There is a risk that their components meant to replace the very same element are registered from two different locations. With that solution, I can verify if the correct one is registered.
- It helps maintain order in the structure of the app.
- It makes it easier to search for the locations from which the views are registered.
The other constant, RegisterViewID, helps determine the locations in which the switching actually takes place. The benefits?
- Makes for easier debugging as I can find the location of the bug more quickly.
- It makes it easier to keep the app structure in order.
- It also makes it easier to find the locations in which the views are rendered.
The usage
Let’s take a look at a practical example of how to use this solution:
Objective registration (the code: Base.tsx)
Registering and displaying a component (the code: TopBar.tsx)
Hiding a component (the code: Notifications.tsx)
Any cons? Solution analysis
- Rendering the entire tree may cause repeated data retrieval or other side effects (can be avoided by hiding an element with CSS rather than unmounting it).
- This solution is quite costly. It’s vital to analyze if the number of components at hand is not too big.
- Using the solution too often is definitely not a good idea! Overusing it can compromise the app structure.
- Other pros I haven’t originally paid attention to, but it can sure save one some trouble to understand it:
It’s about various styles generated by JavaScript, such as jss, material-ui components etc. When one registers a component, it’s vital to remember to pass actual components rather than just rendering functions that take values through currying. Why? It’s all about the React component lifecycle. On multiple occasions, when one registers a component in viewSwitcher and switches the view, it turns out that the component executed and rendered from the switcher no longer has access to values deleted and collected by the garbage collection.
That’s why this is the right way to go:
And this I’d recommend avoiding:
Summary & Thanks
Congratulations! You have successfully made it through the entire analysis of this admittedly quite complex solution. I think that now not only will you be able to implement it, but also deal with similar issues by perfecting it. If you want to do that, I have yet one more farewell gift – the code of the entire solution in one place!
I hope that you found it all interesting and useful. In this place, I also feel it’s appropriate to thank Michał Szuścik and other mentors of mine that helped me create this solution.
Did you know that Head of Next.js at Vercel Tim Neutkens shared some really great insights for us in the State of Frontend 2020 report?
Download it for free now and see for yourself!

