21 July 2020
Let’s make a REST API with Deno! A closer look at Node’s alternative


Deno has undoubtedly been quite a hot topic in the JavaScript and Node communities in the past few months. Safe environment, no Node modules, built-in support for TypeScript – these are only some of the benefits of this runtime. But is it ready to be used in the development of REST APIs? Perhaps, writing a simple Deno-based app will help answer that question.
I’m going to use Deno to write a simple app for user management. The app will include features such as logging in, registrations, and token generation with native Deno libraries. If you are unfamiliar with what Deno is, start by reading this Deno tutorial article.
If you’re good to go, let’s get started!
HTTP server for Deno application
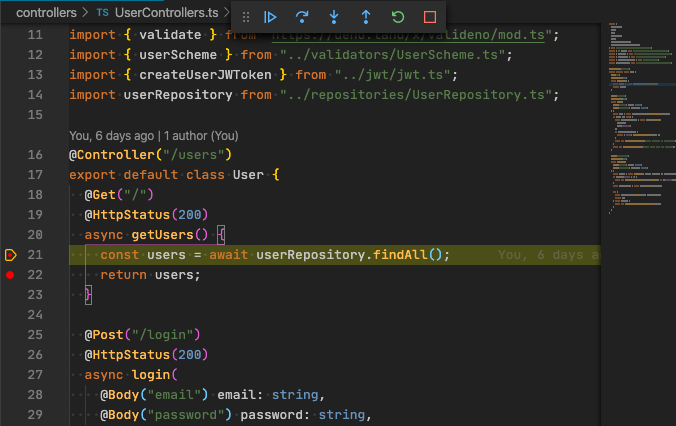
I’m going to use the Oak middleware as my HTTP server, but to give it a more modern feel, I’m also going to take advantage of the Oak-based Dactyl framework. I need to create my first controller. It’s called UserController.ts and it’s located in the controllers directory. It returns a list of users.
I used the decorators made available in Dactyl:
@Controller(“/users”) – routing prefix is set in the argument
@Get(“/”) – with this, I configured routing for the method
Now I need to import the controller, add it to the application generated by Dactyl and set port 8000.
I’m almost ready to launch the REST API. All that’s left for me is to add a file with TypeScript configuration since I’m using experimental decorators.
This is what the tsconfig.json file looks like:
To launch the application, I’m using the command:
deno run –allow-net -c tsconfig.json index.ts
If you follow my directions, you should now see this:
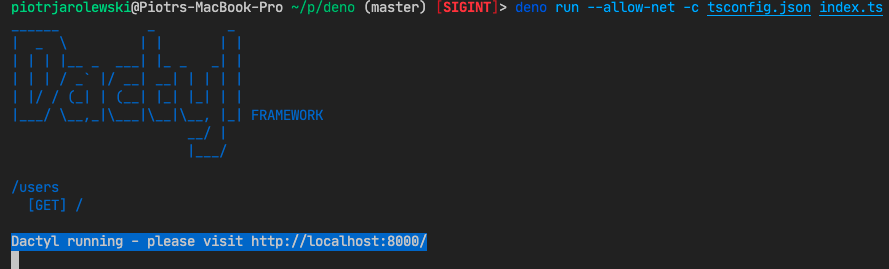
A little explanation about the flags I used here. By default, Deno doesn’t provide access to the network, files etc. for security reasons. In order to be able to launch our app on port 8000, I have to explicitly enable it, using the –allow-net flag and then supply the path to my TypeScript configuration (along with the decorators) with -c tsconfig.json.
I can now get the list of users:
curl http://localhost:8000/users/
The response should be:
[
{
“email”: “[email protected]”
}
]
It works!
Database for my Deno application
I have just created my first controller with a list of users. But the users are now a static piece of data within the code. It would be a good idea to use some kind of database. I’m going to create a new one in PostgreSQL and call it denoapp. The user and password will be simply deno. Now I need to create a new table called users.
To log in the users, I’m going to take advantage of email addresses. I can store the data in the database in environment variables or files. A good idea here is to use the dotenv package (well known to anyone that uses Node.js).
I’m adding the .env file, which includes:
I can now get the configuration from the .env file. I’m also going to add the config.ts file, which I can easily import later on:
By default, the dotenv package returns all variables as strings. The database port should be stored as a number. So I’m going to import it separately and part it.
The database needs a client. I’m going to make a change to the repositories/pg.ts file:
I’m getting the configuration from the config.ts file and connecting to the database.
And here is the client! Now, I can use it to return a list of users from the database. I’m going to add the UserRepository.ts file.
I can now modify the controller method:
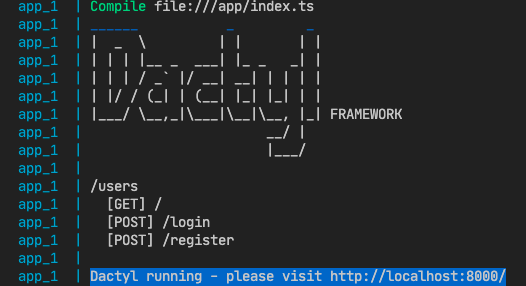
I’m going to launch the application, but I also need to add another flag: –allow-read=./ so the app can read the files (.env).
deno run --allow-net --allow-read./ -c tsconfig.json index.ts
Users need to be able to register. Before I add the feature, I need to check out what kind of data will be sent in the process. The valideno library is a good tool for the job. I’m going to add the valididators/UserScheme.ts file, which contains:
Next, I’m going to add a new method to UserRepository.ts. It adds a new user to the database:
I also need a new method for the controller:
This calls for a little explanation. When a new user is registered, the only data I get is the email address and password in JSON. Next, I need to validate the data. If it isn’t, a list of errors is returned. If it is, the password hash is generated with the bcrypt library. The user is then added to the database.
There is still something missing – a method to check if the user is in the database already. I should add it to the validator.
I need a new method in the UserRepository file. It’s going to return a given user. I can also use it later on for the logging in feature:
I can now add a new validator with the newly created method included:
I’m adding it to the email address validation method:
email: [isEmail(), isRequired(), emailExists()],
Voilà! Now, when a new user attempts to register but their email address is already in the database, a message that provides the information is returned.
Logging in to the application
It’s time I add the logging feature. The method to get a user from the database is already there. All that’s left for me is to write a new endpoint in the controller. Its job is to check the user and generate a JWT token for them.
In order to create tokens, I’m going to take advantage of the djwt library. I also need another key. I’m going to save it in the .env file.
JWT_KEY=secret
I’m going to modify the config.ts file:
Now that I have the key, I can generate tokens. I’m going to add the jwt/jwt.ts file:
For each new email address, I’m going to generate a new token, which is set to expire in an hour. I’m going now to use that function in my controller.
Here, I’m looking for a user with a specific email address. Once it is found, I’m checking if their password is correct and return the token. If the user is not found, I’m serving BadRequestException. It’s then picked up by Dactyl and returned as JSON.
I should also be able to manage the database structure. To that end, I’m going to use the Deno Nessie package.
I need to add a proper configuration for Nessie. It’s contained in the nessie.config.ts file:
I can now initiate a first migration with the purpose of creating users.
deno run –allow-net –allow-read./ –allow-write https://deno.land/x/nessie/cli.ts make create_users
I now have the 1592465715781-create_users.ts file in the directory. It provides two methods:
- up (migration),
- down (rollback).
In the migration method, I’m going to add the ability to create and remove user tables from the database.
I’m launching the migration with a command:
deno run –allow-net –allow-read./ –allow-write https://deno.land/x/nessie/cli.ts migrate
Migrated 1592465715781-create_users.ts
Migration complete
Adding Docker
The application is ready and the migration is working. It’s time for me to provide the app with the ability to launch regardless of the operating system it’s on. For that purpose, I’m going to use Docker.
Deno hasn’t got an official Docker image, but the community has prepared one. I’m going to Dockerfile (docker/Dockefile).
I’m also going to use docker-compose so that my database can be launched in Docker as well (the docker-compose.yml file).
Now, I’m going to build an image with:
docker-compose build
I’m launching the database migration process:
docker-compose run app run –allow-net –allow-read./ –allow-write https://deno.land/x/nessie/cli.ts migrate
With that, I can launch the app in Docker:
docker-compose up
Much like Node, Deno provides a built-in debugger (it works with GoogleChrome’s DevTools and supports V8 inspector protocol). Therefore, I can easily launch it in VisualStudio Code. An example configuration – launch.json:
Deno REST API – summary
Coming from Node and using TypeScript on a daily basis, It was easy for me to get started with Deno. The technology still has a way to go before it can be a proper competitor for Node, but it does seem to be going in the right direction. However, let’s not forget that Node is also still getting better and better. There are definitely interesting times ahead for Node developers.
The biggest advantages of Deno include:
- great development time – no need to install any dependencies. Just import a package and use it,
- full support for TypeScript from the get-go,
- default file format mechanism (deno fmt) from the Go language,
- blocking access to resources and network by default.
Major disadvantages of Deno:
- comparably long import paths for packages. In Node, the name is all you need. Deno requires the entire path, including https://deno… (One can use the import_map.json file, which shortens the imports, but it does require adding one more flag at launch),
- when you use the “Go to definition” option in VSCode, there is no way to find out the location of the current file. Only the file hash can be seen:
![]()
- no syntax suggestions in the editor for packages, which are not imported and cached by Deno. It forces the user to launch the application that has the import before they can really start working with it.
You can download the whole application from Github.
IDE support for Deno
I’ve been using Visual Studio Code with the proper Deno plugin. The actual support is not consistent and it still needs to mature a bit before I can say that you can use it comfortably. Webstorm also provides support for Deno with a plugin.
The libraries used in the article:
Don't forget to check out our general Deno tutorial. It's a great way to start your journey with the latest Node.js alternative!

