14 June 2023
Boost the delivery speed of your serverless apps with ephemeral environments and GitHub Actions


Contents:
Has your serverless app gotten stuck with slow delivery times? Everybody drags, sometimes. Presenting ephemeral environments and GitHub Actions – the solution you’ve been searching for. In ephemeral environments, you test and deploy your code in isolated environments that are quickly created and destroyed. And by using GitHub Actions, you easily automate the deployment process, making it faster and more efficient. In this article, you will practically learn how to implement them to boost the delivery speed of your serverless apps.
What is an ephemeral environment and why do you need (more than) one?
An ephemeral environment is a temporary and disposable environment used to run and test software applications. The term “ephemeral” refers to the fact that these environments are created quickly, used for a short time, and then – poof – destroyed.
The main advantage of ephemeral environments is their isolation. A single environment is completely separated from the others, meaning any changes made to one environment won’t affect the others. This allows developers to test their code in a safe and controlled way without worrying about unintended side effects.
What is more, an ephemeral environment also allows for parallelizing the work. Your development team includes many specialists working on different features at the same time? Just spin up a brand new ephemeral environment for each feature and you are ready to go.
Concerned about the cost?
Usually creating multiple environments for an application quickly adds up and significantly slims down the wallet. Not the case with serverless apps! The fundamental concept of serverless is “pay for what you use” – which means invoking new resources doesn’t generate any cost at all. You only pay for the actual usage and since these environments are only used for testing purposes (and then disappear), the cost is marginal.
In the case of serverless, most of the reliable resources for building the application stack, are being created and destroyed quicker in comparison to, for example, a set of EC2 instances. This greatly reduces the time it takes you to deliver software to customers, as developers test and deploy their code more frequently.
How about a classic local development approach?
You’re probably thinking – “Hey, why don’t we just do standard local development? Instead of pushing every change to the cloud and testing it there, we could mock cloud services locally and test offline, right?”
Sounds great in theory, especially since there are services specializing in emulating the cloud, like Localstack, for instance. I don’t expect you to trust some internet tech guy, so let me convince you with the power of arguments. 😉
Loss of predictability
For me, one of the greatest benefits of the cloud is its predictability as long as you use it at every stage of the development phase – `dev`, `staging`, `prod`, you name it. If something works on dev, it has to work on `prod` as well, since you use the same services provided by the cloud operator. No more “works on my machine, but not in production.”
I oversimplified a little bit. The behavior of cloud-managed services also depends on their configuration. Luckily, that’s something that you can also make identical at every stage of the development by using IaC (Infrastructure as Code) and CI/CD approach instead of manually creating the resources.
By using the local development approach, you automatically lose that massive benefit.
Getting out of sync with the cloud
Cloud providers, especially the big boys, AWS, Azure, and GCP, develop new stuff daily. Don’t believe me? Check out the AWS announcements feed. Just on 31st March 2023 alone, they somehow managed to make eleven new announcements! 🤯
With this roadrunner speed of changes, there is no way for any emulator currently on the market to be always up-to-date and in line with cloud providers. There are a few things worse than dealing with an outdated version of the service locally and realizing it only after deploying the changes to the cloud.
No 100% service coverage
Rapid cloud development means changes not only in the existing services but also in the constant flood of new creations. The same ol’ story – currently, there’s no single service available that could offer 100% service coverage. If you try out a brand new cloud service that just came out or a service that’s been there for some time already, but it’s not yet been emulated, you are at a dead end.
A real-life example from a fintech project
Recently, I had a chance to work in the fintech industry for a digital bank. Sorry for not mentioning the name specifically but we honor and respect NDAs with our partners.
The full case study of our cooperation with the digital bank
By creating an entirely new payment process based on reliable AWS services, we helped the bank grow its portfolio by 4% annually.
Anyway, the banking software product itself and the teams responsible for different domains started growing rapidly, and we entered a phase where we couldn’t effectively deliver new functionalities.
Initially, each developer created the new stack from scratch or used a shared `dev` environment. That quickly got out of hand and developers had two choices: waiting for ages in a virtual queue to test their work or spending even more time initializing the environments from scratch.
So the first idea was picking up Localstack (yup), and trying out the local development perspective. We didn’t have to wait long until we realized that the behavior of mocked services differ from the original ones. Even more problematic for the future was progressing development and growing complexity of our mocked stacks. We were spending most time trying to imitate the cloud instead of delivering value to the customers.
That wouldn’t do. After deliberation, we decided to try out ephemeral environments.

Our stacks mostly consisted of serverless resources, so setting up ephemeral environments for them went silky smooth. Having something over ten different services represented by separate CloudFormation stacks with dozens of Lambdas inside and other serverless services like DynamoDB, S3, etc., we barely saw any increase in our AWS billing. The majority of resources that we used across all ephemeral environments were covered by the AWS Free Tier plan. Also, developer experience and the delivery pace visibly increased since we no longer had to fight each other about who should deploy and test their stuff first.
How to deal with serverful resources?
One of the biggest concerns when dealing with ephemeral environments for serverless is how to approach the serverful ones. Why do we even care about serverful resources when we are building a serverless stack? Great question! Unfortunately, life is not black and white and sometimes you might still want to use serverful resources to accomplish your needs. For instance, you might want to use a classic RDS instead of Amazon Aurora Serverless as a relational database. Spinning a brand new RDS instance for each of your new environments is not the best idea. RDS is not only quite an expensive AWS service, but it also needs some time to boot in, meaning ephemeral environments take longer to create and delete.
How to approach serverful resources then?
Well, I am not gonna lie that I invented it all by myself. Meet the amazing tech personality who specializes in AWS serverless – Yan Cui, a.k.a The Burning Monk, AWS Serverless Hero. I strongly recommend checking out his blog post about handling serverful resources, as I’m only going to briefly summarize his recommended approach.

If there is a way to reuse a serverful resource, do it.
Spawn an instance on your AWS account where you are going to deploy your ephemeral environments and make the serverless stack use it. If that’s an RDS instance, just create a separate database per each environment but across the same RDS instance. When deleting the stack, just drop the database to get rid of test data and free the storage.
Let’s create ephemeral environments with GitHub Actions together
Beginning and the project structure
We’re going to create a simple CI/CD solution using GitHub Actions. The idea is to create two pipelines:
- For creating/updating the environment once the pull request is created/updated by a new commit push.
- For removing the environment once the pull request is closed or merged.
Although the workflows are pretty straightforward, we’ll create two custom actions (called composite actions in Github Actions notation) to simplify and reuse the common steps used by workflows.
I will be using the SLS framework for deploying my stack and Node.js as a runtime.
The cloud provider of my choice will be AWS.
You can see the structure of our `.github` directory below.
The structure of .github directory
Custom GitHub actions
Let’s start by defining and quickly going through our two custom actions.
Setup node action
The purpose of the aforementioned one is to configure our Node.js runtime environment. In both workflows – for creating and destroying the ephemeral environments — we have to first set up Node.js to execute SLS commands.
The action takes `node_version` as the only input parameter. Thanks to it, we can reuse the action with different versions of Node.js.
The action itself is pretty simple, it’s worth mentioning caching though. To save some time (and time is money, of course) the action installs dependencies if and only if the `node_modules` directory is not cached or the content of `package-lock.json` has changed. In any other case, we simply omit the installation of dependencies and reuse the already existing ones on the GitHub Actions runner’s operating system (notice the `if` statement on the `Install dependencies` step).
Get stage name action
The latter action is to retrieve the stage name that will be used as part of our CloudFormation stack. This will be an identifier of our ephemeral environment.
In my case, I named the stages as pull request numbers in the following format: `pr<consecutive-pull-request-number>. However, you’re free to implement your own naming habits, e.g. replace the PR number with the branch name if you find it more meaningful.
Thanks to having custom action, you define the logic once and reuse it across all of your workflows.
To reference the stage name from somewhere else, we have to export it first – that’s why we save the `stage` parameter to `$GITHUB_OUTPUT` environmental variable and then export it via the `outputs` section.
Key things you should prepare in advance
Before you jump into the workflows, there are two things you have to do in advance.
1. Include the stage name in resource names
In the case of the SLS framework, by default, it prefixes all resources with `${self:service}-${self:provider.stage}` phrase. Ensure you set these values properly in your `serverless.yml` file. Wherever you want to give your resource a custom name, make sure always to include the service and the stage names, like in the example below.
Serverless.yml with defined and referenced service and stage names
This way, there will be no conflicts in resource names that, in most cases, have to be unique. Also, by having a consistent naming convention, it will be easier to differentiate resources that belong to the same ephemeral environment.
2. Define variables and secrets required for the deployment
Since you’ll be deploying your app to AWS, you need to configure some AWS-related and app-related parameters. You can do it in the GitHub repository settings under the “Secrets and variables` section.
Secrets:
- `DEV_AWS_ACCESS_KEY_ID`
- `DEV_AWS_SECRET_ACCESS_KEY`
Variables:
- `APP_NAME`
- `DEV_AWS_ACCOUNT_REGION`
Workflow for creating an ephemeral environment
Finally, we are ready to define workflows responsible for invoking and pruning ephemeral environments. Let’s start with the workflow that creates an ephemeral environment:
So, from top to bottom:
Under the `on: pull_request` section you could see three types: `opened`, `synchronized`, and `reopened`. This means that every time you create a brand new pull request, push a new commit to an existing one, or reopen an old pull request, the ephemeral environment will be either created or updated.
If you would like to learn more about different Pull Request triggers, check our GitHub Actions documentation.
In the `jobs` section you have two jobs: `run-linter-and-unit-test` and `create-per-feature-environment`.
Before I deploy the stack to the cloud, I like to validate it first – that’s the reason behind the first job. In my case, that’s just a bare minimum – running code linter and unit tests. You do you since it’s easily adjustable to whatever you like.
The second job performs the actual deployment. Inside the `deploy` step you only have to pass environmental variables – so the serverless framework knows where to deploy – and run `sls deploy` command with the `–stage` parameter set to the value retrieved from the `get-stage-name` step. That’s it!
Workflow for deleting an ephemeral environment
Now let’s take care of deleting the environment when it’s no longer needed, i.e. when the pull request gets merged.
Workflow that deletes ephemeral environment
The `on: pull_request” section probably doesn’t surprise you. Start with setting up your runtime and installing all required dependencies with the `setup-node` action. Next, retrieve the stage name, and finally,b delete the stack by invoking `sls remove` command. Easy-peasy!
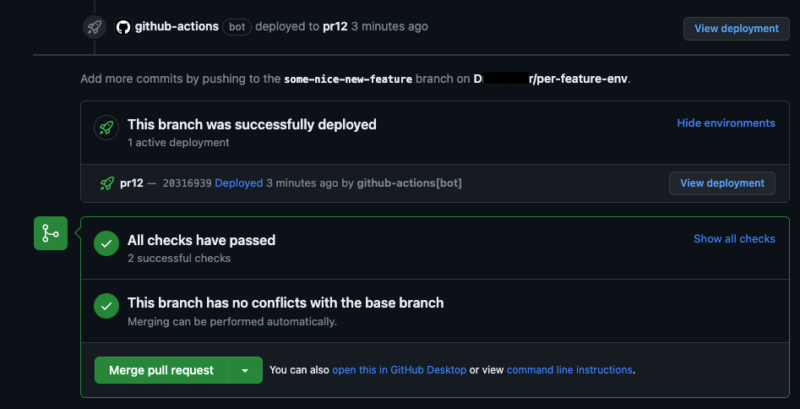
Integrate your CI/CD pipeline with GitHub Environments & Deployments
Ability to see from the pull request view the status of your deployment is a handy feature, if you ask me. Instead of jumping between PR and GitHub Actions tabs, the possibility to have everything in one place is a time saver.
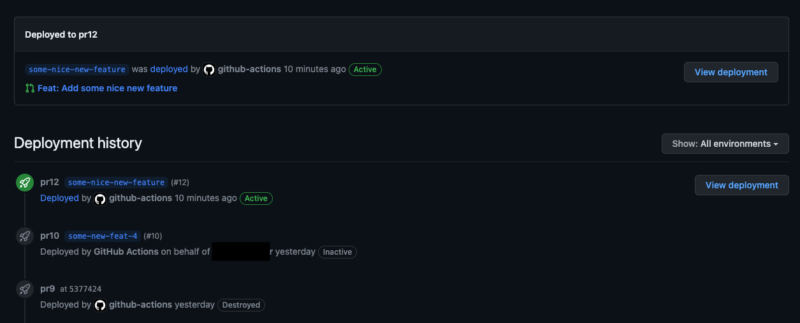
Your life will be easier with the ability to see all of your deployed stacks from the source code repository system, instead of browsing them through AWS Console. Especially when it comes to temporary environments, many of which can exist simultaneously.
Your secret weapon to integrate the pipeline with GitHub Environments and Deployments will be bobheadxi/deployments community action, which is a wrapper for GitHub Deployments REST API enabling you to manage the deployment statuses from your CI/CD pipeline.
Before you start adjusting the workflows, you have to change the permissions for the GitHub token, generated for every workflow (required to change the deployment status). By default, the token has only read access for all of the scopes, but you can also allow it to write access for some/all of the actions.
There are two ways to achieve it:
- Either give the token all-write permission for all of the scopes via the repository settings tab, under the `Actions` section
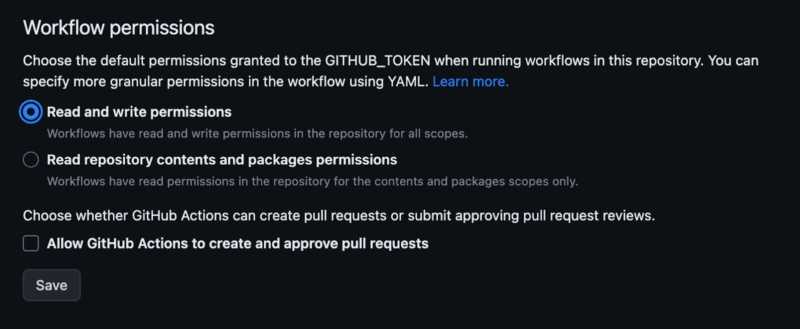
Workflow permissions for GitHub token - Or assign granular permission by explicitly assigning permissions to jobs inside your workflow files.
Enhanced creation workflow
Now, let’s modify the existing workflow for deploying an ephemeral environment.
Enhanced workflow that creates an ephemeral environment
Three things have changed here:
1. Right before the `deploy` step, we have added an extra step called `start-deployment`. By setting `step: start`, we notify GitHub that the deployment of your environment (with the name from the `get-stage-name` step) has just started. If you head over to your PR view, you can see an update on the deployment process.

Remember to set the `ref` property to `github.head_ref`. By default, the action uses `github.ref` which only works for `push` events. In the case of `pull_request` events, you have to retrieve the commit reference from `github.head_ref` field.
2. In the `deploy` step, the only thing that has changed is the two last lines in the `run` section. I fire a simple AWS CLI command to get my app URI from the CloudFormation stack and export it as `api_uri` which is referenced later on.
I retrieve the URI of the AWS API Gateway, but you can put whatever you want here. The URI of AppSync, if you build a serverless GraphQL solution, for instance. Or completely skip this part if the feature of navigating to your deployed environment from the GitHub Actions view is not essential for you.
In the case of the SLS framework, I simply exported the `ApiUri` as an output variable like below.
Export of ApiUri
The `finalize-deployment` step has been added, right after the `deploy` one. Here, you mark the deployment as finished and set its status according to the job status. If the previous step failed, the deployment will be marked as a failure and the previous one will be persisted. If it succeeded, the previous environment will be overwritten with the new one. In addition, you can also set `deployment_id` to the value from the `start-deployment` step, so GitHub knows which deployment id this pipeline refers to. Lastly, specify the `env_url` that you exported earlier.
Enhanced deletion workflow
Your deployment workflow has already been adjusted, now let’s quickly adjust the one used to destroy the ephemeral environment (used for an accurate overview of all your environments).
Enhanced workflow that deletes ephemeral environment
The only thing that has changed here is the addition of the `Deactivate environment` step right after the stack gets deleted. By specifying `step: delete-env` you completely get rid of the deleted environment, meaning it will be no longer visible in the GitHub environments section.
I prefer this approach towards ephemeral environments because once they get deleted I don’t care about them anymore. If you prefer to keep them but mark them as `Inactive`, change the value of `step` to `deactivate-env`.
Congratulations, you’ve just built a complete CI/CD solution for deploying serverless ephemeral environments with the help of GitHub Actions! 🚀
Seed. A zero-configuration alternative
Although setting your own CI/CD solution for the serverless app is not rocket science, sometimes you just want to delegate it to an external vendor and focus on something else. Here is where Seed comes in handy. This is not a paid promotion – I discovered Seed not so long ago and it made a pretty good impression on me. Maybe through my article, somebody else will find this alternative attractive.
![]()
The same team responsible for the SST framework, developed Seed – a combination of a zero-configuration CI/CD pipeline for a serverless app and a real-time Lambda alerting and monitoring tool. It works pretty much out of the box after connecting the source code repository and passing AWS credentials to it.
If you want to experiment with custom stuff on your CI/CD pipeline, Seed enables it via a custom file named `seed.yml` – you describe the steps that will be executed at the specific phases of the pipeline process.
What’s cool about Seed is the fact that enabling the feature of ephemeral environments for your PRs or new branches is just a matter of a few clicks. Take a look at the image below – that’s all you need to do.
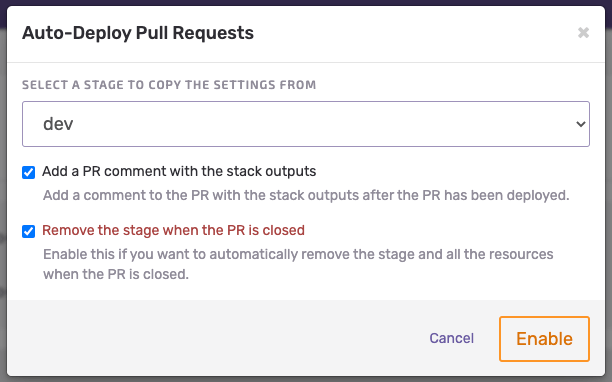
One last feature of Seed that caught my attention is incremental deployments. In the case of a monorepo with multiple CloudFormation stacks, Seed deploys only the stack that changed, without performing any operations on the stacks that didn’t. There is also an option to add incremental deployments at the Lambda level, so instead of deploying the whole stack, Seed simply replaces Lambda’s zip packages. However, at the time of writing, the feature is still in beta version and it is only available for the SLS framework.
In the case of Seed’s drawbacks, for me, the biggest ones are:
- The lack of support for other serverless frameworks than SST and SLS, like AWS SAM.
- The main focus as a source code repository was placed on GitHub. Bitbucket and GitLab are also supported, but they lack some features that GitHub has.
- When CI/CD process is relatively complex, it is better to own and manage your custom CI/CD pipeline to gain more flexibility rather than vendor-locking yourselves with Seed.
I highly recommend checking out Seed and deciding if it fits with your next project. If I were to choose, I would say that when I don’t care about vendor-locking myself to some external CI/CD provider, the project only requires some relatively simple CI/CD process and I am in a hurry, I would consider Seed as an option. In other cases, I’d probably stick to CI/CD solutions that are more mature, like GitHub Actions, BB Pipelines, etc.
Pros and cons of using ephemeral environments
Benefits of ephemeral environments
One of the main advantages ephemeral environments provide is a more agile development process. With the ability to quickly spin up new environments, developers can easily test out new features and changes without worrying about disrupting existing systems. This can lead to faster iterations and a more efficient development process overall.
- enabling developers to work effectively, testing their code independently from other team members,
- testing and accepting features in isolation by Quality Assurance is so much easier,
- compatibility with agile software development,
- no disruption to already-existing systems,
- shortening Time to Delivery of features.
Disadvantages of ephemeral environments
As with most things in software development, ephemeral environments are no one-size-fits-all solution for everything. One of the disadvantages of using ephemeral environments is the constant need for an internet connection to do any action. That’s a minor issue for me – I cannot recall the last time I haven’t had an internet connection at work. The same story goes for downloading an external package required for your project – if you are offline, you simply cannot (unless you have it stored somewhere in your computer’s memory which is a pretty rare commodity).
Another drawback is the limitations of a single AWS account. Some of these limits can be increased if you reach out to AWS support, but others are fixed and cannot be exceeded. For example, the maximum number of Lambda functions you can deploy to a single region is 1,000 (this limit can be raised upon request). However, hard limits cannot be exceeded, e.g. the maximum of 500 AWS Step Functions state machines allowed in a single region. While these limits are generally high and hard to reach, it’s still important to be mindful of them. To avoid hitting these limits, it’s recommended to merge pull requests promptly and regularly, not just for ephemeral environments but also as a general best practice. If multiple features remain unmerged for a week you probably don’t need to keep a separate environment for them.
- configuring overhead while setting the environments up,
- needing a stable internet connection at all times,
- little or no cost increase for each of the environments’ infrastructure.
Temporary environments on-demand
Using ephemeral environments can be a powerful tool for improving the delivery speed of your serverless applications. With the help of CI/CD solutions, creating and deleting disposable environments on the fly is easy and ensures consistency across deployments.
I recommend giving ephemeral environments a try, especially in bigger projects, like the aforementioned banking platform that was operating in a few countries and in different currencies.
From a software engineer’s perspective, the ability of testing features in isolation, even when other people simultaneously worked on the same project, was a massive advantage.
From a business perspective, we managed to ship things a lot quicker than before. Since the deadlines were tight, ephemeral environments provided us with the rocket boost that we needed to successfully finish all jobs in time.
In our case, it was a win-win situation. I hope you will find them as much useful as we did in your next venture.
Fixed deadlines are looming over your project? Our people will help
You have little to no time to recruit additional developers for the job, partner up with TSH and supplement your team with world-class, AWS-certified specialists.
Click below and tell us about your problem. We’ll get back to you with a 1-hour consultation, free of charge.
