28 June 2022
From initial designs to working apps in hours, not weeks. AWS Amplify tutorial in three steps


How would you create a React app? Probably you would open your favorite IDE, select libraries, and implement everything manually. What if I told you, there’s another way? You can generate a nearly whole app from a Figma file and connect it with data. I present to you AWS Amplify Studio.
Let’s start with the basics. What is AWS Amplify?
AWS Amplify is a set of purpose-built tools and features that lets frontend web and mobile developers quickly and easily build full-stack applications on Amazon Web Services. You don’t need years of experience in software development to use AWS Amplify, as it allows you to create a full-stack app with fewer resources and knowledge than organizing all services separately by hand. It is mainly targeted at frontend and mobile developers, who want to create a stable backend for their apps.

The table below presents features with corresponding AWS services that you may use in your application.
| Amplify feature | AWS services |
| Authentication | Amazon Cognito |
| DataStore | AWS AppSync |
| Analytics | Amazon Pinpoint and Amazon Kinesis |
| API | AWS AppSync and Amazon API Gateway |
| Functions | AWS Lambda |
| Geo | Amazon Location Service |
| Interactions | Amazon Lex |
| Predictions | Amazon Sagemaker |
| PubSub | AWS IoT services |
| Push notifications | Amazon Pinpoint |
| Storage | Amazon S3 |
But that’s not over! Moreover, you have access to:
- Amplify libraries for JS, iOS, Android, Flutter,
- Amplify UI Components,
- Amplify CLI toolchain,
- Amplify Hosting,
- and AWS Amplify Studio.
I want to focus on the latter in more detail.
What is AWS Amplify Studio?
AWS Amplify Studio is a visual interface for modeling data, adding authorization, managing users, etc. However, by the end of 2021, a new, revolutionary feature was added. Now you can create React code from Figma components, how cool is that? First, you create components in Figma, then connect them with AWS data and finally generate ready-to-use React code.
You probably wonder, “how much will this pleasure cost me?” Surprise, surprise – AWS Amplify Studio itself is free, so you are not paying for generating components in AWS or exporting them to React code. But it doesn’t mean that the whole AWS service is free to use since there are fees for underlying databases, storage space, hosting (and other AWS cloud services), etc.
When should I use AWS Amplify Studio?
I’ll start with when NOT to use Amplify Studio. I wouldn’t use AWS Amplify in large projects as the main technology, ever! In a large, complex project with lots of developers, AWS Amplify will be restrictive and slow down the whole process.
But luckily you can make progressive changes between MVP and the full app – you won’t have to write the whole app from the beginning.
So, when is this solution advisable to use?
- For quick POC/MVP, when you need to deliver a working solution to a business problem, and the quality of the code doesn’t matter that much.
- When you create something temporary, e.g landing page/app for some one-time event.
- For adding a widget/small component that is not a key element of the app when you’re in a rush.
- For simple CRUD applications.
- For dashboard apps.
AWS Amplify is the perfect choice in the early stages of a project when you need to deliver MVP/POC for a client and you don’t have a big team or budget. AWS Amplify delivers a set of ready-to-use components that you can adjust one by one, so when your project grows you can make progressive changes. No need to write everything from scratch.
How to create a React app with AWS Amplify Studio?
To generate code with Amplify Studio you have to follow three steps:
- Figma,
- AWS,
- and React.
Each step focuses on different elements, so below I’ve prepared an easy tutorial on how to complete them as seamlessly as possible.
Step 1. – Figma
Figma is one of the most popular software that primarily helps in creating designs for web applications but you can also use Figma as file storage, or as a collaborative tool during engaging online meetings.
To create components for AWS Amplify Studio you have to start with AWS Amplify UI Kit. Inside you will find a specially prepared file with primitives – components to create React code.
I highly recommend reading the ReadMe file inside AWS Amplify UI Kit carefully because it’s invaluable instruction on how to create components.
If you have your Figma ready, focus on two things:
Layout
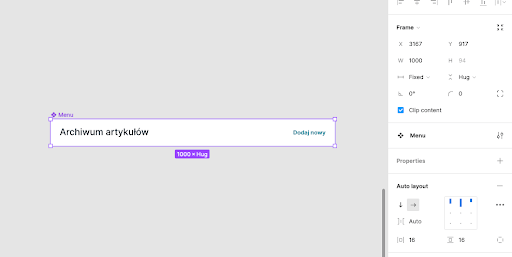
For me, this was the hardest part of creating components as I’ve never done anything in Figma before. But I was positively surprised that the tool itself is very user-friendly. After studying the aforementioned ReadMe file I created components using the auto-layout feature in no time.
Tip: you can set the width of a component to organize all content, and later change the hardcoded width to 100% in AWS. You can use it e.g. to create a top bar menu.
Naming
I know, naming sucks. It’s definitely one of the hardest things in programming. Also in Figma, it is very important how you name your components because AWS uses the chosen name to generate a React component.
My tip: use camelCase name to avoid problems with generating components (if your component name contains spaces AWS will remove them and join the string).
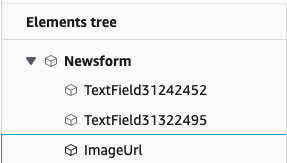
Another problem is changing the name of primitives. Imagine you have a form with four inputs. You add these four inputs from the primitive’s library as TextInput. In Figma, all primitives will have the name TextInput. But after you import them to AWS you will see e.g. TextField31322495. It is really hard to find the right input when adding action.
How to create good naming that won’t cause problems with AWS and React code?
- use PacalCase in components names, e.g ArticleItem (instead of: articleitem),
- don’t use spaces in name e.g NewsForm (instead of: News Form),
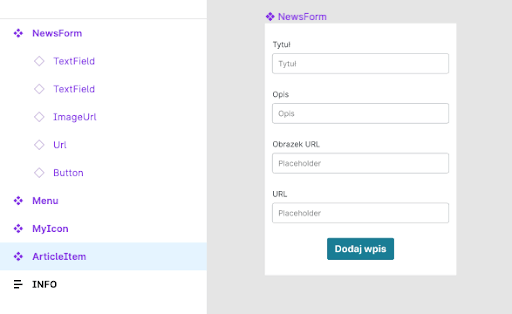
- rename inserted primitives to match business names, e.g in the image below you can see a form with two components TextFields (bad) and two renamed ImageUrl & Url (Good).
Step 2. – AWS
Okay, once you have the components, you are ready to import them to AWS where you can make three actions:
- import a component from Figma to create React component,
- connect a component with data,
- create collections from components.
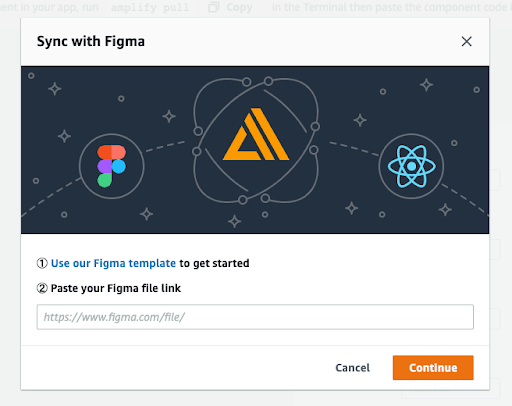
Firstly, you have to provide a link to your Figma file just like you see in the image below.
Then wait a bit until AWS process your components. When it’s done and you see a screen similar to the one below, you’re ready to review your components and decide which one you want to import.
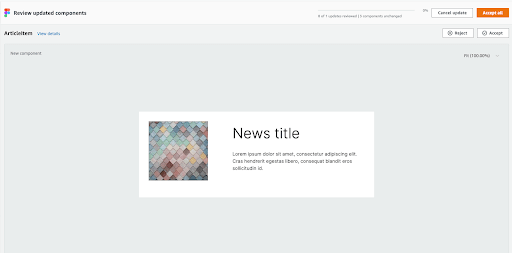
Be careful when importing components! If you see any UI problems during this step it means problems will pop up during later stages too. When this happens, there’s only one thing to do – you need to go back to Figma and fix the component.
After you import all your components you can check and configure them in the AWS Amplify subpage.
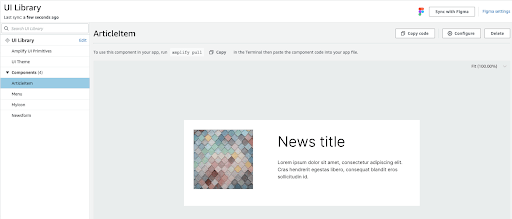
What’s more, you can configure CSS properties of components (e.g: override the width or height set in Figma), add additional props to your components (which can be used later in code), or attach data from AWS.
In the gif below you can see prepared data for my app and how I’m able to place data in the component.

When you connect data with a component you will see random data from the database in the component. If you need a nice place to check whether your component is well-prepared, here it is. What you should check during this step?
- how images are displayed,
- text and content visibility,
- do components expand when data is longer,
- other visual drawbacks.
HTML events (like onClick, onMouseOver, onMouseLeave, etc.) are handled from AWS. You can assign different handlers to these actions. As of writing, the following actions were available:
- sign out,
- open URL,
- open URL in the new tab,
- scroll to anchor,
- refresh,
- modify element property (e.g. backgroundColor),
- create, update and delete data from the store.
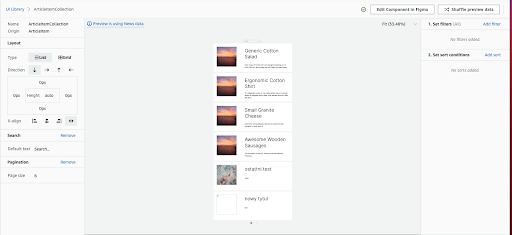
The next step is optional – you can make a list component from the item you created. You can choose between a list or grid (perfect for some e-commerce sites) and the data is fetched from AWS Amplify Datastore. In the picture below you can see how you can customize the list to your needs: you can edit some UI elements, add a search engine, and pagination. You can also filter and sort the data you want to display.
Step 3. – React code
In order to prepare your code to fetch components from AWS Amplify, you have to:
- initialize the project,
- configure routing,
- set up AWS Amplify in the project.
I won’t expand on the first two points as it is described in Create React App and React Router documentation but I will tell you more about the AWS Amplify setup. First, you take care of the access to your AWS account. Check out how to configure CLI on AWS.
Next, install AWS Amplify CLI as a global package.
In order to use Amplify CLI, type the command below in your project (on the top level):
You can find `app-id` and `env-name` in the Amplify console.
If you type this command for the first time, you need to answer a couple of questions:
- favorite editor,
- the type of app (choose Javascript),
- Javascript framework (choose React),
- source directory path (the default is src and you can leave it like this),
- distribution directory path (the default is build and you can leave it too),
- build command,
- start command,
- do you plan to modify backend? (you can choose “No” if you don’t want to change backend from code).
After that, you will see new elements in src directory:
- /models – database models,
- /ui-components – generated components,
- aws-exports.js – AWS config file (you’ll need this in a moment).
How to configure Amplify UI?
Exported AWS components use the `@aws-amplify/ui-react` library to display components. So the first step is to set up this UI library.
Next, in the root file (index.tsx or similar) or main component (app or similar), import basic styles and provider.
Apart from that, configure Amplify library and install it with the command:
…and in the index file add these lines:
Aaand that’s it! Your project is ready to import components from AWS. If you make any changes, import updated components using `amplify pull`.
Generated components
Your components will be in the `ui-components` directory, as AWS generates \*.jsx components. Luckily, you will also find types there so using them in a Typescript project won’t cause any problems.
Three things you should know about generated components:
- Each component supports `overrides` props for customizing `@aws-amplify/ui-react` components. It is simply a key-value map where keys are component names and value is props object. The easiest way to check the component name is to check the code.
- In the collection (list/grid) component you can provide your data. If you pass elements in `items` props they will be used. If this prop is empty, the component makes a request to fetch items from a database.
- AWS doesn’t delete components after a name change. If you change the component’s name and pull new components, in the directory you will see the old component with the old name and the new one. You have to remove it manually to avoid a mess in the code.
Benefits of AWS Amplify Studio
- deeply integrated with other AWS services,
- you don’t need lots of knowledge about AWS services to work with Amplify Studio,
- it allows you to quickly create an app (from designs to working app in hours, not days or weeks),
- can create both a full app and a single widget,
- after being generated, each component is customizable,
- configuring backend in minutes,
- connecting UI components to your backend with just a few clicks,
- you can quickly test your business idea before hiring a large team,
- you can save time & money on bad ideas.
AWS Amplify tutorial. Final thoughts
If you have access to Amazon Web Services, add Amplify Studio feature. I highly recommend checking this feature out, it might be just the thing you need in your next project.
So let’s sum up the most important takeaways from this AWS Amplify Studio tutorial:
- Remember to use AWS Amplify UI Kit,
- Add descriptive names to your components,
- Check components’ UI during the import to AWS,
- Customize components, and add event handlers in AWS,
- Create a list/grid from components,
- Prepare React project and pull components from Amplify,
- Override some component props but for larger changes, you have to go through the whole process,
- Remember that AWS generates *.jsx components,
- Each component has a file with types,
- AWS doesn’t delete components after a name change.
Good luck!

