15 October 2019
Swift Package Manager tutorial: working with packages and creating your own

The Swift Package Manager has been around for some time. But with the release of Xcode 11, you can use it across the entire Apple ecosystem. Let’s see how to with existing public and private packages after the update. Then, you’ll discover how you can create, maintain, and distribute your own packages.
Regardless of whether you use 3rd party dependencies, develop your own internal frameworks, or just want to extract part of your app’s code to make it more modular and orderly (or everything at once), Swift Package Manager advantages can go a long way to help you out.
It’s one of the most flexible Swift tools. With the release of Xcode 11, it’s going to become a very important part of Apple’s IDE.
Now, SPM Apple packages work with all Apple platforms, including the iOS system (so far, it supported command line tools and server-side Swift apps only).
If you haven’t used Xcode Swift Package Manager yet, now is the best time to give it a try! Time for a quick Swift Package Manager tutorial!
Swift Package Manager features for iOS and more
What exactly can Swift Package Manager do for you?
- It automatically adds dependencies to Frameworks, Libraries and Embedded Content in a target (unlike Carthage).
- It automatically adds embedded dependencies (packages used by libraries you added) to your Swift project (another missing feature in Carthage).
- It allows you to delete unneeded libraries at a click of a button (missing in CocoaPods).
- It makes it easy to edit packages by overwriting references to dependencies with a local version.
In my 2-part Swift Package Manager guide, I’ll show you how to take advantage of SPM’s potential.
Today, I’ll focus on using SPM to consume both private and public libraries. The soon-to-be published 2nd part will tackle the issue of using SPM to help create your own modules and edit the source code of your dependencies.
I hope that by the end of the guide, you’ll love the idea of working with Swift and SPM as much as I do!
Xcode -> File -> New 😍
Let’s say you’re working on a project of an iOS app for a client from the insurance industry. A desktop app for agents already exists.
Now, the task is to create a simplified version for potential clients. Its main purposes include gathering data (basic personal data, risk factors and declarations) and calculating premiums.
Create a new Workspace (File -> New… -> Workspace) and a new app project (File -> New… -> Project). Also, make sure:
- To add the project to the Workspace and to its group.
- Not to tick the ‘Create Git repository on my Mac‘ box. We will later create a high-level repository that will include the whole Workspace.
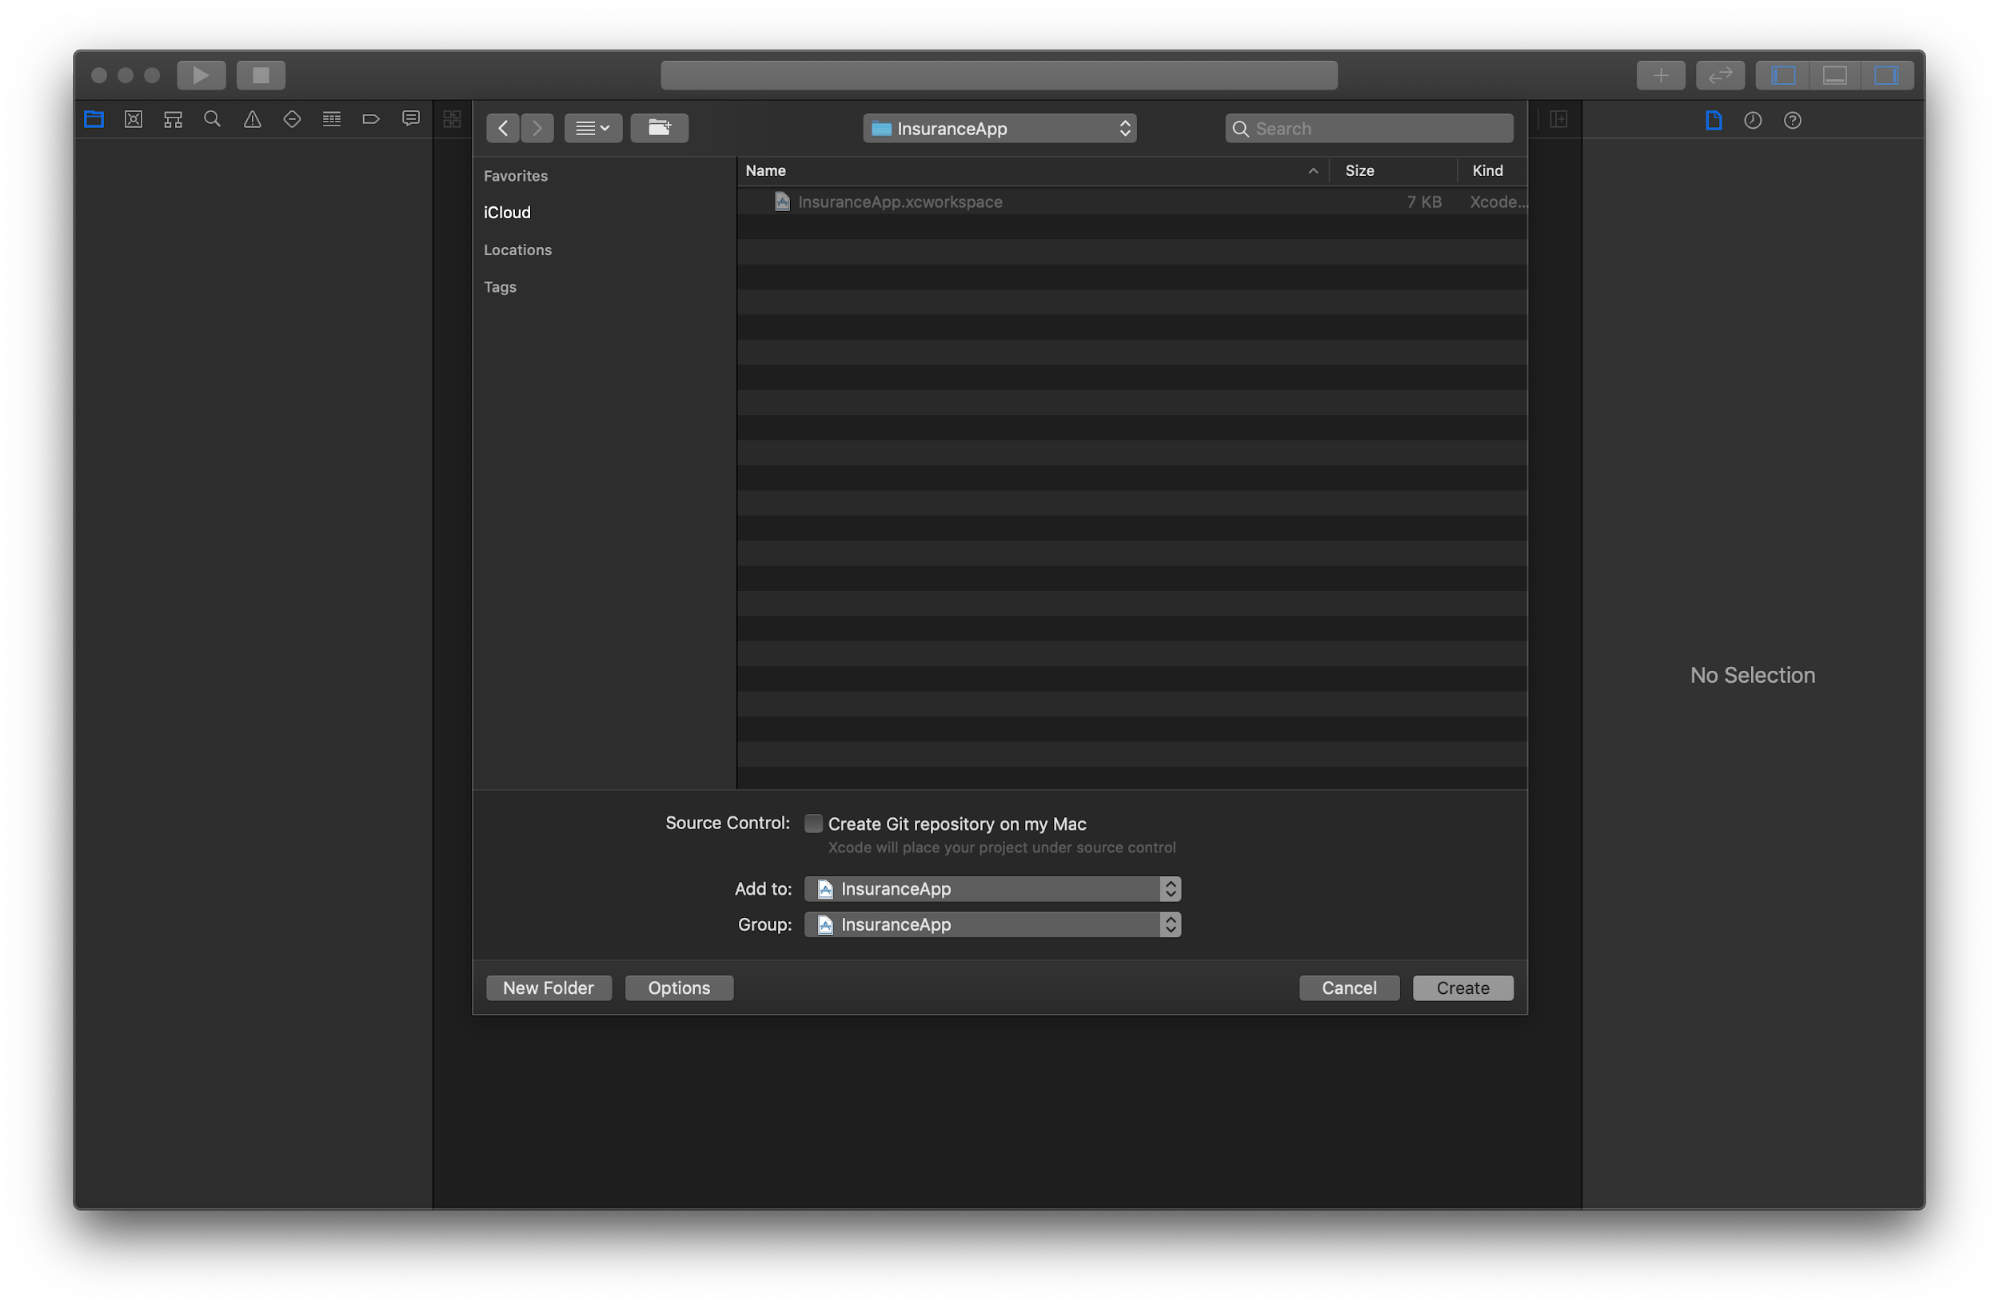
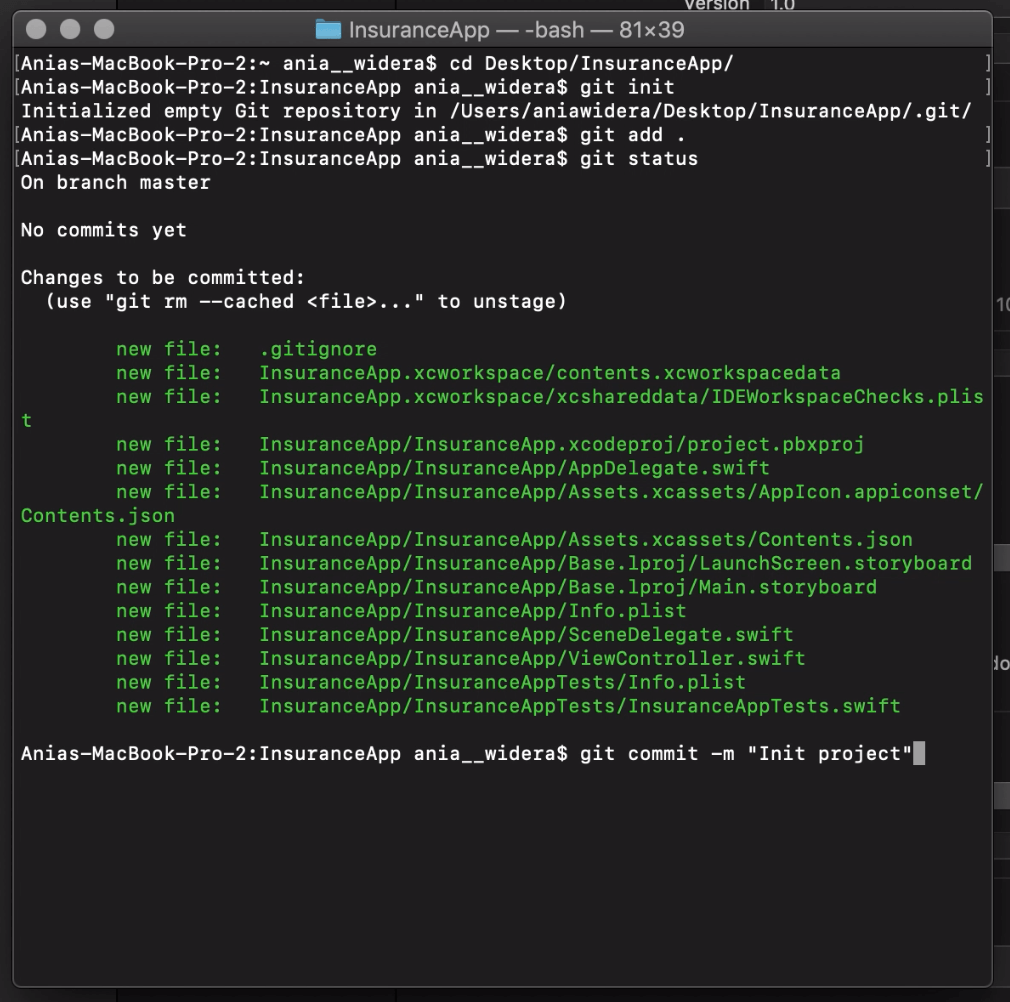
Now, create a repository at the same level as the catalog that contains the *.workspace file and the project directory.
I wasn’t able to force Xcode’s version control (In the Source control menu) to let me create a repository where I wanted to, so I did it via the terminal (see the screen below). I also added a .gitignore file.
📦 Cross-app library
Let’s assume that the team responsible for the macOS app created a library called InsuranceCulculator, which includes all the logic that calculates premiums.
Using the same library across both apps will not only speed things up, but also ensure that agents and clients will see the same results.
By the way, if you are wondering how to share your code to your internal team or even the entire public, so that it can be added with Swift Package Manager, make sure to read the upcoming second part of the guide.
In doing so, our SPM story will come a full circle. ♾️⚠️
In order to access packages in your company’s repository, make sure to properly configure your Github/Bitbucket/GitLab account in Xcode (Xcode -> Preferences -> Accounts).
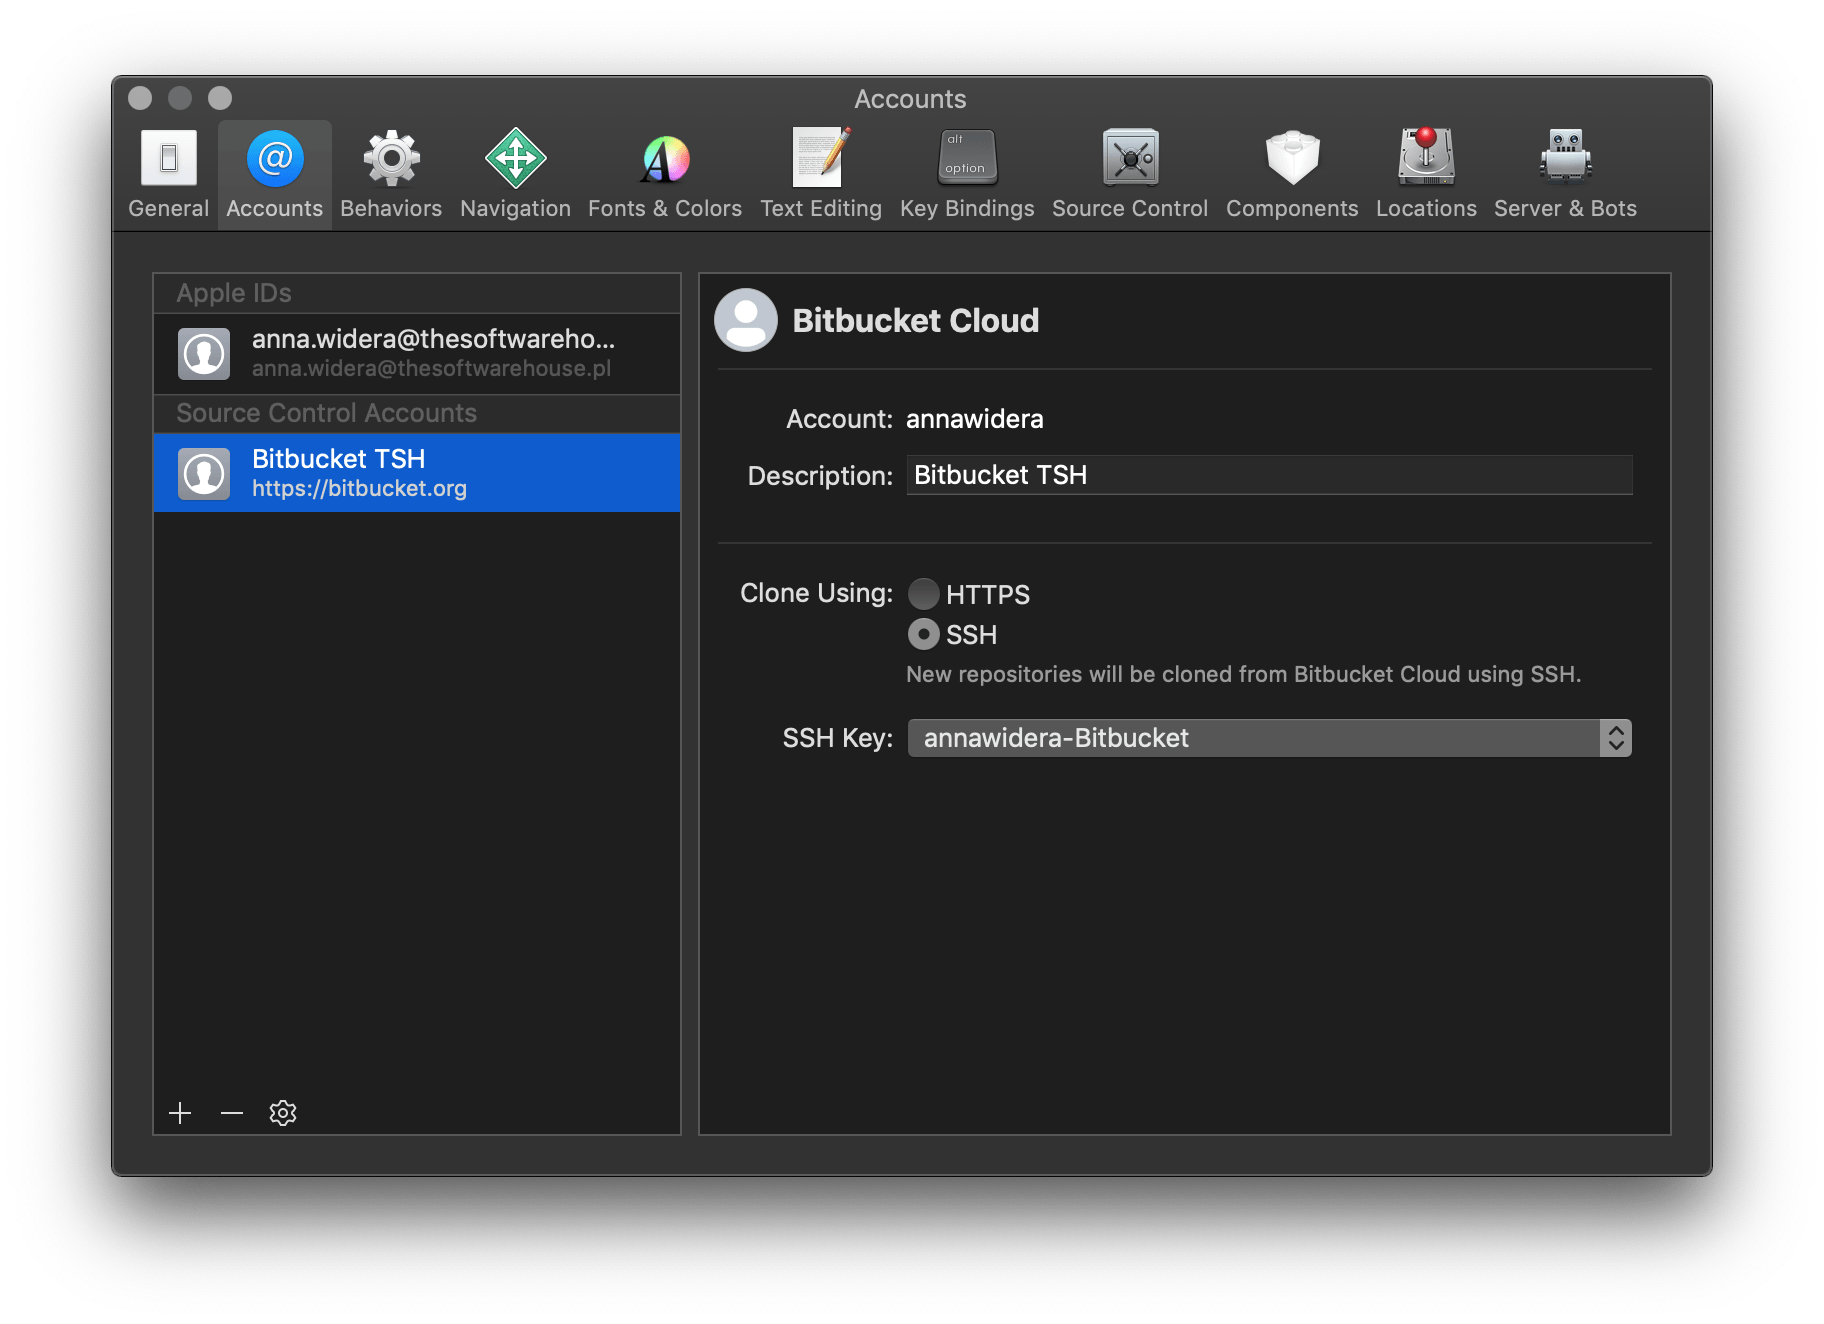
Now, that we took care of all that, we can add our first Swift package! 🎉
Adding dependencies to a project
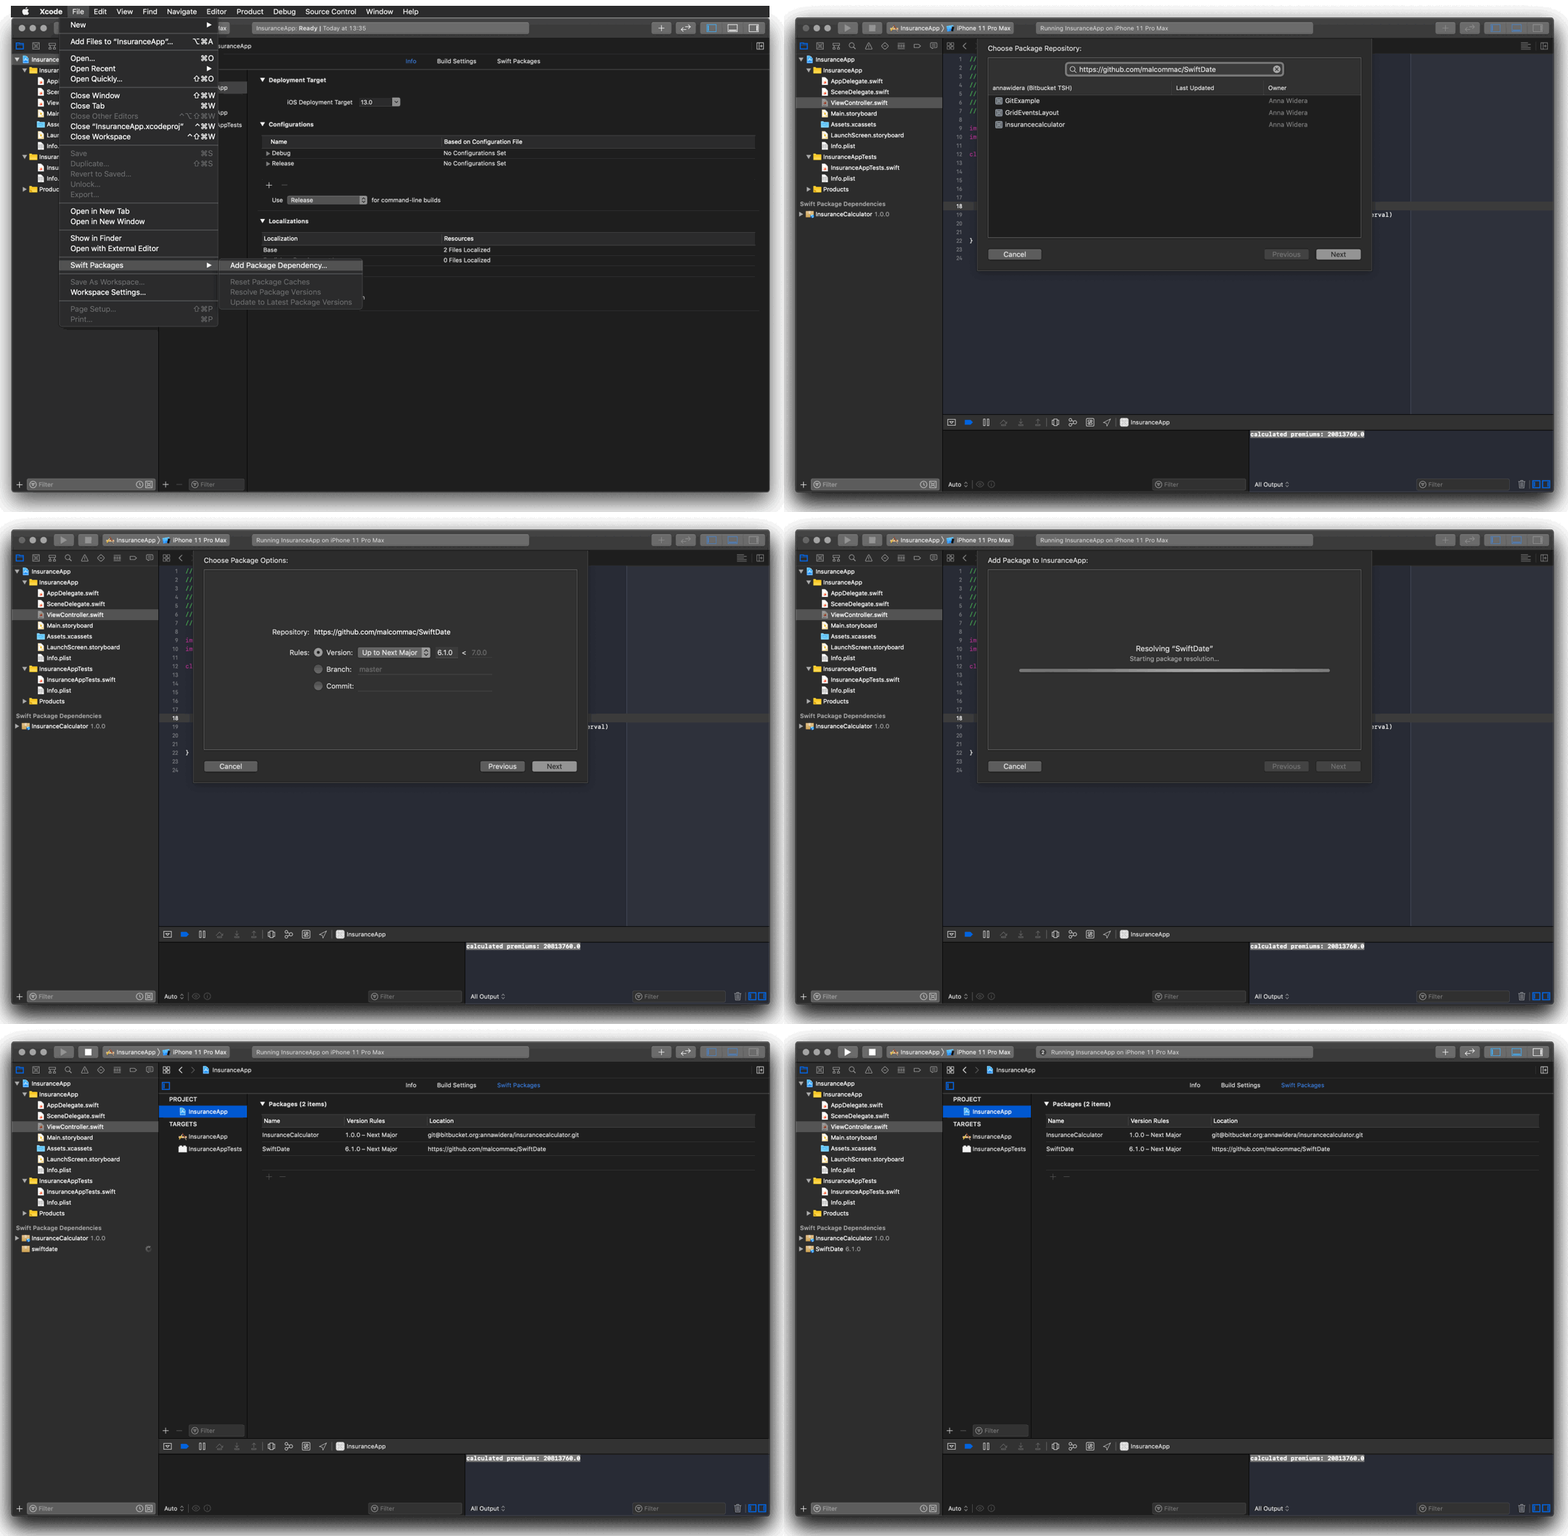
Go to File -> Swift Packages -> Add Package Dependency – a new window will open.
By default, it shows all of the repositories you own. A search can be used to find a specific repository out of those you have access to.
Choose insurancecalculator and click Next. Now, choose which version you want to use (more about available options in a moment) and specify a target for this new dependency. It’s done!
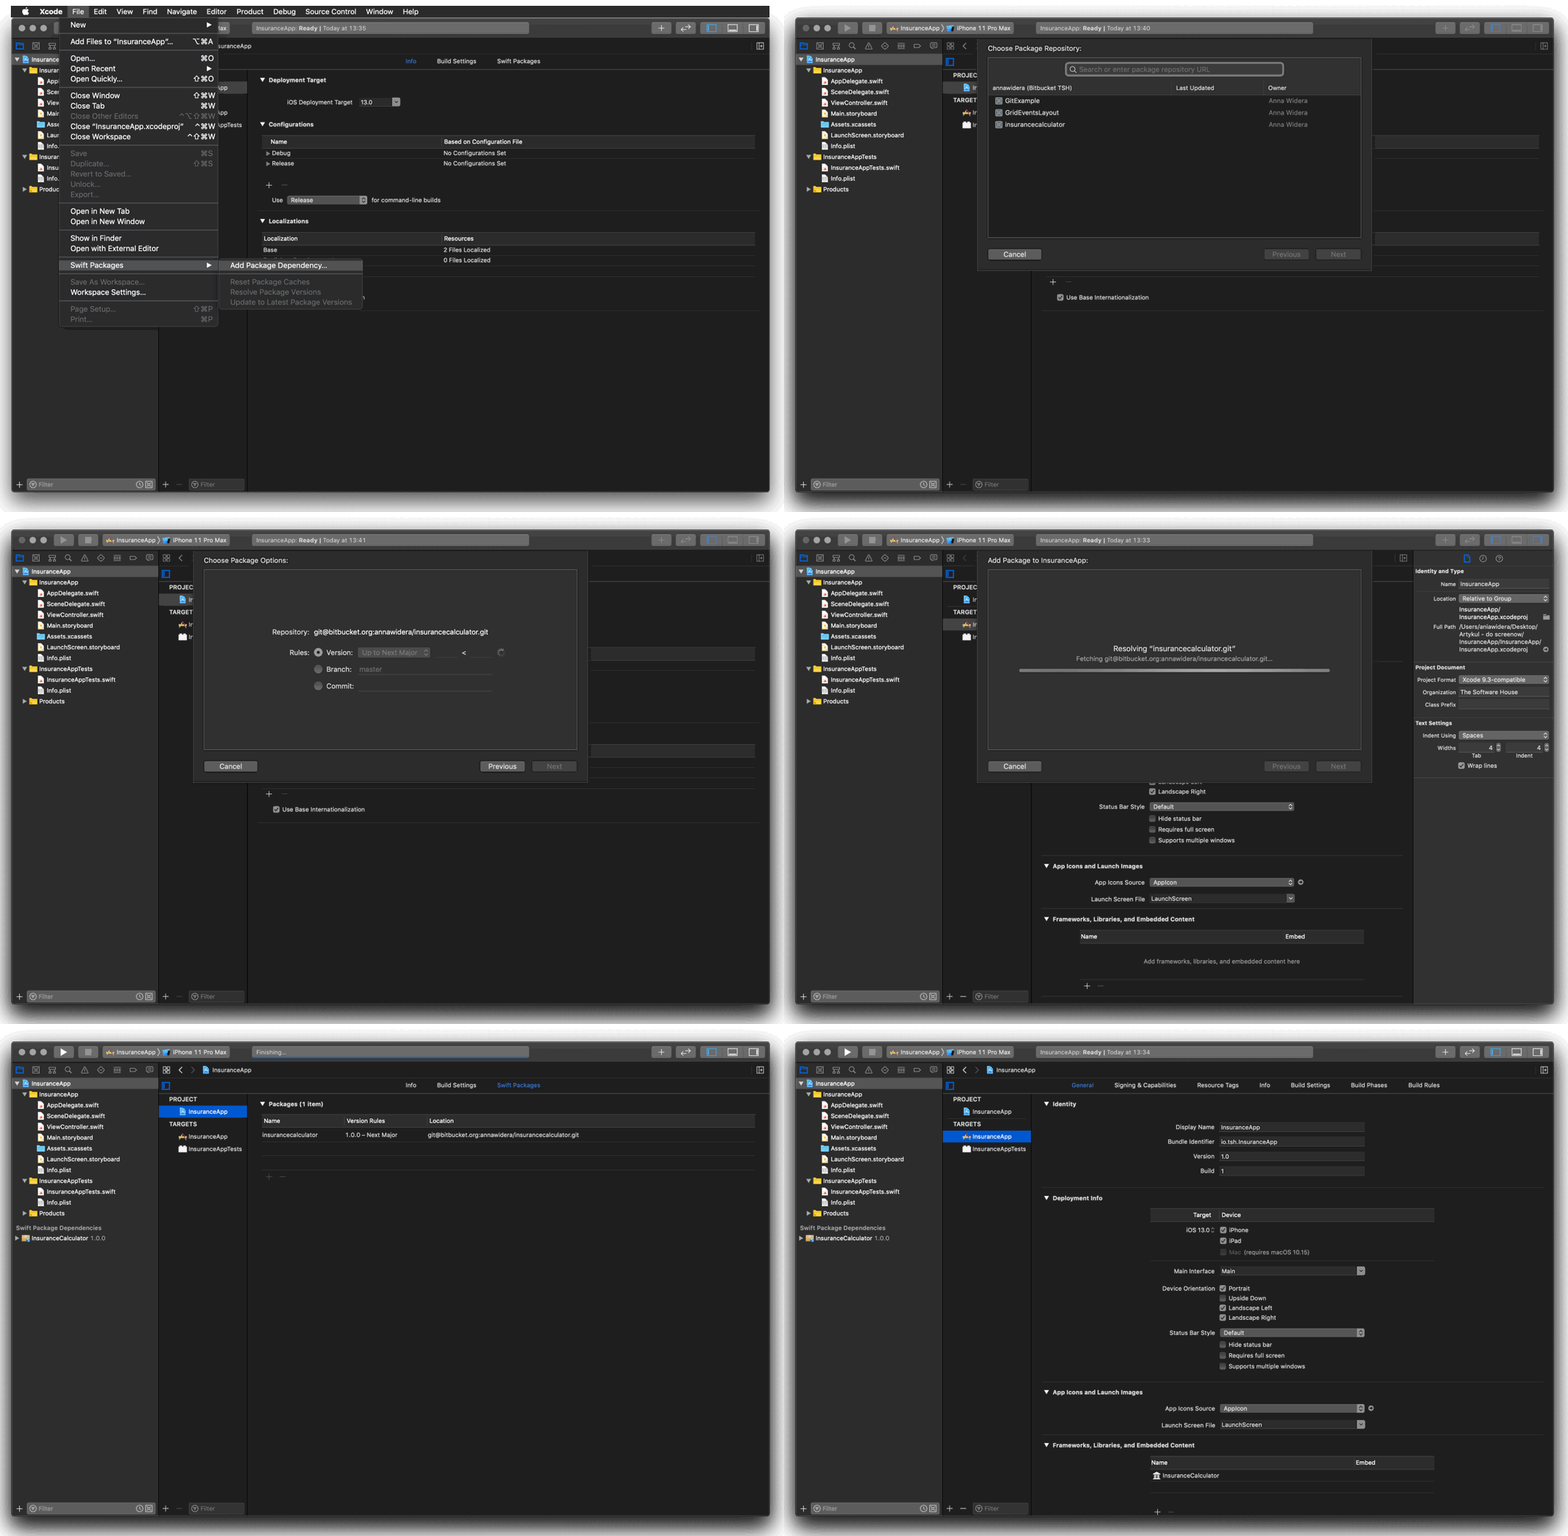
Swift Package Manager can now download a repository that contains the library, checkout the proper version, add the library to Frameworks, Libraries, and Embedded Content in the specified target and add a reference to the dependency in the project.
All of that happens automatically (or magically, if you’d rather 🔮).
🥳 Voilà! Now you can import InsuranceCalculator to the InsuranceApp and get to calculating those premiums!
import UIKit
import InsuranceCalculator

class ViewController: UIViewController {

override func viewDidLoad() {
super.viewDidLoad()

let customer = Person(age: 33)
let interval = DateInterval(start: Date(), duration: 60*60*24*365)
let premiums = InsuranceCalculator.calculatePremiums(for: [.car, .flat], insuredBy: customer, in: interval)
print("calculated premiums: \(premiums)")
}
}
The console now shows the value of calculated premiums to be 20813760.0
Versions, versions, versions…
Now is a good moment to learn how you can specify the version of a dependency you add to a project.
The version management process is quite similar to what you might know from Carthage or Cocoapods. There are three groups of rules at our disposal:
- Version-based: prioritizes the version of a given library (according to the Semantic Versioning 2.0.0 standard),
- Branch-based: references a branch in the package’s repository,
- Commit-based: references a specific commit (using its SHA-1 hash).
The version-based strategy is the most popular one and is usually recommended. It allows you to easily specify how important updates (referred to in this context as significant changes) should be accepted. The choices include:
.upToNextMinor(from: "5.0.1")
.upToNextMajor(from: "5.0.1")
A more restrictive approach which specifies a range (e.g. “3.1.0” … “3.1.2”) can also be used. Another, most restrictive option is to simply specify a single compatible version (.exact (“5.0.1”)).
This approach is usually not recommended, since it can cause conflicts in the dependency graph if more libraries use the same dependencies in different versions. You will also lose access to bug fixes.
You also should keep in mind that before you publish your package’s version, you are required to remove all dependencies based on branches and commits.
It works for me…
Let’s say that your friend is cloning the repository and for some reason can’t build the Swift project.
If you come across such problems, check if your friend properly connected their account to the company repository in Xcode. You should also check if they use SSH.
📦 3rd party library
So far so good! Still, I doubt you have missed this awful line 😉
let interval = DateInterval(start: Date(), duration: 60*60*24*365)
We can definitely do better. Start by adding the SwiftDate library. It will help us to express the duration time in a more concise manner.
Use the File -> Swift Packages -> Add Package Dependency… menu to add a link to the SwiftDate GitHub repository. The remaining steps are the same as before.
🥳 Voilà! SwiftDate is ready to be imported and used! 🎉
import UIKit
import InsuranceCalculator
import SwiftDate

class ViewController: UIViewController {
override func viewDidLoad() {
super.viewDidLoad()

let customer = Person(age: 33)
let interval = DateInterval(start: Date(), duration: 365.days.timeInterval)
let premiums = InsuranceCalculator.calculatePremiums(for: [.car, .flat], insuredBy: customer, in: interval)
print("calculated premiums: \(premiums)")
}
}
The value of calculated premiums remains the same: 20813760
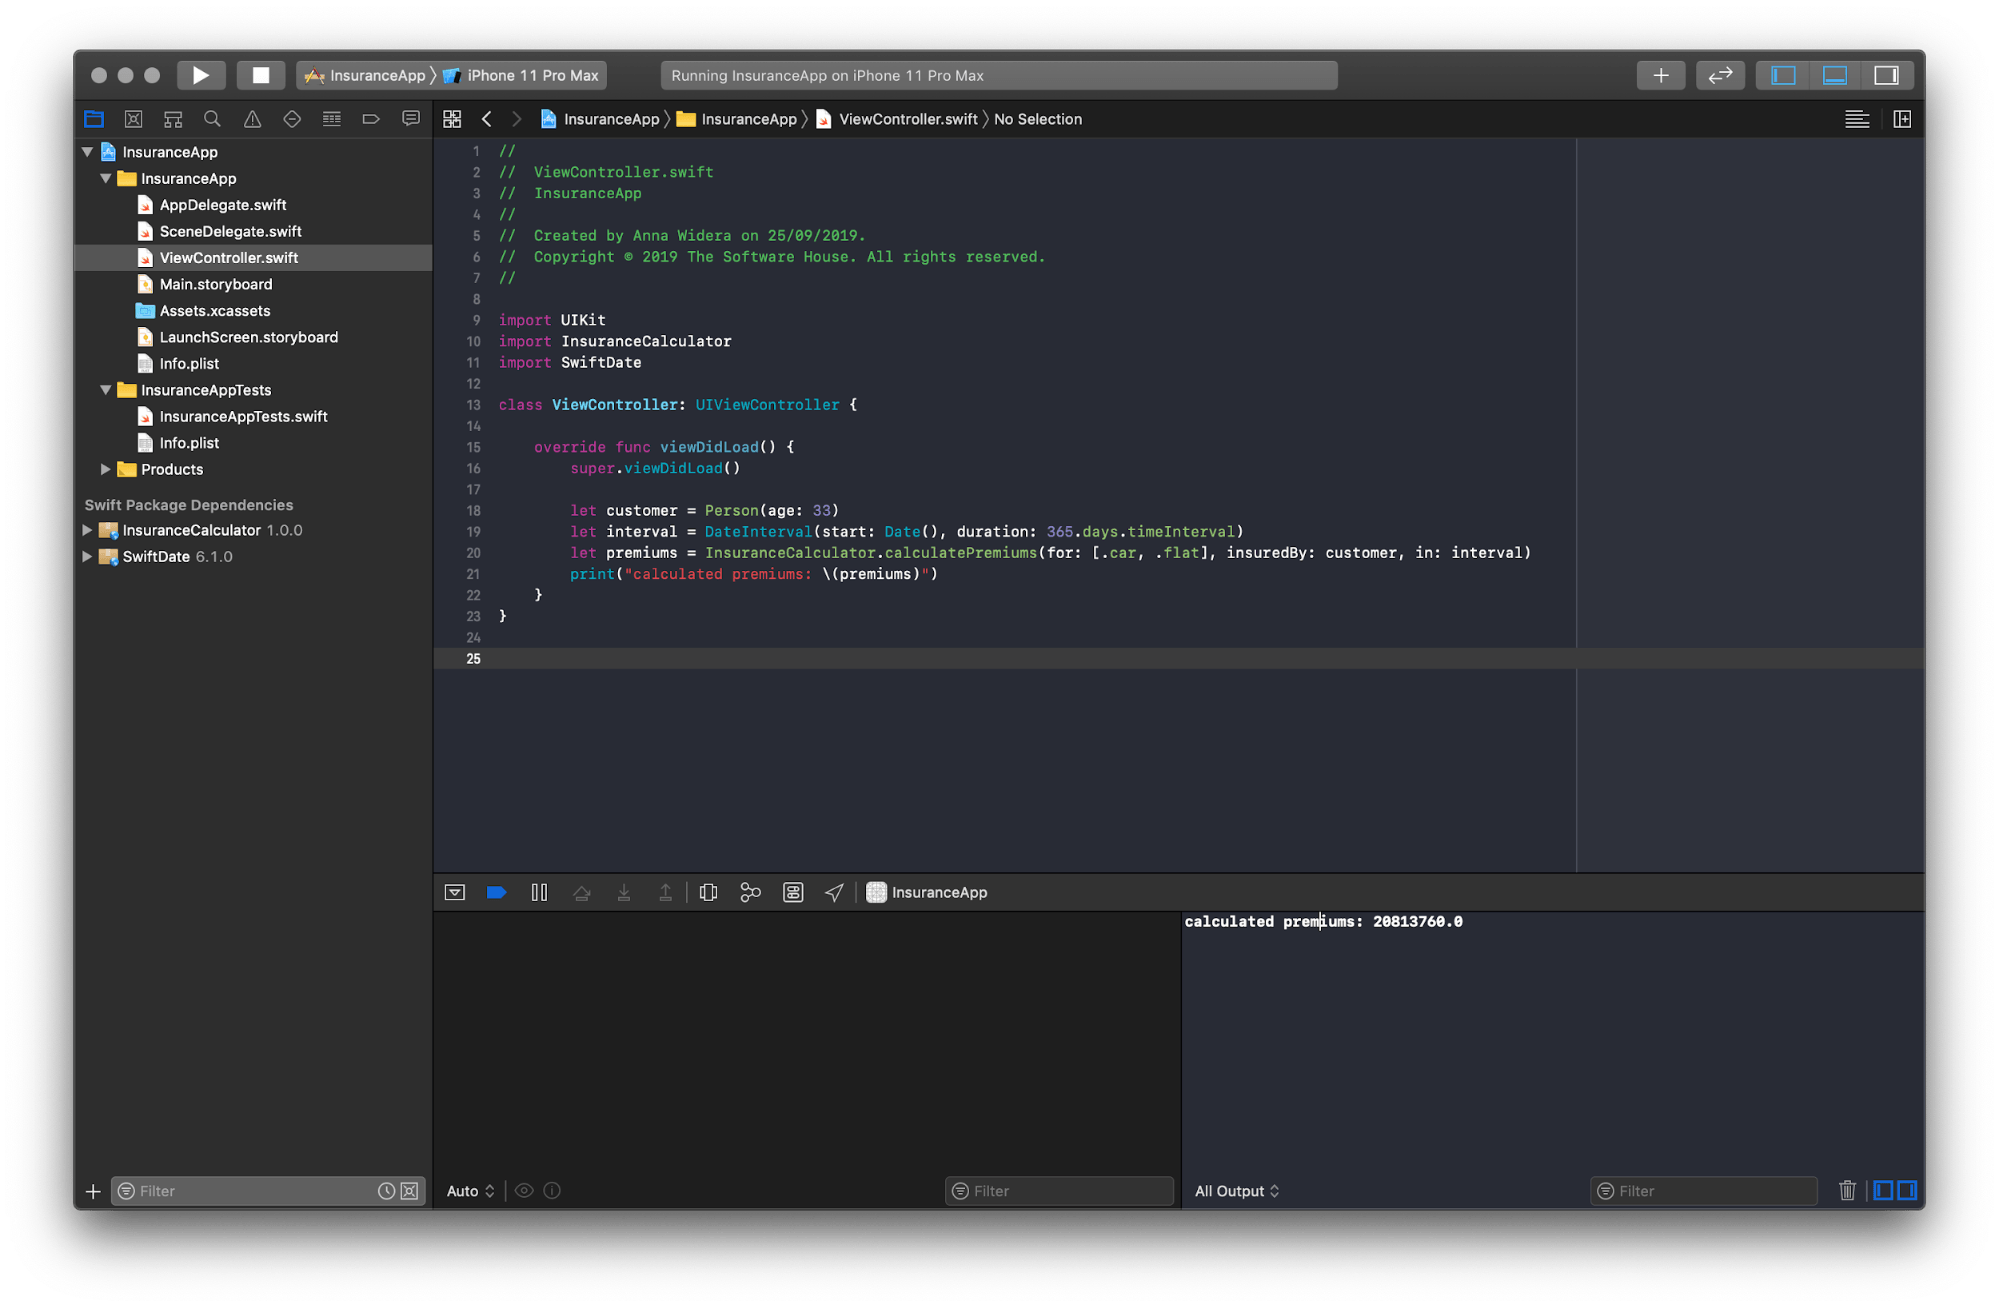
It was easy, wasn’t it? Thank you, Swift Package Manager!
Removing dependencies
Want to remove some dependencies? It only takes a moment!
Select a project in the Projects and targets list in Xcode, go to the Swift Packages tab (next to Info and Build settings), mark packages to be removed and click the “-” sign. Done.
Time for a recap
Until now, you’ve learned to work with existing public and private packages.
Package management with SPM is really fun. It only takes a couple clicks to add a new library in a specific version.
All packages are updated according to the rules you choose. In addition to that, a new Project Navigator section Swift Package Dependencies makes it easy to view all the dependencies we have added to a project.
With that, finding unneeded dependencies and keeping things clean is a walk in the park.
Using Swift Package Manager in making of modular apps
Now, we’re going to:
- Divide an app into manageable modules 🤹♀️,
- 🗄️ Go over the structure of a single SPM package,
- Analyze the Package.swift manifest file,
- 🔗Add dependencies to a library,
- 📤 Publish a library for an organization’s internal use only.
This scenario works for parts of code you want to wrap into a (Swift) package and separate from the project. It’s not a separate reusable library yet, though. This approach has a couple of benefits:
- Makes the responsibility scope of each and every module very clear,
- Helps you write clear code, promoting the use of namespaces,
- Forces you to explicitly decide which parts of the module can be used outside,
- Makes it easy to replace the module with another one provided the public API remains the same.
A package like this will surely change a lot as the app grows. That’s why I think it’s better to version the code of this module together with the whole app.
Back to our example.
Let’s say that I want all the network-related code to be separated as a new module. In order to do this, I’m creating a NetworkStack package.
I’m planning to use it only to share simple methods for getting insurance quotes via a public API. Details such as endpoint routes, response serialization etc. will remain hidden in the module.
Creating a package
Before you delve deeper into Swift Package Manager, make sure you are familiar with all the basic terms I’m going to use here. Some of the key concepts include modules, packages, products and dependencies.
Before Xcode 11, you could create SPM packages by running a command (the library type is default, the other being the executable type):
swift package init // or swift package init --type library
By default, the init command creates the structure for the library package.
Now, you can do the same using Xcode 11’s interface – File -> Swift Packages -> Add Package Dependency…
It’s worth it to note that:
- When you add the library package, you also add it to the app’s workspace,
- There is no need to tick the “Create Git repository on my Mac” box. The code will be version in the main repository of the project.
Adding a package to the project
The workspace now includes InsuranceApp and the NetworkStack module. To use the newly-created library in the app’s code, I need to add it to the main target (in the General tab of InsuranceApp’s target).
Note that I’m choosing the 🏛️NetworkStack product rather than the 📦NetworkStack package.
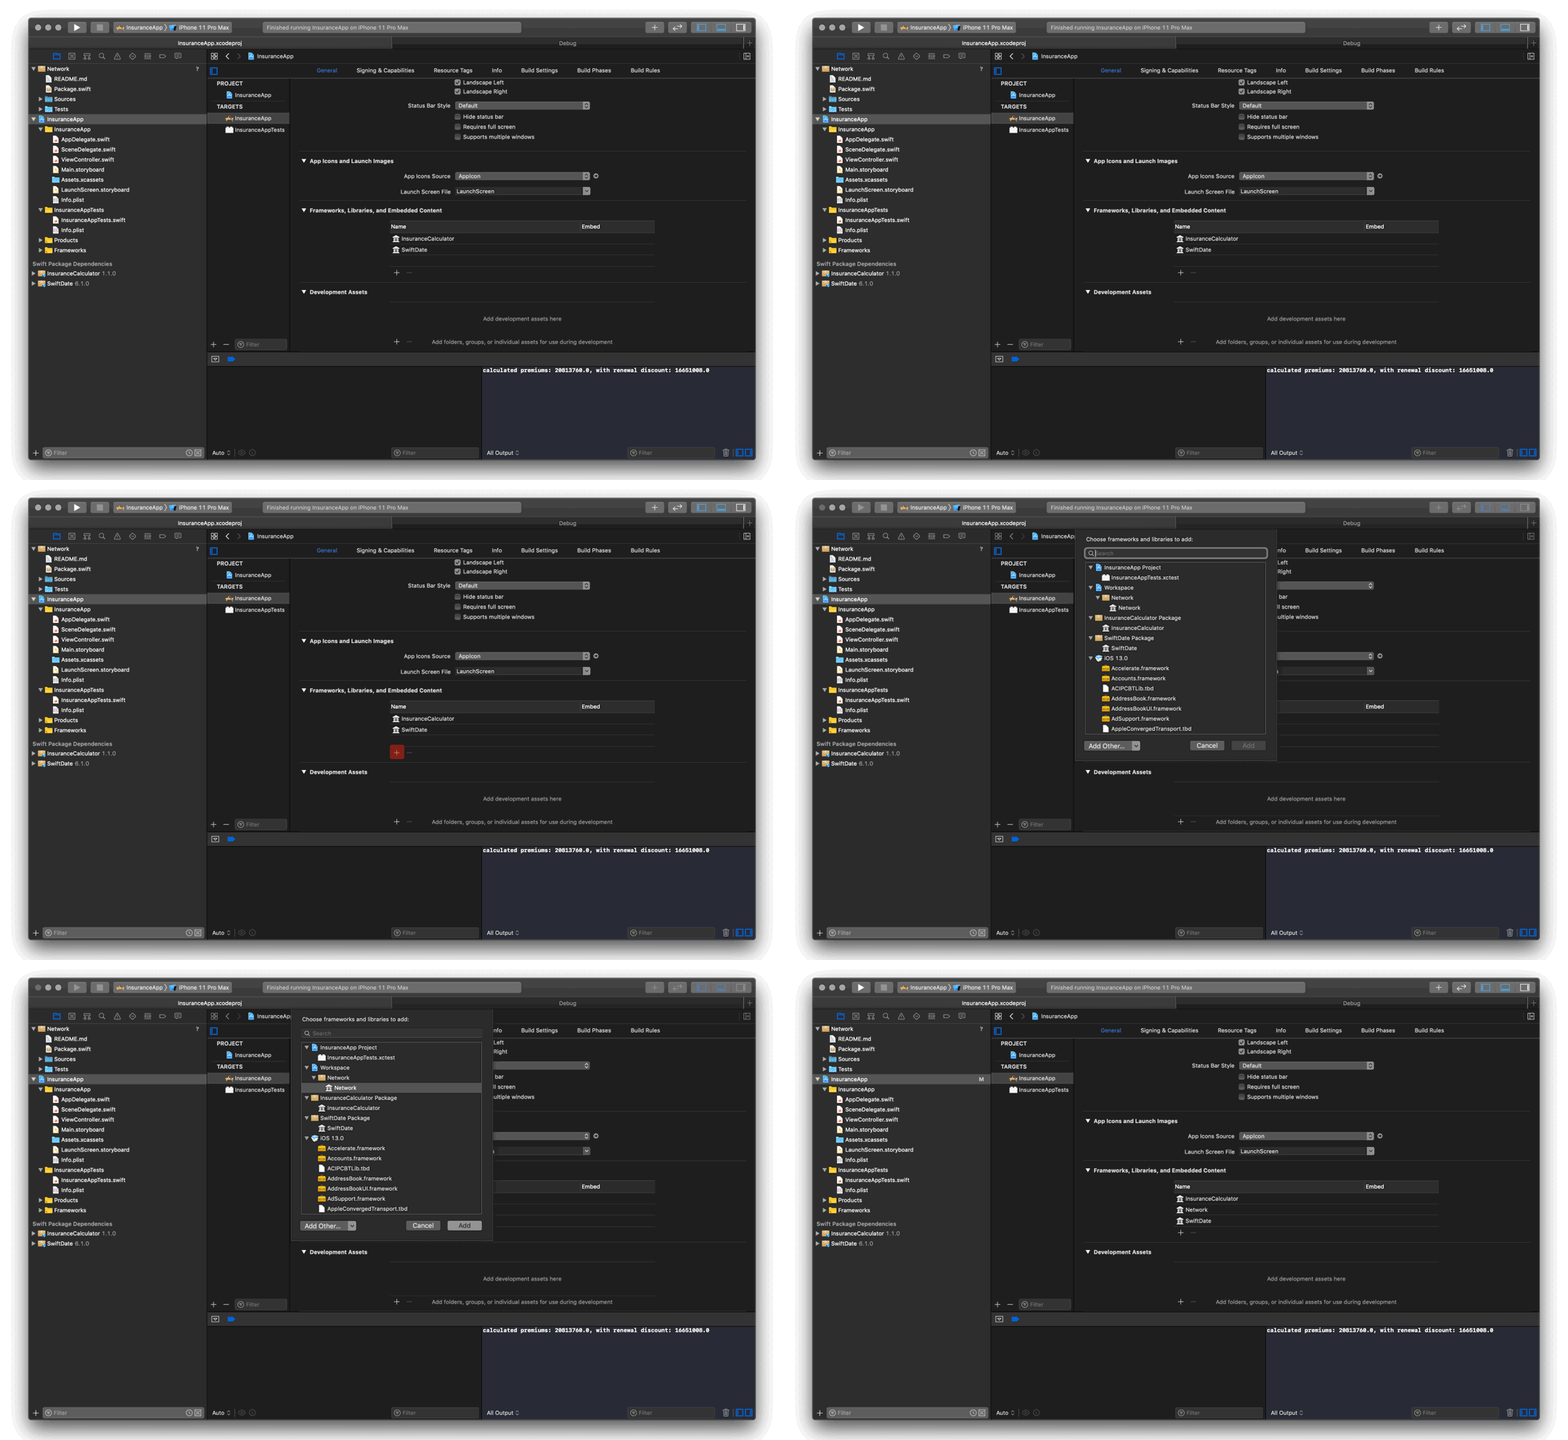
🥳 Voilà! Now, the app has access to all the public features of the NetworkStack library.
🔎 Show me what you’ve got inside
So far so good. The next step is to add something of value to the newly-created module. The structure of the package’s catalog is clearly defined.
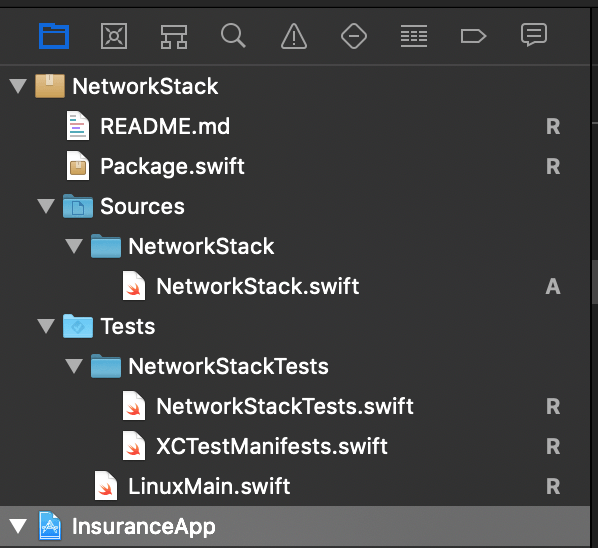
📦 Package.swift – manifest file,
📂 Source/NetworkStack contains source files,
📂 Tests/NetworkStackTests is for all the tests,
📄 README.md – take your time, of course… ;),
📝 .gitignore – SPM makes it quite useful
Let’s start with the Package.swift manifest file.
// swift-tools-version:5.0
// The swift-tools-version declares the minimum version of Swift required to build this package.

import PackageDescription

let package = Package(
name: "NetworkStack",
products: [
// Products define the executables and libraries produced by a package, and make them visible to other
 packages.
.library(
name: "NetworkStack",
targets: ["NetworkStack"]),
],
dependencies: [
// Dependencies declare other packages that this package depends on.
// .package(url: /* package url */, from: "1.0.0"),
],
targets: [

// Targets are the basic building blocks of a package. A target can define a module or a test suite.
// Targets can depend on other targets in this package, and on products in packages which this package
depends on.
.target(
name: "NetworkStack",
dependencies: []),
.testTarget(
name: "NetworkStackTests",
dependencies: ["NetworkStack"]),
]
)
Isn’t it great that you can write the manifest of a Swift package in Swift?
“The manifest file, or package manifest, defines the package’s name and its contents using the PackageDescription module.
A package has one or more targets. Each target specifies a product and may declare one or more dependencies.”
You can read more about the manifest file in the Swift Package Manager’s documentation.
The full documentation of API PackageDescription is available here on GitHub.
Adding dependencies to the module
Since the NetworkStack module will keep me busy enough, I’m going to make things a bit easier by using the Alamofire library.
In order to add this dependency to the package, you need to:
1. Add it in the Package.swift manifest file to the dependency table,
dependencies: [
        .package(url: "https://github.com/Alamofire/Alamofire", .upToNextMajor(from: "5.0.0-rc.2")),
    ]
2. Add it to the target’s dependencies in the same file,
targets: [
        .target(
            name: "NetworkStack",
            dependencies: ["Alamofire"]), // <-------
        .testTarget(
            name: "NetworkStackTests",
            dependencies: ["NetworkStack"]),
    ]
And that’s it!
I know, I keep repeating myself, but I’m really amazed at how much easier things can be with Swift Package Manager. With just this, version 5.0.0-rc.2 of Alamofire appeared on the list of Swift Package Dependencies in Project Navigator. Just like that.
However, when I try to build my project, I get an error:
❗The package product ‘Alamofire’ requires minimum platform version 10.0 for the iOS platform, but this target supports 8.0.
Packages can choose to configure the minimum deployment target version for a platform by providing platforms in the Package.swift manifest file.
let package = Package(
 name: "NetworkStack",
 platforms: [ .iOS(.v10) ],
 ...
Adding an entry to support iOS 10 and higher resolves the issue – the project builds without any errors.
For more details about struct SupportedPlatform, head over to the Swift Package Manager documentation.
Let’s get something real done
How exactly can a module like this be useful in a project? I’m going to show it by adding a public method, which fetches a list of insurance advisors.
// NetworkStack.swift
import Foundation
import Alamofire

public struct NetworkStack {

    public static func getConsultants(_ completion: @escaping ([Consultant]) -> Void) {

        AF.request(Endpoint.consultants.url).response(completionHandler: { response in
            do {
                let result = try response.result.get()
                if let data = result,
                    let consultants = try? JSONDecoder().decode([Consultant].self, from: data) {
                    completion(consultants)
                } else {
                    completion([])
                }
            } catch {
                completion([])
            }
        })
    }
}


// Consultant.swift
import Foundation

public struct Consultant: Codable {

    public let name: String
    public let email: String
    public let id: Int
    public let phone: String
    public let website: String
}


// Endpoint.swift
import Foundation

internal enum Endpoint {

    case consultants

    var url: URL {
        switch self {
        case .consultants: return URL(string: "https://jsonplaceholder.typicode.com/users")!
        }
    }
}
In the main ViewController of the app (I know… but this is not an article about app architecture 🙂 ), I’m importing the NetworkStack library and download the list of insurance advisors.
import UIKit
import NetworkStack

class ViewController: UIViewController {

    override func viewDidLoad() {
        super.viewDidLoad()

        NetworkStack.getConsultants { consultants in
            print(consultants)
        }
    }
}
By moving all the code responsible for network requests to a new module, the project has become much clearer. The new namespace allows me to encapsulate many structures and operations.
It usually is not a good idea to use models that map 1:1 with the API responses (as a matter of fact, I can’t think of a good scenario for this…).
I decided to extend the NetworkStack package with mapping to public models, which only include necessary data in specific formats (dates, URLs etc.).
Declaring private Endpoint enum in the module inside guarantees that making additional requests that do not go through the NetworkStack layer will simply be impossible (without very strong effort, of course!)
And now the best part!
I decided to share this extremely useful, well-thought-out and thoroughly tested library with another team. Can Swift Package Manager handle that?
Publishing a package
Publishing some code that has been a separate module from the start is far more straightforward than trying to extract a piece of the project’s codebase created in the main target, even if it is conceptually separate.
The latter scenario requires tons of self-control and experience in order to maintain a good level of concern separation.
Besides, this extracted code will have to be wrapped into some kind of package/library anyway, so it’s much better to do it from the start.
What exactly should you do to publish a package? There are a couple steps to it:
- Drag the file from Xcode to your desktop. Make sure to hold the “⌥” key to make a copy.
- Open the standalone package in Xcode by double-clicking the Package.swift file.
- Put the package under source control by going to Source Control -> Create Git Repositories…Xcode will create a local Git repository and automatically commit the current state of the package all at once.
- Tag the master with a current version of the library (e.g. “1.0.0.”).
- Create a remote repository and push the package and tag to it.You can also do it via Xcode in the Source Control Navigator tab (CMD+2) if you have configured your GitHub/Bitbucket/GitLab in Xcode (I have gone over the process in the 1st part of the guide).
You can now import the internally-developed library by going to File -> Swift Packages -> Add Package Dependency…
Read the first part to learn more on that, but you know what it means 😈 ♾️, it may be wiser to keep on reading for now👇
Boris Buegling has talked about Creating Swift Packages during this year’s WWDC (ca. 8:00).
He includes adding content to README and writing tests. I skipped it since it would only complicate the process, while the library’s code should already have solid test coverage (I already used it in the app after all).
A package in the edit mode
You thought we’re done? Not even close! SPM still has a killer feature up its sleeve! 😄
I’m going to show you how you can edit the source code of your project’s packages in the very same Xcode window.
Let’s get back to the InsuranceCalculator library. Let’s say I need to make a change in how it calculates premiums.
First, I want to do this locally and see how the update works in the iOS app, and then I want to update the library so that the macOS app gets it too.
In order to change the reference to InsuranceCalculator for a local version, I need to:
- Clone the library’s repository to my local drive,
- Drag the InsuranceCalculator directory to the workspace.
And that’s pretty much it.
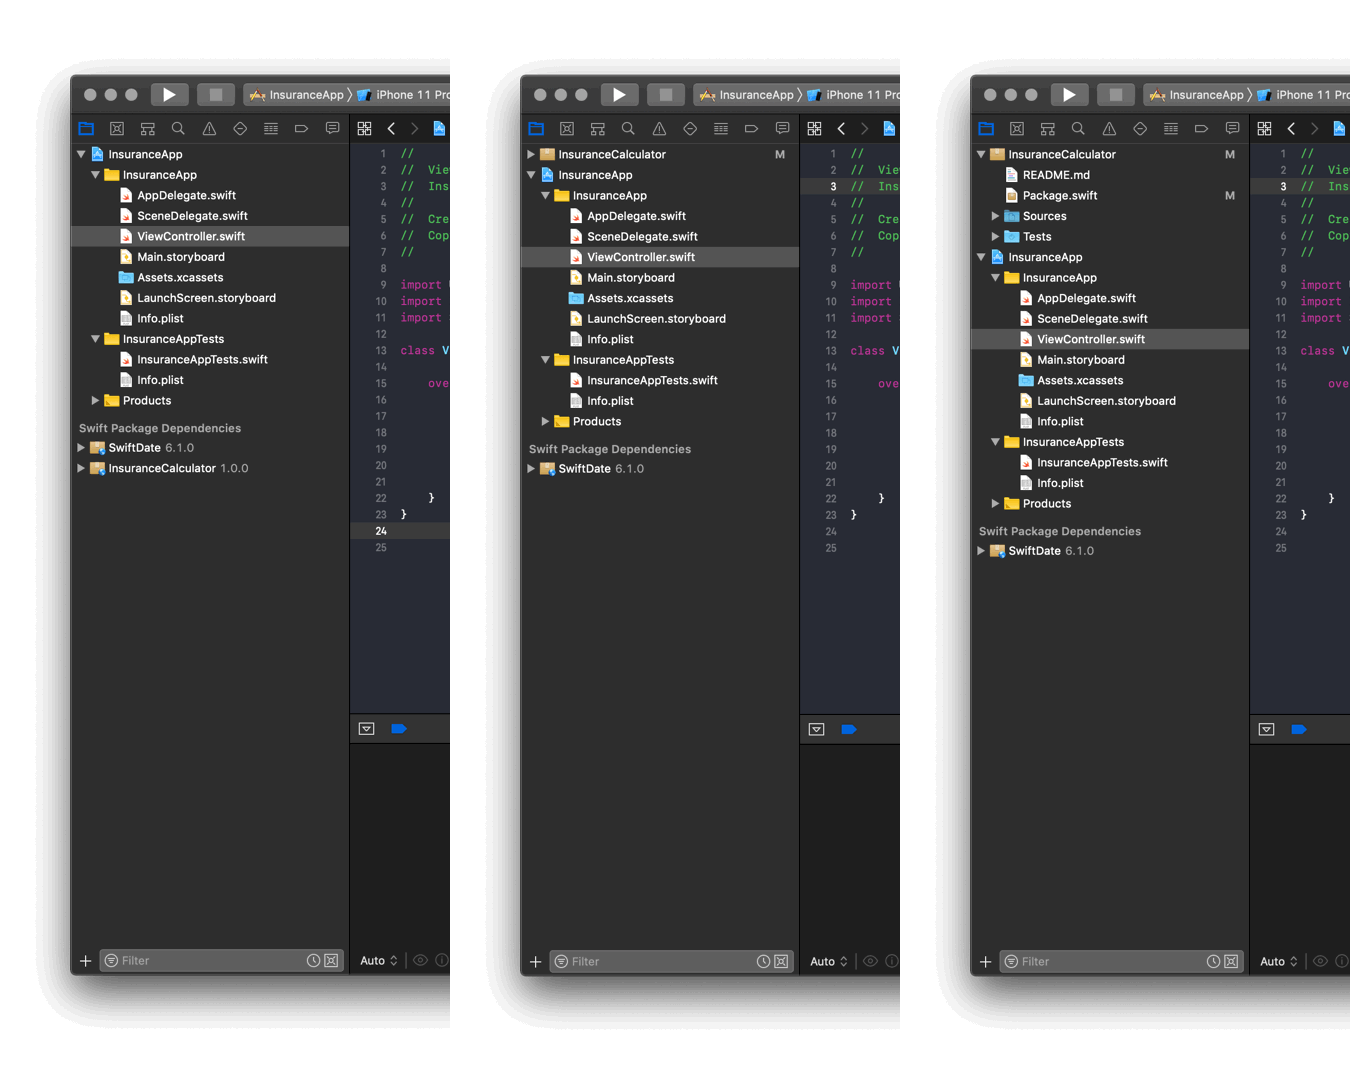
Now I can edit the source files of the package in Xcode, in the very same workspace I’m working with all the time!
I can now add the discounts applicable when extending the insurance contract in 📦 InsuranceCalculator/Sources/InsuranceCalculator/InsuranceCalculator.swift. I’m also adding more tests.
How to run tests
I’m launching the tests in the Terminal using the swift test command (while inside the catalog that includes the InsuranceCalculator package, of course).
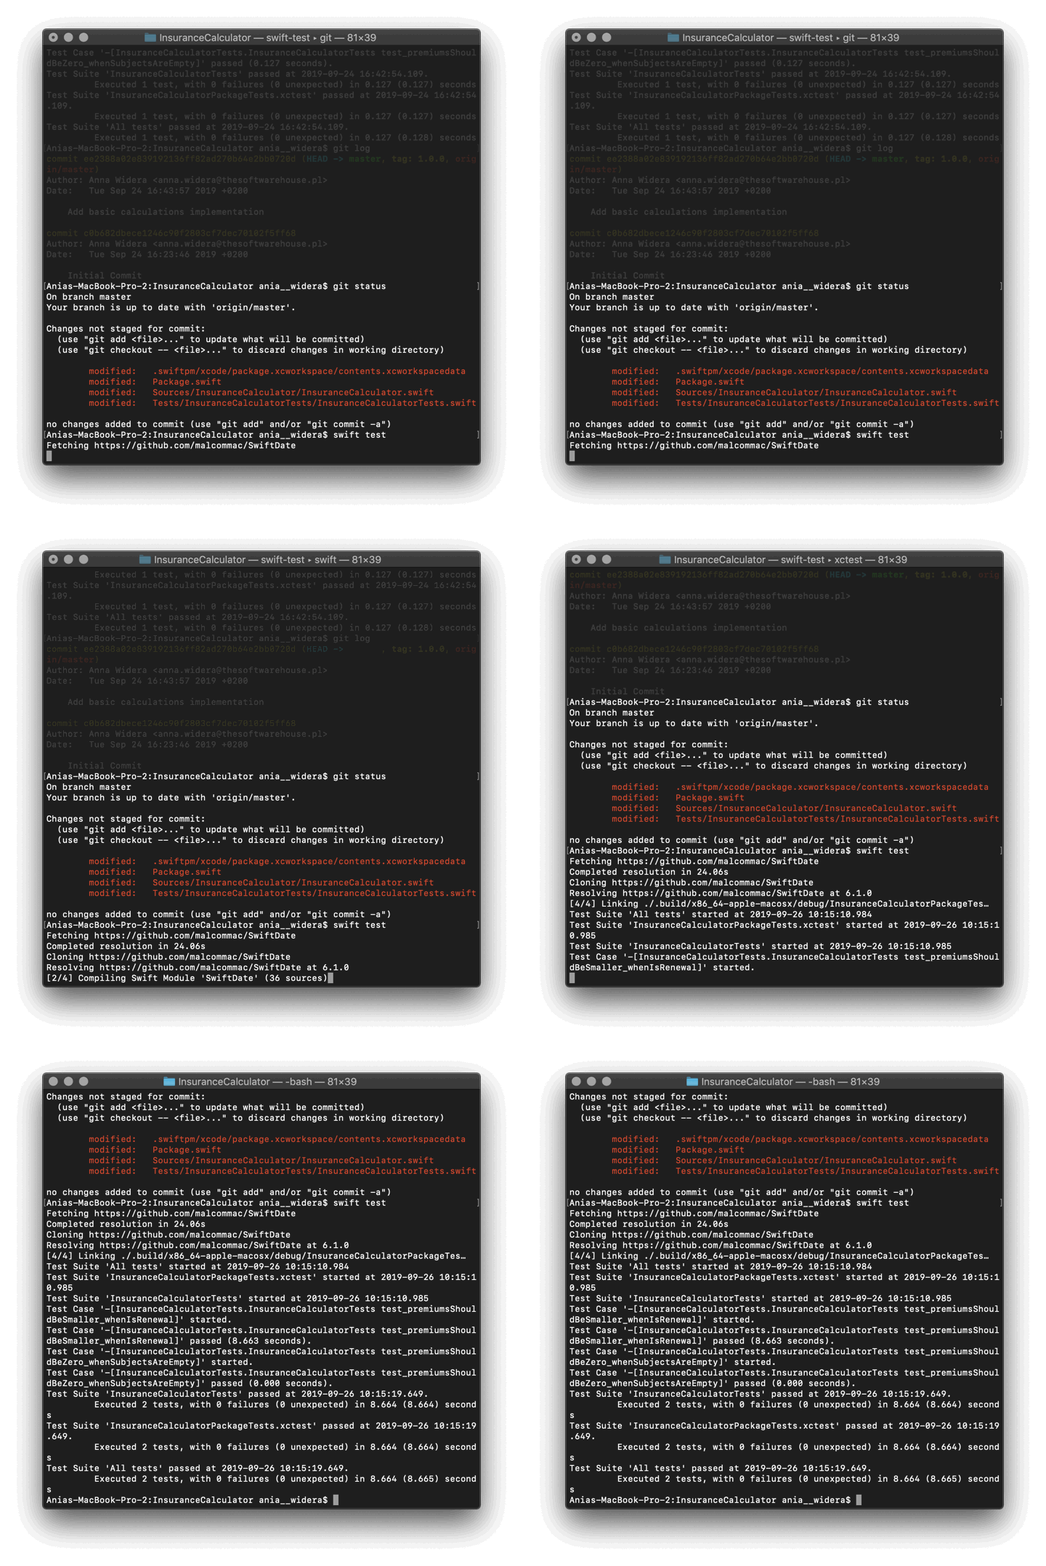
Use updated
The newly-updated calculatePremiums method is automatically available in the main project.
No need for any further configuration. I can now calculate premiums, taking into consideration the renewal discount.
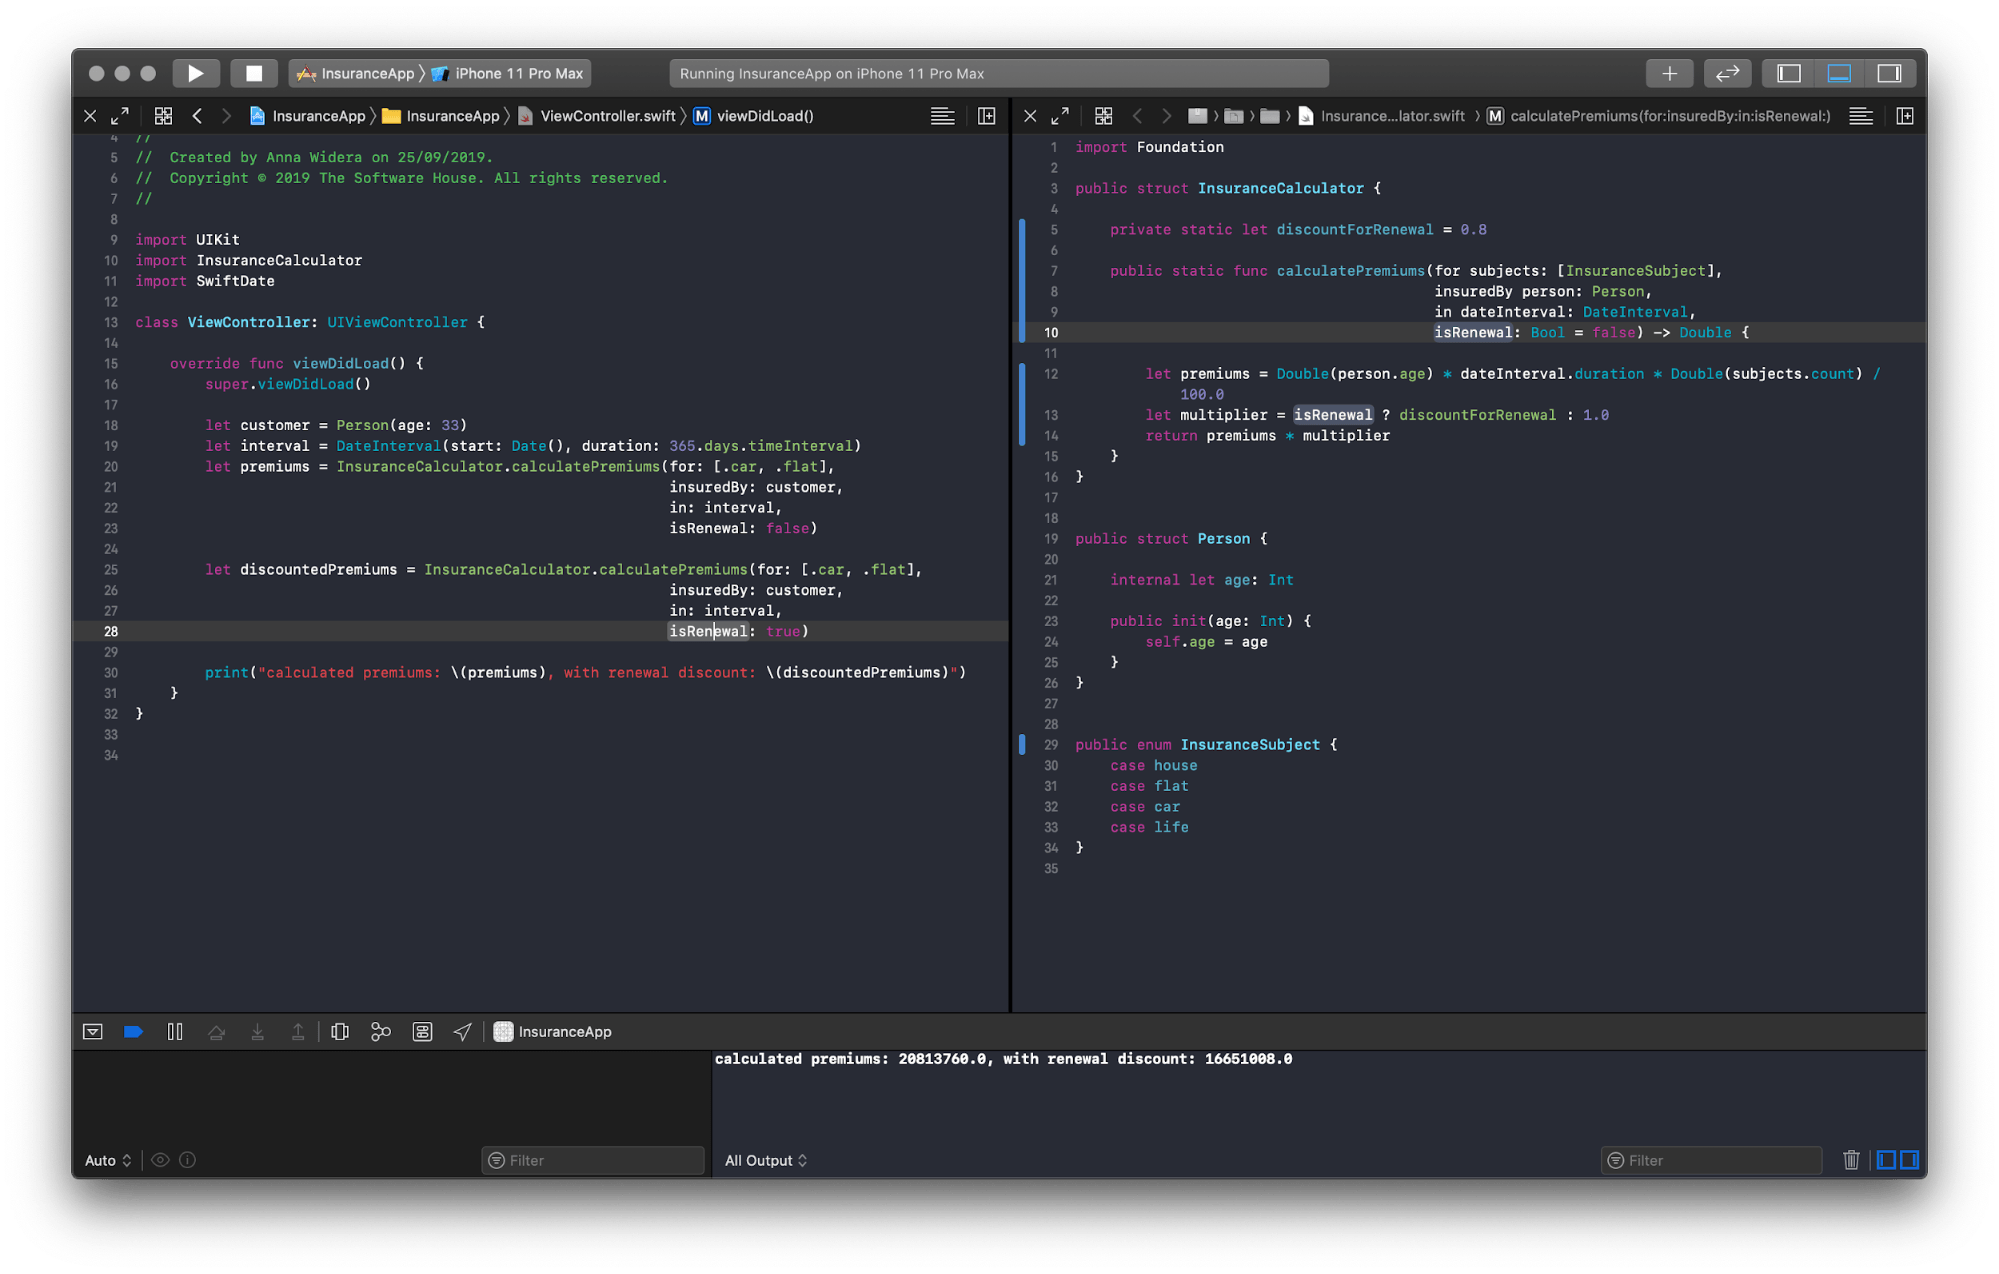
Publishing an update
The next step is to update the InsuranceCalculator library in the repository.
I can commit all changes and bump the version to 1.1.0 (tagging the master branch) using Xcode’s Source Control interface. Once pushed, the new version is made accessible to all teams.
In order to switch back to InsuranceCalculator from the repository, all I need to do is… remove the reference to the local version.
Note that InsuranceCalculator can again be found in the Swift Package Dependencies section, but this time its in the 1.1.0 version.
SPM has fetched the latest version of the dependency in the 1.0.0 < 2.0.0 range.
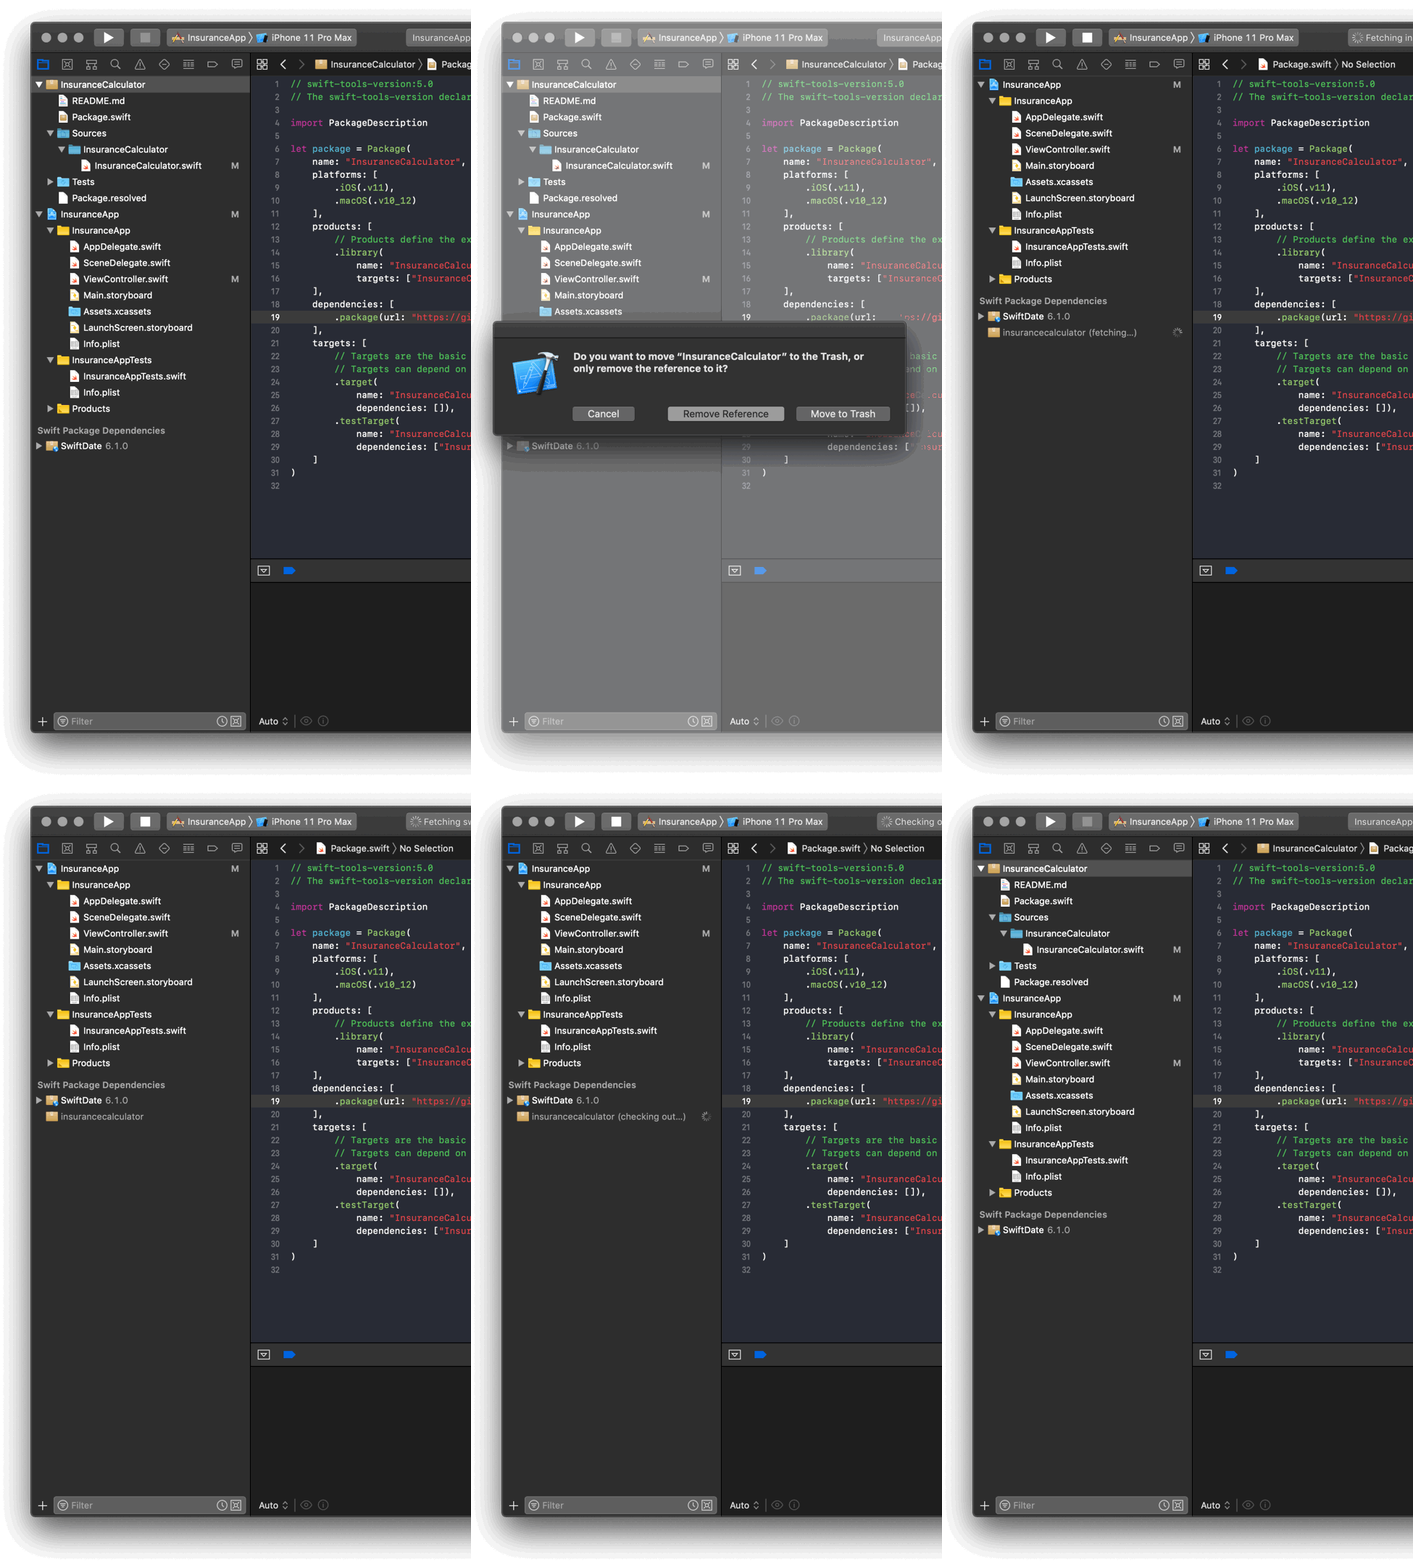
⚙️ Cloning on a different machine
As I already said, I saved the best for last. So here is another killer feature.
Let’s say a new team member is getting into the project. They clone the repository to their local drive. They click CMD+R. And the magic begins.
Swift Project Manager is sorting out all the dependencies and their versions, fetching and checking them out.
Next, Xcode is building the project, adding all the required libraries in the process. No extra commands, no need to configure any paths. Everything simply works as it’s supposed to. 🙇
Summary
For me, this tutorial was me expressing admiration and gratitude for the new and improved Swift Package Manager, which now supports all Apple platforms and integrates with Xcode 11.
Now you know how to unpack, pack and build packages with the Swift Package Manager.
Since it’s easier it is to build and maintain a modular app with it, it’s also easier it is to invest your time and effort in making one.
I really hope that it will all translate into much clearer and pleasant codebases you gladly return to months or even years later. 🤞
Also, if you want to learn even more about trends in Swift, make sure to read my previous article on protocol-oriented programming in Swift.

