12 July 2023
Message brokers – use cases & model AWS implementation using SNS & SQS

Modern applications are getting more and more complex. Time and resource-consuming operations, communication between multiple services, processing lots of data – that’s only a few of many problems that developers have to face. Fortunately, there are solutions that can simplify some of these challenges. One of them is using a message broker.
If you have already heard something about message brokers and also know a thing or two about message delivery in distributed systems, you should already have an idea about why message brokers can be so useful, especially in the case of large systems that speak various languages and technologies at the same time.
But there’s a lot more to be said about message brokers if you want to use them well in practice.
Let’s review the contents of this article.
What you’ll learn
I’m going to go over:
- the theory behind message brokers – for the uninitiated (if you meet the conditions laid above, you can skip this part),
- the most common distribution patterns for message brokers,
- advantages and disadvantages of message brokers,
- major use cases for message brokers, that is: long-running tasks and crucial APIs, microservices, mobile apps, transactional systems, and data feed management,
- popular message brokers currently on the market,
- a practical implementation of a message brokers using AWS services, SNS and SQS in particular, complete with code.
We’ve got a lot to cover so let’s just do it!
What is a message broker? ✉️
A message broker is a piece of software, which enables services and applications to communicate with each other using messages. The message structure is formally defined and independent from the services that send them.
This allows applications to share information with one another, even if they’re written in different programming languages!
Sounds cool, right?
How do message brokers work? 🤔
Before we start let’s get through some basic concepts of a message broker:
- Producer – the application responsible for sending messages. It’s connected with the message broker. In publish/subscribe pattern (we’ll move on to that) they are called
publishers. - Consumer – the endpoint that consumes messages waiting in the message broker. In publish/subscribe pattern they are called
subscribers. - Queue/topic – a folder in a filesystem. Message broker uses them to store messages.
There are two particularly popular distribution patterns for message brokers. Let’s take a look at them.
Two most common distribution patterns
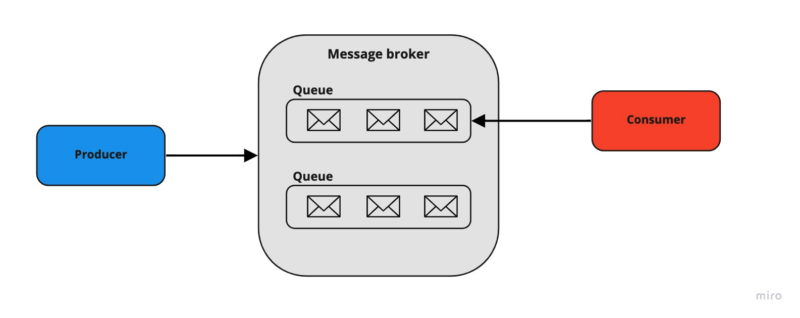
Point-to-point messaging
In this pattern, there is one-to-one relation set between the sender and the receiver of the message. Each message is sent and consumed only once. We can use this pattern for example, when some action needs to be performed only once.
Now you probably think: “Ok, so what’s the difference between this and some REST API?”. The answer is simple. The message broker guarantees that message will not be lost in case of failure of the consumer. It’s stored safely in the message broker queue. We’ll move to that and the other advantages of the message broker later in the article.
Publish/subscribe
This pattern is slightly different from the previous one. Here, the sender of the message doesn’t know anything about receivers. The message is being sent to the topic. After that, it’s distributed among all endpoints subscribed to that topic. It can be useful e.g. for implementing notifications mechanism or distributing independent tasks. This solution can also lead to implementing an event-driven architecture-based system, where applications have fewer dependencies between each other.
In this pattern, the components are loosely coupled and transmit events to one another. These events would be messages sent to the message broker.
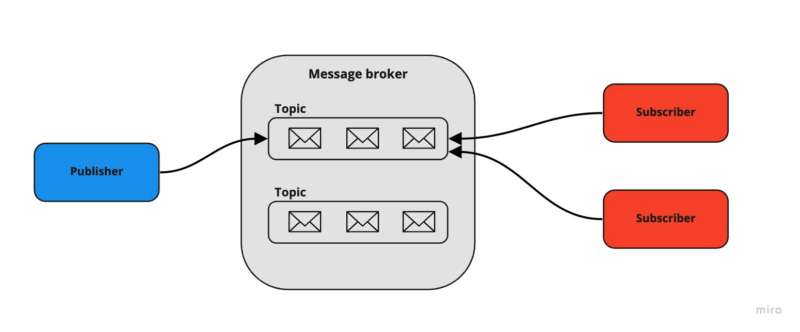
Of course, there are more variations of these patterns. You can have multiple consumers attached to one message queue. Or you can specify criteria for retrieving only desirable types of messages.
What are the advantages of using the message broker? 📈
- Provided communication between services that may not be running at the same time. The producer can send messages regardless of whether the consumer is active or not. All it needs is a running message broker. The same applies to the consumer.
- Improved system performance by introducing asynchronous processing. High-consuming tasks can be distributed to separate processes. That will fasten up your application and increase user experience.
- Increased reliability by guaranteeing the transmission of messages. Message brokers offer a redelivering mechanism. In case of consumer failure, it can redeliver the message immediately or after some specified time. It also supports routing of not delivered messages – it’s called a dead-letter mechanism.
That sounds good, but there is no solution without drawbacks. Message brokers are no exception.
What are the disadvantages of using the message broker? 📉
Use of the message broker involves asynchronous processing. Therefore, the disadvantages of using it are related to the challenges we face by using asynchronous calls.
- Increased system complexity. Introducing a message broker in your system is a new element to your whole system architecture. Because of that, there are more things you have to take into account, such as maintaining the network between components or security issues. Additionally, a new problem arises related to eventual consistency. Some components could not have up-to-date data until the messages are propagated and processed.
- Debugging can be harder. Let’s say you have async multiple stages of processing a single request using the message broker. You send something but did not receive a notification. Searching for a cause of failure can be a challenge as every service has its own logs. Keep in mind to add some message tracing facilities alongside implementing systems using message broker.
- There’s a steep learning curve at first. Message brokers are not trivial as they sound. They have a lot of setup and configuration options. The size of queues and messages, the behavior of queues, delivery settings or messages TTL, are only a few of many options you can set.
Not that we know the theory behind message brokers and familiar with both the good and the bad of this approach, we can get to the fun part – using message brokers in practice!
When should you use the message brokers?
1. Long-running tasks and crucial API 👨💻
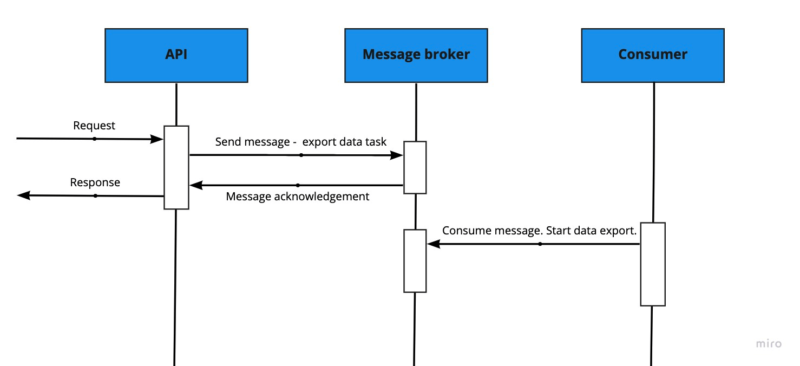
Let me tell you an example from my personal experience. Some time ago I had to improve the performance of the mechanism responsible for data export. It was triggered by an HTTP request and was taking too much time. What is more, users could not use the application after triggering action as they were waiting for the export result.
As you probably guessed, the message broker came to the rescue.
I reduced the request logic only to sending a message to the broker. Data export became the responsibility of the consumer which was running asynchronously. The result was very satisfactory, as we achieved a non-blocking request. Its time was reduced from over a dozen seconds to several dozen milliseconds! The user was able to download the file after receiving the notification about success.
In short, if you have actions in your system which:
- are time and resource-consuming
- doesn’t require you to return the result of the operation immediately
…then the message broker is for you.
2. Microservices 🖥 ↔ 🖥
Large systems can consist of many separate services. It can be challenging to coordinate communication between them. The solution which comes at first is to make integration using REST API. However, with the growing number of services in the system, it can be hard to extend and maintain it. Besides, what if one of your applications goes down and becomes unavailable? The API will start returning critical errors.
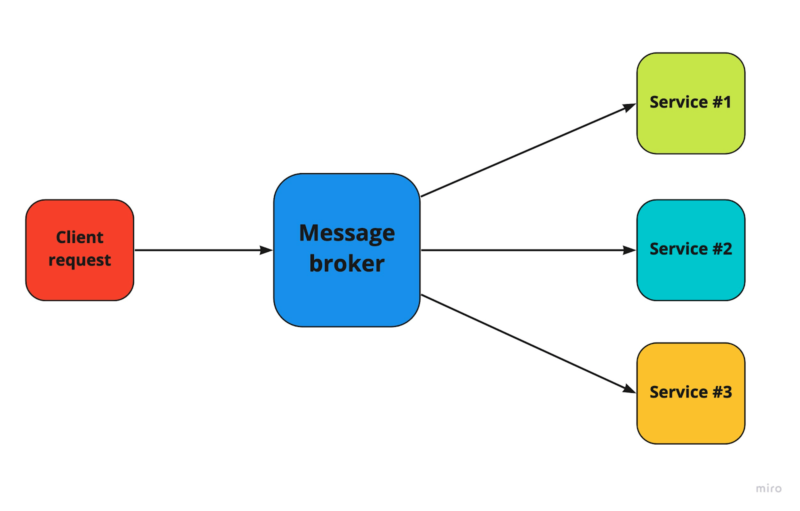
A great alternative is to create event-based communication and use the message broker together with publish/subscribe pattern. The broker would work as a central router (to route messages). Every service can subscribe to the types of messages that they need.
This solution has a lot of benefits. You don’t need to extend your already existing services if you want to add a new one. If some services are down – they will consume the messages after they’ll reboot.
3. Mobile applications 📱
It is a great use case for the message broker. Why? Because almost every mobile app has push notifications, of course. Let’s imagine you are developing a news application. Every phone connected to the network can subscribe to some message broker’s topic. Whenever some redactor posts some news – you are receiving notification. Pretty simple, isn’t it?
4. Transactional systems🤝
It connects a bit with the long-running task and microservices scenarios, but it is also worth mentioning. Sometimes it is required to perform some actions in a specific order.
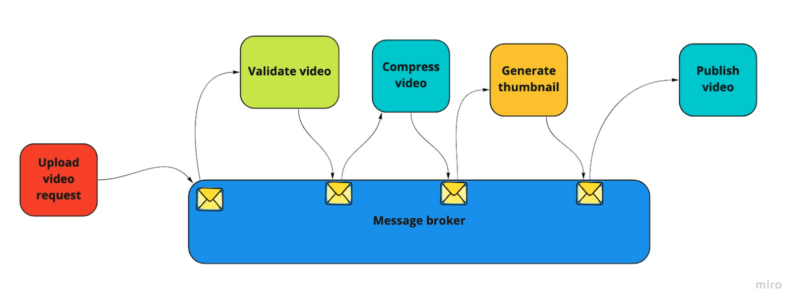
Let’s say you create a YouTube-like system and you want to have a mechanism for publishing a new film. First, you are uploading the video. After that, it needs to be validated, compressed, some thumbnail has to be generated. Finally, it can be made public. Every action should be triggered after the previous one is finished.
To achieve that you can use the message broker. Let’s assume that you have separate services for validation, compression, etc. Every service can have the role of sender and receiver at the same time. After consuming its task it can send a message to the broker that the job’s finished. After that, the next service can take over the video.
5. Controlling data feeds 👮♂️
It can be useful if you want to control and limit the number of some entities in your system. One of the simplest scenarios is to control the limit of registered users. You can, of course, do this without the message broker – for example by locking tables on the database layer to prevent race hazard. With message broker it’s more simple – you can just publish a message after every registration request. The consumer will take the messages one by one. When it reaches the users limit – it can return some error or send an e-mail to not registered user.
🧮 Try this test to determine your company’s observability mastery
When you use message brokers, services talk to each other, generating data. Does your system analyze it? Observability can save money and improve any metric, e.g. time-to-market. Check how good you already are. No registration.
Examples of message brokers
The most popular message brokers are RabbitMQ, Apache Kafka, Redis, Amazon SQS, and Amazon SNS. Each of them is a great and powerful tool to use. For some basic cases and low load, you would not see the difference between them. However, when it comes to massive operation scale and advanced cases – they operate differently. It’s worth knowing what the main differences are.
RabbitMQ
It supports advanced and complex routing options. It provides four types of exchanges – it’s a part of the broker which is routing messages to proper queues. So in the case of RabbitMQ messages are sent to exchanges first – not to queues.
AmazonMQ
An alternative cloud version of RabbitMQ and Apache ActiveMQ provided by Amazon Web Services. It reduces your operational responsibilities by managing the setup and maintenance of a message broker for you.
Apache Kafka
It was created at first to track website activities. These required a massive load of data for a long period of time. And that’s what Kafka is good at. It can be even used for streaming data to storage systems and provide reliable message storage.
If you want to know why Apache Kafka is a unique among message brokers, read this article about data streaming using Kafka.
Redis
It can also be used as a message broker. It is an in-memory data structure store. Because of that, messages are not guaranteed to be durable there. If you have a system that requires an extremely fast broker, but you can allow yourself for some data loss – it can be a good choice.
Amazon SNS
A push notification service provided by Amazon. It can be used in a publish-subscribe pattern as also for sending individual messages. As the previous examples were open-source – the Amazon SNS is not. It’s available as part of Amazon Web Services. One of its main advantages is a low-cost infrastructure. It is also automatically scaling workload within your application.
Amazon SQS
A fully managed queuing service provided by Amazon. As in the case of Amazon SNS – it’s the part of AWS. It can also be scaled automatically to the size of the workload. What is more – it’s offering a free tier for a limited number of message queues and is very cost-efficient. The difference in how it works with Amazon SNS is the message consumption method. SNS has a push mechanism and pushes messages directly to consumers without storing them. Amazon SQS, in turn, has a pull mechanism – the receivers have to pull messages from SQS queues by themselves.
How to implement a simple message broker using AWS Services? ☁️

Yes, you can combine Amazon SNS power of publishing to multiple recipients with Amazon SQS durable queues!
In this example, I will show you how to create a simple message broker with the publish-subscribe pattern using AWS SDK for PHP. Of course, you can do it without SDK – all actions we’ll be doing you can perform by just using your AWS Console. Time for some tech meat!
Architecture overview
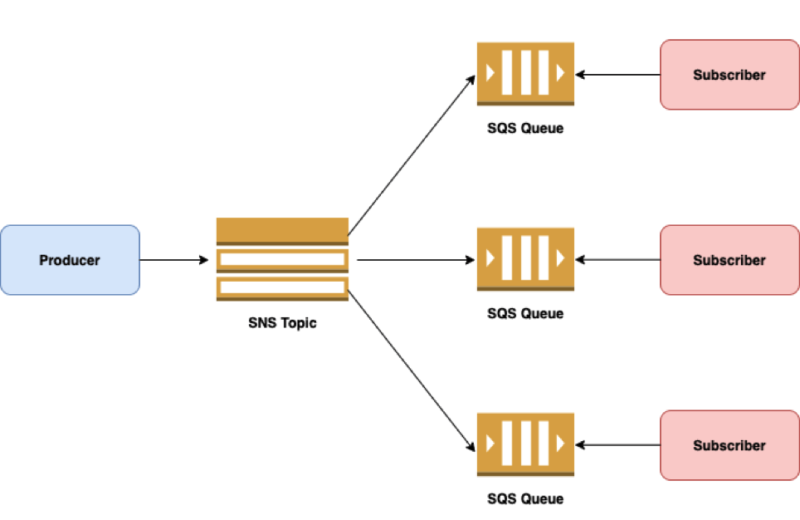
How will the SNS-SQS combination work?
In short – the publisher will send messages to the Amazon SNS topic. The topic will replicate and send the received message to all its subscribers. In our case – those subscribers will be Amazon SQS queues. Every queue will be connected with the subscriber, which will be pulling out the messages. For simplicity, our publisher and subscribers will be simple PHP scripts.
This solution guarantees that the messages can be delivered to applications that require immediate notifications for some events. They are also persistent thanks to the queues and can wait there until some consumer will be available.
Before we start coding, you need:
- an AWS account with programmatic access
- some PHP project where you can install AWS SDK
Step 1: Create an SNS topic
First, you need to create an SNS topic using a SnsClient. It’ll need some data to establish a connection with your AWS service:
- Region on which you want to have your SNS topic
- Version will determine which API operations are available for the client
- Credentials – your AWS Secret Access Key and AWS Access Key Id
In the code above, I passed the credentials to the AWS account as arguments in the constructor. Remember that it’s only for example purposes! Hard-coding your credentials within your application can be dangerous. You can read more about this here.
Now you can create your SNS topic. Think of some name for your topic and trigger the createTopic function of the SnsClient. As a result of the operation, you’ll get an Aws\Result object with information about your newly created topic. You can retrieve single data using the get function on the result object. Save a TopicArn property – you‘ll need that later.
Step 2: Create queue
Creating a queue is very similar to creating the topic. Instead of SnsClient and createTopic function use SqsClient and createQueue function. For the next steps, you’ll need the URL and ARN property of the newly created queue. You can create as many queues as you want – we’ll connect them to the topic later.
Step 3: Add a policy to the queue
Now you have to allow our topic to send messages to your newly created queues. AWS uses policies to manage permissions. These are represented in JSON format. For creating your policy you’ll need the topic and queue ARN’s. They uniquely identify your AWS resources. You should pass the policy to the SQS queue (not SNS topic) using sqsClient and setQueueAttributesFunction. For pointing up to which queue the policy needs to be added, you must set QueueUrl parameter.
Setting up the policy cannot be skipped. If you subscribe queues to the topic and the topic won’t have permission for sending messages – your queues will remain empty after publishing messages.
Step 4: Subscribing queue to the topic
After setting up the policy you can subscribe your queues to the topic. You need to use snsClient here and its subscribe function Setting up subscription requires choosing protocol – it’s a type of endpoint on which you want to receive messages. Amazon SNS supports sms, email, or even AWS lambda function, among other things. In our case, it will be sqs protocol, as we are subscribing queues. As an Endpoint, you need to pass your queue ARN. For TopicArn – as the name of an argument says – pass your topic ARN so the client will know to which topic you want to subscribe to a new endpoint. If you want to see subscription ARN in the result – set up the ReturnSubscriptionArn parameter to true.
Step 5: Publishing message
Your architecture setup is complete and you can move on to publishing a message. It’s very simple. All you have to do is to prepare a message and send it using snsClient and its publish function. You need to pass topic ARN, on which you are publishing, and message content. There are much more options you can set up before publishing a message such as subject, attributes, etc, but they are not required.
After running the script, access your AWS panel to see your queues. You can notice that one message has been replicated among all your queues subscribed to your topic.

Step 6: Receiving messages
Now, when you have your messages in queues, you can start receiving them. For that, use sqsClient again and call receiveMessage function. The only required parameter is QueueUrl. You can also set up how many messages you want to pull out (MaxNumberOfMessages parameter) and which attributes you want to receive. For each message returned, the reply contains several parameters, of which you are the most interested in message content and the receipt handle.
After calling the receiveMessage function you’ll get the Aws\Result object. Your messages are stored behind the Messages key as an array. Remember that it can be an empty array in case of no messages in the queue. Every message is an associative array and should look more or less like in the image presented below. You can see the message content under the Message attribute, as also your receive confirmation under the ReceiptHandle attribute.
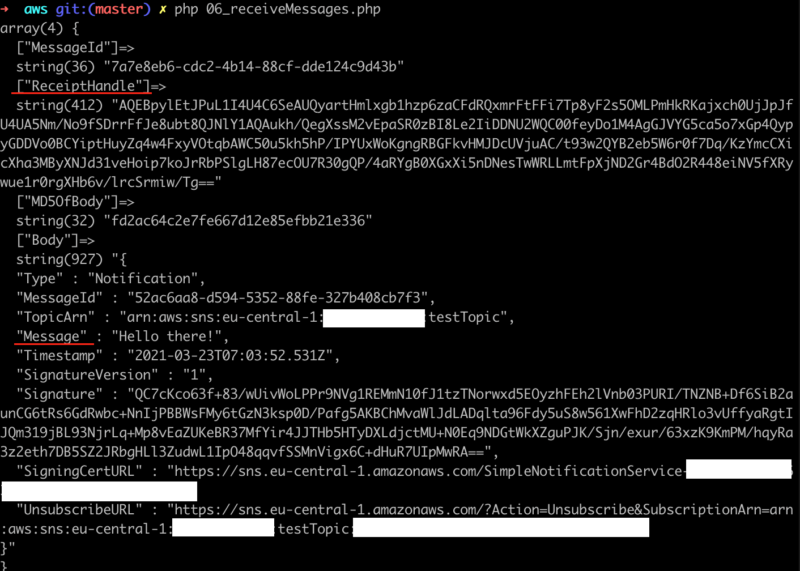
Every message should be deleted from the queue after receiving it. That’s because AWS counts not deleted message as a failed receive. Depending on queue configuration, it can be re-queued or moved to the dead-letter queue. For removing a message you need to call deleteMessage function and pass ReceiptHandle attribute received with the message.
Message brokers are not that hard!
As you can see, message brokers are helpful when you want to improve your system architecture. Today you’ve learned:
- how do message brokers work,
- what are the main advantages and disadvantages of message brokers and when it’s advisable to use them.
- how to implement such a message broker by yourself using the AWS services.
You should learn more about related message broker concepts such as: advanced message queuing protocol, Java message service, or message broker stores. And if you want to learn more about AWS SDK for PHP and see all configuration options – here’s a link to the official documentation. There are also dedicated packages for Symfony and Laravel which include the SDK.
Our developers don't hoard knowledge for themselves. Check out some more awesome content:
Wondering if your system would benefit from the message broker? 🤷
Or maybe you already know that, but are not sure which broker you should use? Schedule free, non-binding software consultations and let’s talk tech!

