13 July 2021
How to do performance testing using k6? Prepare & implement like an absolute pro

When working on the development of the application, the primary focus goes to implementing new functionalities to meet your customers’ expectations. Unfortunately, under the pressure of deadlines or other factors, people tend to forget about non-functional aspects, such as security, or as in this case – efficiency. In this article, I would like to tell you why and how to do performance testing using the K6 tool and how to implement it.
Prepare your basket
I hope you’re excited because the biggest sale is coming to your favourite online store today at 10 am! You’ve already picked nice products, and your basket couldn’t be more ready. Only a few seconds are left for the announced price cut to apply and you can finally complete your order.
👨💻 3…, 2…, 1… it’s the time!
Just to be sure, you refresh the basket to get the discount. Hmm, it takes a while (ugh, the other users…), but everything seems to be correct and the price reduced. You go to payment, enter all the necessary data and click “Buy”.
A loader appears on your screen.
😱 Oh no.
A few seconds pass and you still don’t see the summary of your purchase. You didn’t receive an email confirmation either. It’s never a good sign, so you start to get seriously worried.
🤔 Oh, something’s going on, the page is reloading!
“This website is temporarily unavailable”.
🤬 @#$%&!
Not what you expected, so the only reasonable thing to do is to refresh the page multiple times.
🥳 OMG, it loaded! Not all hope is lost!
Unfortunately, your basket is empty and the products you wanted to buy are no longer available.
☠️ There’s probably not enough @#$%&! to express your frustration at this point.
Disappointed, you shut down your computer. Your favourite brand just dropped on the bottom of the table. You vow to never buy there again, and their reputation is lost in your eyes forever.
How easily they could have prevented it…
What is performance testing?
What did the app developers forget about in the horror story above? Of course, performance tests.
As mentioned in the introduction, performance tests belong to the non-functional tests group. This means the object of their research is NOT the functions and features of your application.
Performance testing investigates the behaviour of applications and services under various traffic conditions, using the available functionalities to simulate end-user activities.
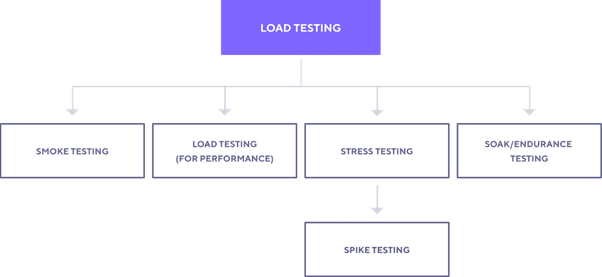
As in the case of automated tests, performance tests can be divided into several types. Each of them is designed to provide different information about your system.

Smoke testing
Checking if your system can handle the minimum user load without any problems.
Load testing
Evaluating system performance in terms of a specific (expected) number of concurrent users or requests per second.
Stress testing and spike testing
Assessing system limitations and stability under extreme conditions, such as a sudden increase in active users traffic. The example from my little story with discounts applying at a specific time illustrates this well.
Soak/endurance testing
Informing about the reliability and performance of the system under a specific load over a longer period.
💡 Read some more insightful articles about software testing from my colleagues:
Benefits of performance testing (there are loads!)
If you are wondering why it is worth spending extra time to take care of performance tests, or you need arguments to carry them out in your project but you need to convince someone first, the following list should be very helpful to your cause:
- You care about user satisfaction – apart from obvious operating errors in functionalities, nothing – I repeat – NOTHING irritates users more than slow apps.
- You get to know the speed and stability of your app – just making sure that even with increased user activity, the functionalities in your application are still running smoothly.
- You are prepared for unexpected traffic – regardless of the circumstances and great opportunities, you can be confident that your store will handle a huge number of orders, e.g. during Black Friday.
- You improve scalability – with cloud solutions, you make sure that with an increased flow of customers, the architecture of your application allows it to scale smoothly.
- You identify bottlenecks – not all errors are detectable during manual, automatic or security tests. Thanks to the performance tests, you can discover even more.
How to prepare and implement performance tests
You’re already aware of performance tests value and convinced people from your team to carry them out. It’s time to choose the right tool. When browsing the available frameworks, there is a lot of choices. Because at The Software House we operate in JavaScript technologies, our developers expressed the need for something that operates in the same realm. So for our performance tests, we chose k6.

Spoiler: k6 was a really great decision!
Installing k6 is very easy. On macOS it comes down to executing one command:
brew install k6
Yeah, really. If you don’t believe me, go to the official k6 website and check for yourself.
It’s time to implement the first performance test!
Use the public REST API https://gorest.co.in/ for this, and the test scenario will include four basic endpoints, covering CRUD operations (create, read, update, delete).
The test code looks like this:
The most important here are:
options object– stores the test configuration. In this case, you declared 10 virtual users (vus), and the test duration is 30 seconds,default function– contains the implementation of the test scenario that all virtual users will “go through”.
Additionally, when making requests to selected endpoints, you check the status of their responses. This happens as part of the check method. Of course, there are so many parameters that you can verify, but in this case, you will focus on the simplest possible implementation.
With the test script prepared in this way, there is nothing else but to run it from the command line:
k6 run testScript.js
…and wait for the first results.
How to analyze the performance testing results?
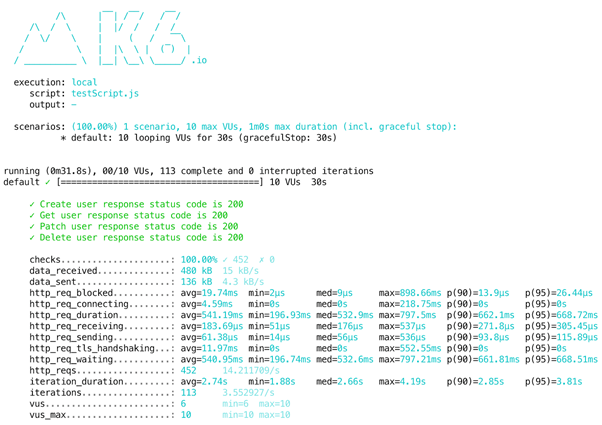
The summary of performed tests in k6 is very easy to read:

Apart from the information about the test duration, the number of virtual users and the summary of all “checks”, you see several different metrics that carry a lot of important hints.
I can say from my experience that the metric http_req_duration and its p (90) and p (95) values are interesting. They show the average duration of an HTTP request for 90% and 95% of all requests, respectively. Remember that the avg value, the average of all requests, may be susceptible to extreme values. So in my opinion, the 90th and 95th percentiles much better reflect the actual performance state of the tested application.
I’m not going to decipher every metric, so check out the official metrics here if you’re interested further.
What’s next for your performance testing?
The test was configured for 10 users only and takes a relatively short time. If you want to go one step further, we should get to know the expected production traffic in your application and update the parameters of the options object.
If you are unable to obtain this information, you are left to test application performance gradually. For example, start with a 100 vus and check response times. If you don’t notice anything disturbing, you can increase the number of active users by another 100 and retest. Do it until you the first problem emerges (usually in the form of timeouts). Thanks to this gradual approach, you will reveal the current performance of your application, and the team/the client will assess whether it is satisfactory for them or whether further optimization is required.
💡 How about not-so-obvious types of testing?
Sample configurations for different performance test types
It is also worth taking a closer look at conducting various types of performance tests. In k6 it is extremely simple, because you use the same performance test script for this, only modifying the configuration in the options object. Below I present official example configurations for different types of tests. These are practical enough and you can definitely execute scripts like these in your own project:
Smoke Testing:
Load Testing:
Stress Testing:
Soak Testing:
Remember, it is extremely important to carry out all performance tests in a dedicated environment that reflects the configuration of the production environment as much as possible. Otherwise, the results will be biased. Which in turn will make analysis problematic or even impossible.
How to do performance testing using K6 – summary
Phew, you’ve got to the end! I hope you’ve learnt something valuable today and performance tests became more accessible to you. Using tools like k6 makes performance testing extremely easy but provides so much valuable information about your application.
As one of the points of the k6 manifesto says – even the simplest tests are better than not having them at all.
Little effort for a lot of profits.
And with this in mind, I’m leaving you.
However, this is just the beginning of our publications on k6 performance testing. We’ve completed so many projects with this tool and we will be happy to share our experiences. So stay tuned!

