10 November 2020
How to deploy Node app to AWS using Beanstalk

AWS is the most popular cloud provider. As per our latest report, State of Frontend 2020, it has more users than Azure and Google Cloud Platform combined! Even though it is so popular, AWS is difficult to use for many users, especially when it comes to deployment. That’s why I decided to show you how to deploy Node.js app to AWS using Elastic Beanstalk.
Most of us know basic AWS services like S3 or EC2, but when it comes down to making our app public, the only idea we’ve got is to create EC2, SSH on it, and set up some poor man’s CD with Github Hooks. We’d rather use Heroku (because it is easier), than AWS (because we don’t know how easy it is to deploy something with it). This time we will go through 99% automated deployment of any dockerized app on AWS. However, in this article, we will use Node.js as an example.
What is Elastic Beanstalk (EB)?
Let’s assume we have a fully-functional dockerized app. We don’t have any environment set yet, but we would like to set up staging and production easily with the least possible complexity.
The thing is that most of the time, when we read Docker, we actually think about a lot of tools like Kubernetes, or Terraform which are difficult to understand. We might even think that we need a DevOps to actually deploy such an app. Yet all of those points are false. So how to deploy Node.js application on AWS server?
AWS offers us a few ways to deploy Docker containers:
- doing it manually using EC2 with Docker installed on it,
- using ECS (Elastic Container Service) to deploy containers,
- using EB to orchestrate the whole infrastructure for us.
The first one is the worst choice. We will need to handle everything by ourselves – from creating an instance, through infrastructure setup and configuration, to installing and maintaining software on EC2 (e.g.: installing Docker).
The second option is the most configurable, yet it is also the most complex one. It will require some additional experience, so you can set up everything appropriately. Nevertheless – it gives you the highest scalability.
The third one is the easiest, yet often forgotten. The way Elastic Beanstalk works is that you need to upload your code (or even connect it to your repository) and the rest is done by EB. It will set up basic infrastructure, deploy your code on it, and even connect monitoring for you. All of this at the click of a button.
AWS Elastic Beanstalk pricing
Elastic Beanstalk is free, however, we still need to pay for provisioned resources. This is important because the default configuration is not the cheapest one. If you want to set up a simple testing/development environment, then you need to configure it yourself.
By default Elastic Beanstalk comes with:
- 2 x EC2 instance,
- Auto Scaling Group,
- Application Load Balancer,
- and most of the time RDS.
And let’s be honest, this could be pretty pricey (since we’re using 2x EC2, then obviously the so-called AWS Free Tier is not going to cover it).

Of course, we can change it up a bit. We could reduce the size of a scaling group, remove Load Balancer, use spot instances to make it cheaper or we could even go with a single instance mode, but still it is fully configurable at any point either through CLI or AWS Console.

Application setup
Elastic Beanstalk doesn’t require a lot of configuration. If we have a working production Docker image, then we’re going to create a simple configuration file, but also we will need to change some variables of our Node js app (if we’re going to use RDS).
Let’s assume we have a docker-compose for our application.
Our idea is to use RDS for database, AWS EC2 for app. However, we don’t want to use ElastiCache for Redis (since it is quite pricey). Instead, we’ll host both app and Redis on the same machine – the so-called multi-container approach.
First, let’s prepare our app for RDS integration.
When Elastic Beanstalk provisions a database for us, it sets a few environment variables:
RDS_HOSTNAME– database URI,RDS_PORT– database port,RDS_DB_NAME– database name,RDS_USERNAME– database user,RDS_PASSWORD– database password.
Some of those we can change ourselves during configuration. However, some (RDS_HOSTNAME, RDS_DB_NAME) are not configurable. The easiest option is to use those variables in our app for the database connection.
The next (and last!) thing is to create a special file Dockerrun.aws.json that will be used to create our containers.
The syntax of that file depends on a Docker platform we choose for Beanstalk:
- Amazon Linux AMI-based Docker platform is used for deploying a single container on EC2 and uses V1 syntax (link to the configuration details),
- Multicontainer Docker platform (Amazon Linux AMI) is used for deploying multiple containers at the same EC2 and uses V2 syntax (link to the configuration details).
We’re going to use the Multicontainer approach. That’s why Dockerrun.aws.json is going to look like that:
We’ve defined two containers. One for Redis and the other one for API. Since API requires Redis to work, we’ve also defined a link between those two using the link property.
Our API is using a custom docker ENTRYPOINT that allows us to run only one command –API. However, feel free to change the command into `[sh, -c, ‘npm start’]` if your app is using npm start to run.
The last thing is portMappings. By default, EB routes traffic through port 80. Since our app is exposed on port 1337, we need to map it to 80 on our host machine.
And that’s all the configuration we need in our app. Let’s move to infrastructure provisioning.
Need a hand with that Node.js project?
👨🏼💻 Adam (the author) and his engineers would gladly channel their cross-industry development expertise into your team.
One of our biggest Node projects was a custom CMS for Reservix – Germany’s 2nd largest e-ticket platform.
First environment
At this stage we will need to have:
- AWS CLI and EB CLI installed and configured locally (link to the AWS CLI configuration details; link to the EB CLI configuration details),
- Amazon Web Services Secret Key and AWS Access Key for our user (this can be done on IAM – so-called programming access).
The first step is to launch an EB application. Let’s create a deployment directory in our app code and copy Dockerrun.aws.json there so we get such a structure.
If you want to go through interactive configuration, then go to that directory and run eb init. Remember to choose “Multi-container Docker running on 64bit Amazon Linux” as a platform.
Otherwise, you can use this command:
eb init --region eu-west-1 --platform "Multi-container Docker running on 64bit Amazon Linux" <YOUR-APP-NAME>
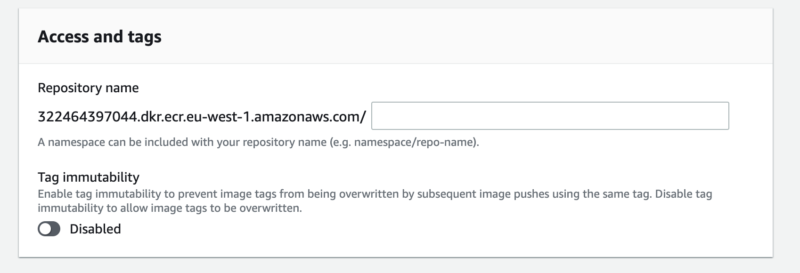
The next step is to create our Docker container registry. On AWS there is a service called ECR. Go there and create a new repository.

Remember to copy the repository URL – we’re going to need it soon. 😉
After that, we need to update the IAM Role used for Beanstalk deployment because by default it has no access to ECR. The Role we’re going to update is called aws-elasticbeanstalk-ec2-role.

And the policy we need to attach is AmazonEC2ContainerRegistryReadOnly.

Now we’re ready to push our production image into the repository and then create a new environment.
In order to do that, let’s build the image locally first. Assuming Dockerfile is available in a docker/prod directory, the command we’re going to run will look like this.
docker build -t $AWS_ECR_URL:$VERSION -f ./docker/prod/Dockerfile
Remember to tag the image with your ECR URL.
Then, we need to log into the registry. This is where AWS CLI is quite helpful.
aws ecr get-login-password --region $AWS_REGION | docker login --username AWS --password-stdin $AWS_ECR_URL
By doing this we’re ready to push the image.
docker push $AWS_ECR_URL:$VERSION
The only thing that is left is to update the API image property in Dockerrun.aws.json with a tag value of our pushed image ($AWS_ECR_URL:$VERSION).
We’re ready to create an environment. Once again we either use an interactive console or predefined CLI commands. First, let’s go back inside our deployment directory. Now, we need to create a new environment. Let’s call it staging. If you want to use an interactive console then the only thing you need to run is eb create staging. Remember that only a single instance configuration is covered by the free tier!
Otherwise you can just run:
eb create staging --database --database.engine postgres --database.password $RDS_DB_PASSWORD --database.username $RDS_DB_USERNAME --envvars REDIS_URL=redis://redis:6379/1,APP_NAME=$APP_NAME --instance_type t2.micro --single
This command will create a single T2 micro EC2 instance, and RDS for the Postgres database, and pass two additional environment variables to that instance – REDIS_URL and APP_NAME.
After a few minutes, you should get an URL of a new environment.

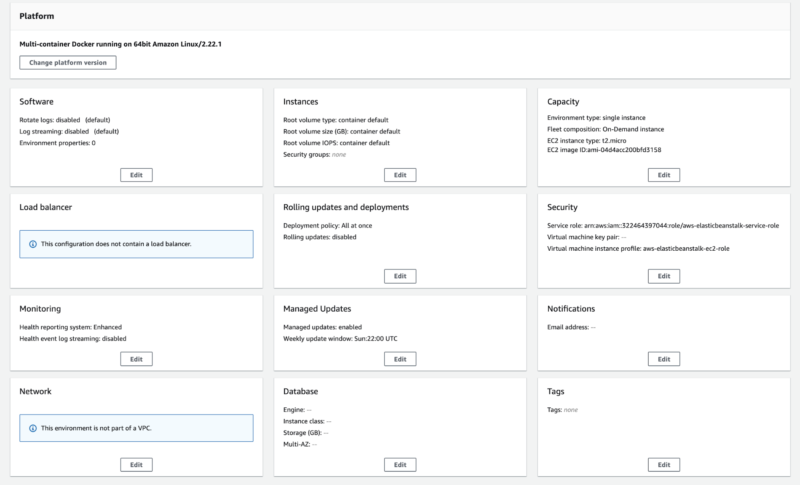
Also in the AWS Console, you should be able to see the health dashboard for the staging environment.

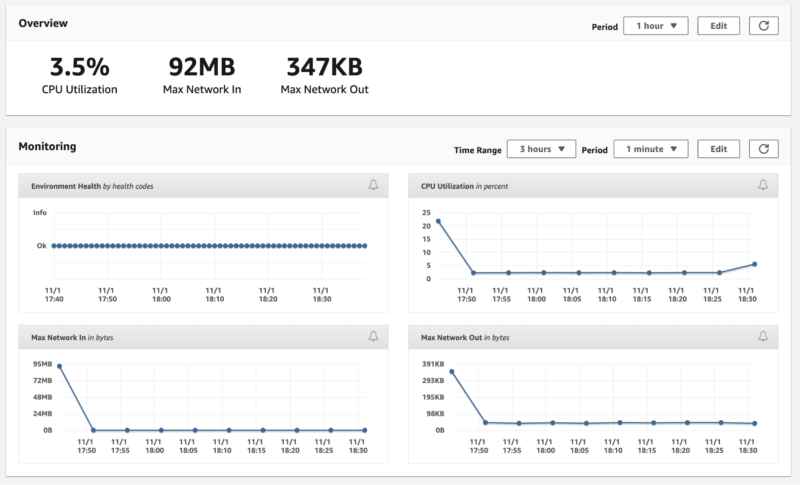
And some default metrics.

It is important to mention that you need to create an environment once. After that, you can deploy a new version on it using the eb deploy <environment-name> command.
What’s next?
There are a few improvements that could be helpful for you at a later stage. This approach works well with manual deployment, however, with CI/CD you’ll need to change the content of a Dockerrun.aws.json to deploy a specific image – for example, based on a git commit.
At The Software House, we use a placeholder in our JSON file and then replace it using the sed command.
sed -i s,API_IMAGE,$AWS_ECR_URL:$BITBUCKET_COMMIT, Dockerrun.aws.json
Another important point is debugging. EB allows you to get logs from your instances. However, sometimes you might want to ssh onto the instance. This can be done using the eb ssh command.
Just remember that Docker is not directly available for ec2 users. You need to type sudo su before. And have fun playing with Elastic Beanstalk! 😎

