05 June 2018
Poor man's zero downtime deployment


When you work on a project, sooner or later you’ll have to present your results to the client. It goes without saying that you’ll be updating files, services, or schemas in the database, which means only one thing – deployment time!
For many programmers, this process can be stressful. There are times when the service is down, the database falls apart, or a migration goes wrong. Clients don’t make our lives easier either. They would like the deploy to run problem-free and take as little time as possible. Ideally, it should run unnoticed by users. Unfortunately, the conditions may vary, and the deployment of subsequent versions can take quite a long time. It can also cause temporary downtime for the users.
In such cases, we can always ask the DevOps team for help. However, they are usually very busy and can’t guarantee to rebuild the whole deployment process on the spot.
However, we can introduce a few changes to the project to shorten the deploy time as well as the application downtime. Below are some concepts and solutions that every developer should be able to smoothly adopt for their project.
Back in time – deployment then and now
It’s almost certain that a vast majority of programmers remember the beginnings of their careers and their first deploys. When we worked on a small project ourselves, we created an application entirely on our machine. We attached or built libraries, downloaded various types of resources (images, fonts, styles), and sent the ready application to the server using an FTP client. So, most of the preparations were performed locally.

With the technology development and new standards creation, the way projects are deployed also changed. Now, in most cases, the developer logs in remotely on the production/test server, downloads the current version of the project from the repository and then launches the application-building process. The result is a complete application with the necessary dependencies. It’s clear that the whole process has been moved to a remote machine, which allows us to automate the process and promotes easier management.

Faster frontend deployment using building tools
Building a frontend application most often looks as follows:
- Clean a folder with the current application build
- Run the bundling task
- Remove unused code
- Translate the application so that it can work on various browsers
- Load environmental variables
- Compress and minify the code to obtain the smallest possible files
- Copy additional assets
- Done!
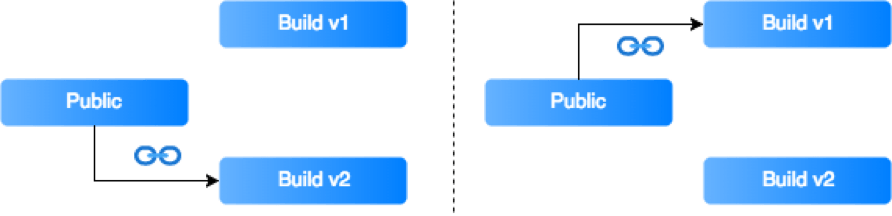
The time needed to build an entire application poses a significant problem. For a large project, you can count it in minutes. Since you clean the folder with the current build (you want to get rid of old and unnecessary files), users lose access to your application. In order to avoid this, you can build the application in a folder different than the one served to clients and move the files there at the very end.

This solution reduces the time when the application is unavailable to clients, but it has two significant problems:
- The files are duplicated.
- When you want to return to the previous version, you lose the data.
Instead of copying the files, you can create symbolic links and keep the next builds in separate folders with tags or timestamps.

Example task with linking
If necessary, a rollback to a previous build will only require linking files from another folder.
The last thing to remember is that the symbolic links must be relative, and the build folder should also be available on the server.
Path example
To avoid problems with the browser’s cache, it’s also advisable to have a random hash assigned to the files.
Backend deployment
HAProxy
For quite a long time, all applications in TSH have been based on the Docker containerization. It increases the flexibility of the project by allowing us to change various elements of our applications easily. However, in order to replace some elements in a way that is invisible to users, you need to extend your architecture with a load balancer. In our case, the balancer will redirect traffic between old and updated containers. HAProxy (High Availability Proxy) will suit our needs perfectly. Setup is as easy as just adding a few lines to our docker compose file.
docker-compose.yml
API update
To a large degree, backend actualization comes down to building a new container for the current API version and redirecting all traffic from one container to another. With HAProxy, the whole process becomes virtually seamless. Still, let’s systematize our knowledge in this area.
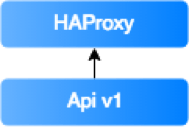
On the server, you have launched the API v1 version connected to LB (load balancer – here: HAProxy).
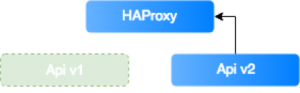
You build an API v2 container and add it to the already-launched containers. To do this, you have to use the docker-compose scale api=2 command, and the HAProxy itself will add it to the configuration and redirect traffic to it (by default, the traffic is distributed evenly over all containers in the configuration).

Now, the only thing left to do is to remove the v1 version and redirect all traffic to v2. Unfortunately, changing the API scaling to 1 will remove the container that was added last – i.e., your current API version. You must, therefore, remember to stop and remove the old container before you change the scale. This problem can be solved with a simple bash script.
deploy.sh
After the script has been executed, only the api v2 container will stay active, with all traffic directed to it.
Database
The last element to be discussed here is the database. Depending on what you want to change, it may be one of the simplest or most challenging element of the system. To ensure that this procedure will run without any problems some simple concepts are presented below. Also, it is worth mentioning that you should modify the API gradually, alternating with the database.
Adding a new column
- Create a migration to add a new column.
- Deploy the code with the migration.
- Upload new the API version that is using the new column.
Removing a column
- Modify the code not to use the selected column.
- Prepare a migration for obsolete column adding a meaningful suffix, such as _deprecated:
- If the new functionality works and you’re sure you will no longer need the data, you can delete the column.
- If you come across a problem, you can rollback database easily by removing the suffix.
Changing a column name
- Prepare a migration that creates a column with a new name.
- Add an event that ensures the updated data is copied to the newly-created column.
- Migrate the data from the old column to the new one (it’s best to divide records into parts).
- Modify the code to use only the new column.
- Remove the old column (see the example above).
Changing a column type
- Create a migration that contains a new column of a different type. Add a suffix with the column type to the name so that it’s easier to distinguish between them name_column_type.
- Add an event that ensures the updated data is copied to the newly-created column.
- Migrate the data from the old column to the new one.
- In the model, enter the name of the new column type. (Compatibility is important here so let’s make our model “smart”. If you don’t find the column name_column_type, use the original column name. In the Doctrine the columns can be obtained using Schema-Manager).
- Create a migration that adds the _deprecated suffix to the original column and removes the type suffix from the new one.
- Remove column name guessing logic from the model.
- Remove the old column (see the example above).
Looking at the examples above, you can see that well-thought-out migrations allow us to update/modify the database in a way virtually invisible to users.
You can shorten your deploy time
In conclusion, a relatively small amount of work can significantly shorten your deploy time. Of course, the process requires some preparation, caution, and discipline in its implementation. But, in the end, it equals less stress and more satisfied clients.
Worth reading:
Use all the resources to put together a strategy that will work for your project and get your hands dirty!
See also: how to automate deployment and SSL certification of your Kubernetes microservices

